
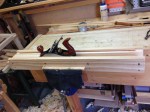
OK, magic may be a little bit over the top, but this thing works great. The plan for the Hillbilly Tansu designs call for the frame stock to be 36mm square. The more consistent the pieces are to size, the easier the joinery will go. Doing this by hand is doable, but fussy. There is also the chance of ending up under size while trying to get all the pieces to the same thickness. So I had been struggling to come up with a consistent, and repeatable way to plane all my pieces to the same thickness. Then, out of the blue, Paul Sellers posted a video on Woodworking Masterclasses that showed the construction of a jig to plane pieces to a consistent thickness.
I adapted the design to work with my intended thickness of 36mm. After a little trial and error, I had the sizes of the components worked out. I paid special attention to getting the base board flat and square. Then I switched my attention to getting the plane runners to a height that would produce my intended piece thickness. The fussy part here is to account for the drop that will result in the blade removing wood from the runners until the edges of the plane body bottoms out on the runners. Once you reach this point the blade won’t remove anymore material from the runners. Unless of course you increase the depth of cut. So I did quite a bit of practice runs until I had the result I was after. Then it was just a matter of securing all the remaining loose bits and pieces.
One thing to note is that this jig will thickness a piece, but will not square the sides to each other. Since my pieces will be square in shape, its important that I have all four sides of the oversized piece square to each other. Once I have that, it’s just a matter of dropping the piece into the jig, watch the grain orientation, and plane away. Flip the piece before you bottom out and finish planing to thickness. Then do the same with the other two sides. Just like magic, I have a square piece that measures 36mm on each side, every time.

-
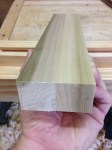
- Exactly the same thickness
Greg Merritt

This jig first appeared in Fine Woodworking in the Methods of Work long before Paul Sellers showed it. Paul might have come up with the same idea (not unusual for two different persons coming up with the same idea) or he built the jig based on what he had read.
Thanks for the additional source. I referenced Paul Sellers because his video is where I obtained my information.
You have to like Sellers, he certainly knows all the tricks.
He’s putting the info out there. Most of it is not new, just new to me and in a format that is readily accessible.
Greg
New to me is all I ask for.
Hey Greg glad to hear that worked out, that jig would have come in handy when I did the coffee table legs. Still without shop and tools in storage, glad to read about your continued successes.
Brian
Success? Maybe. Perseverance? Yes. I hope you can get settled in soon and get a shop up and running.
Greg
Hey I count all new things learned as a success each day… That is how I can consider myself so successesful lol
Pingback: HB Tansu Progress-1 | GREG MERRITT – BY MY OWN HANDS
Pingback: Chinese Gate Bench-Progress 3 | GREG MERRITT – BY MY OWN HANDS
Pingback: HB Tansu #3-Progress 1 | GREG MERRITT – BY MY OWN HANDS
Do you first plane the the plane runners to the correct thickness by planning and measuring until you have the thickness correct than plane the stock?