
 My Hillbilly Tansu project requires the chopping of several narrow and deep mortises. 6mm(W)x18mm(L)x24mm(D) to be exact. Clearing the waste from these mortises is difficult to say the least. There is almost no room to lever out any of the waste so I’m forced to use a narrower chisel to dig out all the chips. This works but is tedious and, even when being very careful, makes the chances of bruising the mortise edges high. On several of the practice mortises I did just that. So I had to find a better way. I could shoulder the mortise, but that makes the mortise even narrower and leaves too small of a tenon. After searching around the internet, I found that the western solution is a swan neck chisel. This seems like a good solution but this chisel is still too large to clear my narrow and short mortise. So I kept looking. Then I remembered reading something in Toshio Odate’s book, “Japanese Woodworking Tools: Their Tradition, Spirit and Use“, about a chisel designed for this sort of problem that the Japanese use in building shoji screens. According to Odate:
“The remaining wood on the bottom is scored with the mortise chisel, and the last of the wood fibers are removed from the bottom of the mortise with the sokozarai-nomi, a thin, goose-necked tool with a small spadelike bend at its end.”
So another search of the internet turned up a few sources for this chisel. Here and here for example. The least expensive was $54. I’m sure that these are finely crafted and worth the money, but that is just too much money for me to spend on a tool that I’m not sure will solve my problem. But hey, it looks pretty simple, I should be able to make one for myself.
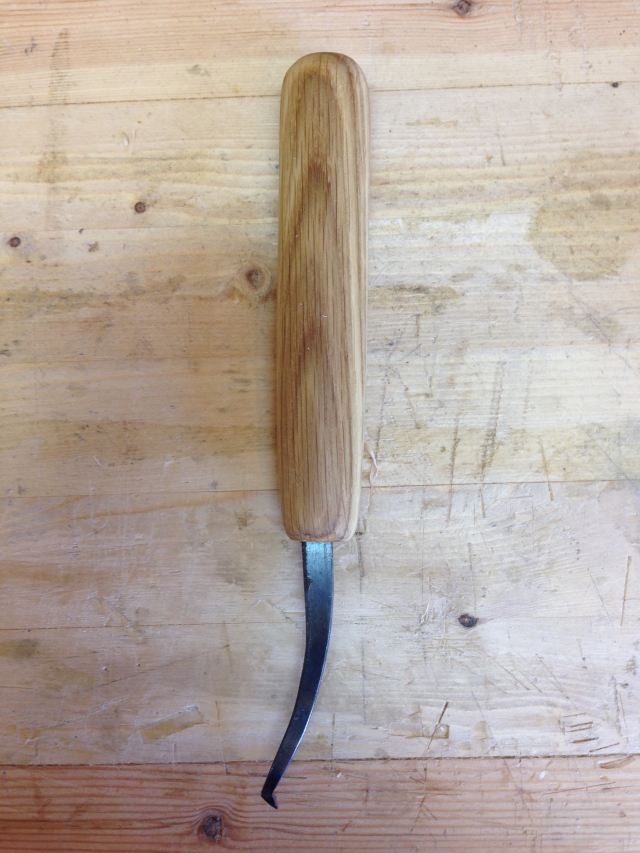
 I had a small piece of 1/8″ thick O1 tool steel left from when I made my rebate plane that should be just the right size. So using the drawing in Odate’s book and photo’s from the internet, I shaped my piece of tool steel to a close approximation. Then I created a cut-away mortise of my intended size and tweaked to shape so that I could reach the entire mortise bottom with no danger of bruising the ends of the mortise.
  Then I shaped the opposing end into sort of a spike shape for inserting into a handle. Once I was satisfied with the shape and eased the sharp edges, I used a portable torch to heat the business end to red-hot, quenched just the tip in some used oil, cleaned the tip with a file and waited for the remaining heat to travel back into the tip. I watched as the colors changed. When I saw a straw color on the tip, I then quenched the entire blade. Not the most scientific way of tempering but seams to work pretty well. This chisel is not meant to have a cutting edge, it just needs to be durable.
This chisel is never to be hit with a mallet so the handle is a simple affair and adds leverage and comfort. I used a piece of white oak, drilled and shaped the hole to be slightly smaller than the steel and then drove the handle onto the steel. A little final shaping and a coat of oil and the chisel was complete.


After a little dressing of the tip using diamond stones it was time for a test drive. I began chopping the mortise as per usual. When I reached a depth that would no longer allow me to comfortably clear the chips, in came my newly minted secret weapon. I worked like a dream. From there it was just a matter alternating chopping and clearing. Much, much faster and no bruises on the mortise edges. Win, win.
Greg Merritt

Really cool job.
Making a tool that works as it should is a great thing.
Brgds
Jonas
Thanks Jonas…sometimes I get lucky. 🙂
Greg
Very nice. Got to make me one of these. Thanks
Glad you like it and find it useful. It’s quite simple to build and works really well.
Greg
Greg you are a man of many talents, what type of torch did you use for heat treating your blade, I tried using a plumber type gas torch to heat treat the plane iron for the plane Paul made, I had the blade sat on and surround by furnace bricks but I could not get the iron close to cherry red.
I think the torch was only good for soldering
I used a small propane torch. It only worked because this piece of steel is so small and I only needed to get the first inch or so cherry red. There is definitely not enough heat generated to harden a plane blade. I only wanted the business end of this chisel to be hardened with the remainder a little softer so it could flex but not bend. To heat treat my plane blades I use charcoal and a hair dryer to build up the required temperature.
Greg
Nice homemade solution Greg, thanks for the post!
Brian
Pingback: Build Yourself a Sokozarai-Nomi (Bottom Cleaning) Chisel | GREG MERRITT – BY MY OWN HANDS – A Road Less Traveled
If you look at other sokozarai chisels… Those are bended the other way round. Probably easier to shave the chips.
Greets, Simon
knifemakers have a similar problem and solution. I believe it’s called a broody?!