
My nephew was in from college a couple of weeks ago and told me that he had a project for us to work on over the long Thanksgiving break.
me..”Sure, no problem. What do you want to make?”
him…”A new deck for my longboard.”
Since I’m the uncle who can do “anything”…”Sure, no problem.”
…and that is where we left it, until now.
Since I am old and out of touch…
Step 1-what the hell is a longboard?
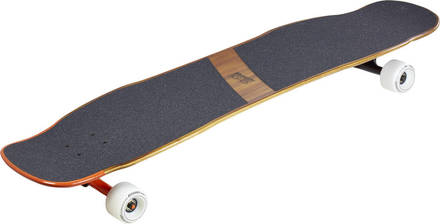
A search of Google and YouTube gave me a pretty good idea of what a longboard is. Essentially a long, wide skateboard. What I also found was that there are many variations in deck design. Several of the decks were formed laminations and several were simply flat boards. Most were made from plywood. So I figured he must want to make one of the flat versions. All I should need is a piece of 1/2″ birch plywood and some shaping tools.
Step 2-pick up the plywood.
 My nephew is now in for the long break and anxious to start the project. So I pick him up and we head over to the local Woodcraft to buy some plywood. While we are standing in front of the racks of ply he begins to explain what he has in mind. Then shows me a video to help me understand. He wants to make a full-on formed lamination!
We purchased enough 1/8″ birch ply to make a four layer lamination. He tells me he has a few things to do and will come over to my house in a few hours to get started. So I rush home and binge watch as many YouTube videos on the subject as I can find. After a few videos I manged to convince myself that we could do it.

Step 3-build a form.
This lamination needs to turn up at both ends and needs to have a concave running down the length of the center. Turns out the form is actually pretty simple. A stout base board with a few sticks tacked to it. The height of the stick dictates the depth. Essentially we guessed at this assuming a certain amount of spring back (also a guess). Clamping the lamination in the form is simple too. Just a stout board pressed along the centerline of the lamination draws the pieces of ply down over the delineating sticks of the form.

Step 4-the lamination.
We purchased two pieces of 1/8″ ply that were 30″x48″. Ripped those in half along their length to generate four 15″x48″ pieces. After a frenzied round of glue spreading (lots of glue), the pieces were stacked onto the form and ready for pressing. We had done a dry run prior to spreading the glue and the clamps were already set, so applying the clamps to the glued up lamination went pretty smoothly. In the end we ended up using almost every single clamp I own plus a few pieces of wide tape just for good measure.


Now we wait…
Greg Merritt

Hi Greg.
That looks terrific.
I remember my younger brother making a skateboard pretty much the same way back in the late 80’ies.
Large glue ups can be so stressful. I hope yours will work out just fine, and based on the number of clamps involved it should be super.
Brgds
Jonas
Hey thanks Jonas.
It was a mad dash to slather on glue and get the clamps in place, but the task was much easier with two people. Which is a new experience for me. Im usually all on my own.
Fingers crossed!!!! :O
Thanks Antonio. My (can do “anything”) status is in serious jeopardy!
http://www.roarockit.com if you’re interested in a more full fledged “real” final product — only recommended if you plan on making multiple though since you need to buy the vacuum bag. I’ve made a few by hand w/ maple veneer and have also tried other woods. Good fun and the results are “retail” level if you take your time.
Thanks for the info.
What??? No vacuum table with a million PSI of suction? 🙂
Looks like fun … for anyone who still has their sense of balance.
Happy Thanksgiving!
Happy Thankgiving to you and yours too Bob!
LOL…I’m way out of my element here. I am amazed at all of the contraptions that are available to do this sort of thing. But I think the make-shift form and clamps will have to do for this project. 😉
I also would have have had to look it up. The first and last time I tried a skateboard involved a lot of blood and gross-looking regrowth of skin. In 1965 I was young and very confident.
LOL…I’ll help him make the thing, but there is no way in hell that I will be climbing onto it! I don’t bounce very well anymore and take forever to heal.
Very cool, when I taught junior high school in the 80’s finger boards were popular. The kids would make a two piece form, soak two layers of ply at lunch then come in after school to glue and clamp them overnight. Lucky for me they didn’t want to do the actual sized board!!
I vaguely remember the finger board craze. Too bad that isnt still the “thing”.
Greg,
Are you using a japanese planing board / bench as your form base?
It is a failed attempt at one from many moons ago. The board that I used is comically unstable. You can almost watch it move. I gave up trying to keep it flat a long time ago, but never had the heart to throw it out. I knew it would come in handy for something.
A well written humorous post, just how are you going to add those bends. Here’s something you probably didn’t know, Egyptologists found the world’s oldest piece of plywood in a third dynasty coffin. It was made of six layers of wood four millimetres thick held together by wooden pegs. I wonder if there is a long board hidden there somewhere.
I’m looking forward to the build.
Thanks Salko! That is an interesting bit of history right there.
The build is progressing, but I find it hard to keep my hands off and just teach. He is doing great though.
Man, I am old. I was thinking surf board, Looks good
Pingback: Longboard?-Part 2-Complete | HILLBILLY DAIKU