
 I bolted awake in the wee hours of the morning with an idea. OK, let me back up a little. When I start a project I usually have the finish worked out before the lumber is even purchased. I know what products I’m going to use, the colors and the materials. In my mind’s eye I know pretty much exactly what the completed project will look like. With the Hibilly Tansu, not so much. I dove into this project with no clue as to what finish I was going to apply. This little oversight has been constantly on my mind since the beginning. Apparently my subconscious was working on it last night and woke me up to let me know the solution. Tinted wax.

There are some streaks but those will disappear with successive coats.
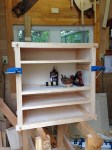
On the end tables that I recently completed, I used dark brown Briwax to even out the overall tone between the dark oak top and the barn red milk painted base. Most of my projects contain the same color values, red and dark brown. I wanted to continue this in the tansu. So, after my morning coffee, I made a run to Woodcraft and bought a can of Antique Mahogany Briwax. The idea being that the antique mahogany would give me some red undertones that I could then go over with the dark brown Briwax. Once back home I jumped in with both feet and coated the bottom panel with the antique mahogany wax. Note I said bottom panel. I’m crazy, not stupid. If it went south, no one would ever know unless they turned the tansu over. Briwax flashes incredibly quick so the process moves along at a pretty good clip. I followed the mahogany wax by burnishing it with the polissoir. After a quick buffing, I applied a coat of dark brown wax and buffed it. I liked what I saw and did the same to all of the exterior panels before I changed my mind. I’ll even out the finish when it comes time to apply the finish to the rest of the tansu. With the panels pre-finished, there was nothing left to do but complete the final glue-up of the carcass.
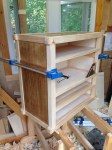
There are a lot of parts and each one of them is essentially joined with a mortise and tenon joint. I began with by applying hide glue to the mortises in the rear frame assembly. I then applied glue to the corresponding tenons of the side rails and installed them. These were followed by the handle rails and exterior panels. From there I installed all of the side bearers and then the dust panels. Here is where it got tricky. I now had to apply glue to twelve mortise and tenon joints and then get those twelve joints together as well as guide the nine panels into place. This is one of the reasons for the extra length on the side rail tenons. The extra length allowed me to place the front frame assembly onto the tenons and start those seating before any of the other elements. With the front frame assembly started onto the side rails, I then added a clamp to each corner. From there it was just a matter of slowly tightening the clamps and guiding each piece into its new home. Once everything was started into its new home, it was just a matter of systematically tightening the clamps until everything was seated then adding the wedges to lock it down. I’m guessing the whole ordeal tool between 20 to 30 minutes and the liquid hide glue worked as advertised. It gave me the extended time I needed to complete the assembly without any joint freeze or issue of any kind. Once the glue has cured I’ll trim the wedged tenons and plane/sand the carcass as needed. Then I’ll apply the same finish treatment to the remaining parts.
-

- Dead square. No tweaking with clamps needed.
-
- Another peak at the future finish.
-
- If all else fails, this will make a great tool chest.
So the first Hillbilly Tansu carcass is glued, assembled, wedged and in the clamps. Better still, this Hillbilly Daiku (carpenter) is none the worse for wear. There is just a hint of a nervous tick in my left leg and that should subside by morning. Now I’ll need to turn my attention to building drawers and sliding doors.
Greg Merritt

Lookin good sir, who needs sleep anyways????? Hopefully that tick is gone and you can rest well in the knowledge that your planning and execution will put you in good standing for a celebratory Guinness was it? Heck let me buy the first one…. Lol
Thanks Brian. You’ll have to buy Guiness no2. The first one was employed to medicate the tick in my leg. 🙂
Greg
Greg,
It’s looking great. The one thing that I’m not quite getting is how you intend to apply your finish to the rest of the Tansu without messing up your wax finish on the panels. Did you apply the wax directly to the bare wood? Wouldn’t any solvent in the finish for the rest of the cabinet interfere with the wax. I suppose you could mask everything carefully, but that seems like a lot of work and peeling of the masking tape might lift the wax.
Either way, its looking great so far and I look forward to seeing the project progress.
All the best,
Jonathan
Thanks Jonathan.
Briwax from the container turns liquid at 88degF. So its a lot like working with a gel stain. I applied it directly to bare wood and used the polissoir to apply heat and pressure to work the first coat deep into the wood. Each additional coat will dissolve the wax from the previous coat, so layering is no problem. The remaining exterior will be finished just as I did the panels and will not cause me any issues. The only masking I’ll need to do is where the front bearers transition into the dust panels. I have plans to add a finish to the interior, so that will be the dividing line. I should have the entire carcass finished tomorrow and will do up a post. We’ll see if I’m right soon enough. 😉
Greg
Pingback: HB Tansu Progress-6 | GREG MERRITT – BY MY OWN HANDS