
 What started out as a simple idea to make a few cigar box guitars, ballooned into a full-blown research and development project. Starting out I had no idea how deep down the rabbit hole I would be taken, but it has been a challenging and rewarding trip.
If you perform even a cursory search of the internet for “cigar box guitar”, it will become quickly apparent that designs vary widely. So my first challenge was to find a design. Easier said than done. There is plenty of information to be had on these “simple” instruments and, like with most subjects, a good chunk of it is in direct conflict. Thus began many hours of searching, reading and sifting. Not just cigar box guitars, but acoustic instruments in general.
The goal from the start was to use a design that was easy to execute with a minimal tool set, was quick to build and had an acceptable musical sound. The hope was that those receiving one of my cigar box guitars would enjoy it, but also be inspired to explore and build their own versions. A complicated build, while possibly impressive, would be off-putting to many and do little to encourage them to build their own versions.
One more wrinkle is that I am not a musician. I can bang out a few cords on the guitar, but that is about it. I just don’t have an ear for music and have never studied music theory enough to grasp a true understanding of it. This is what drew me to the cigar box guitar in the first place. Its simplicity.
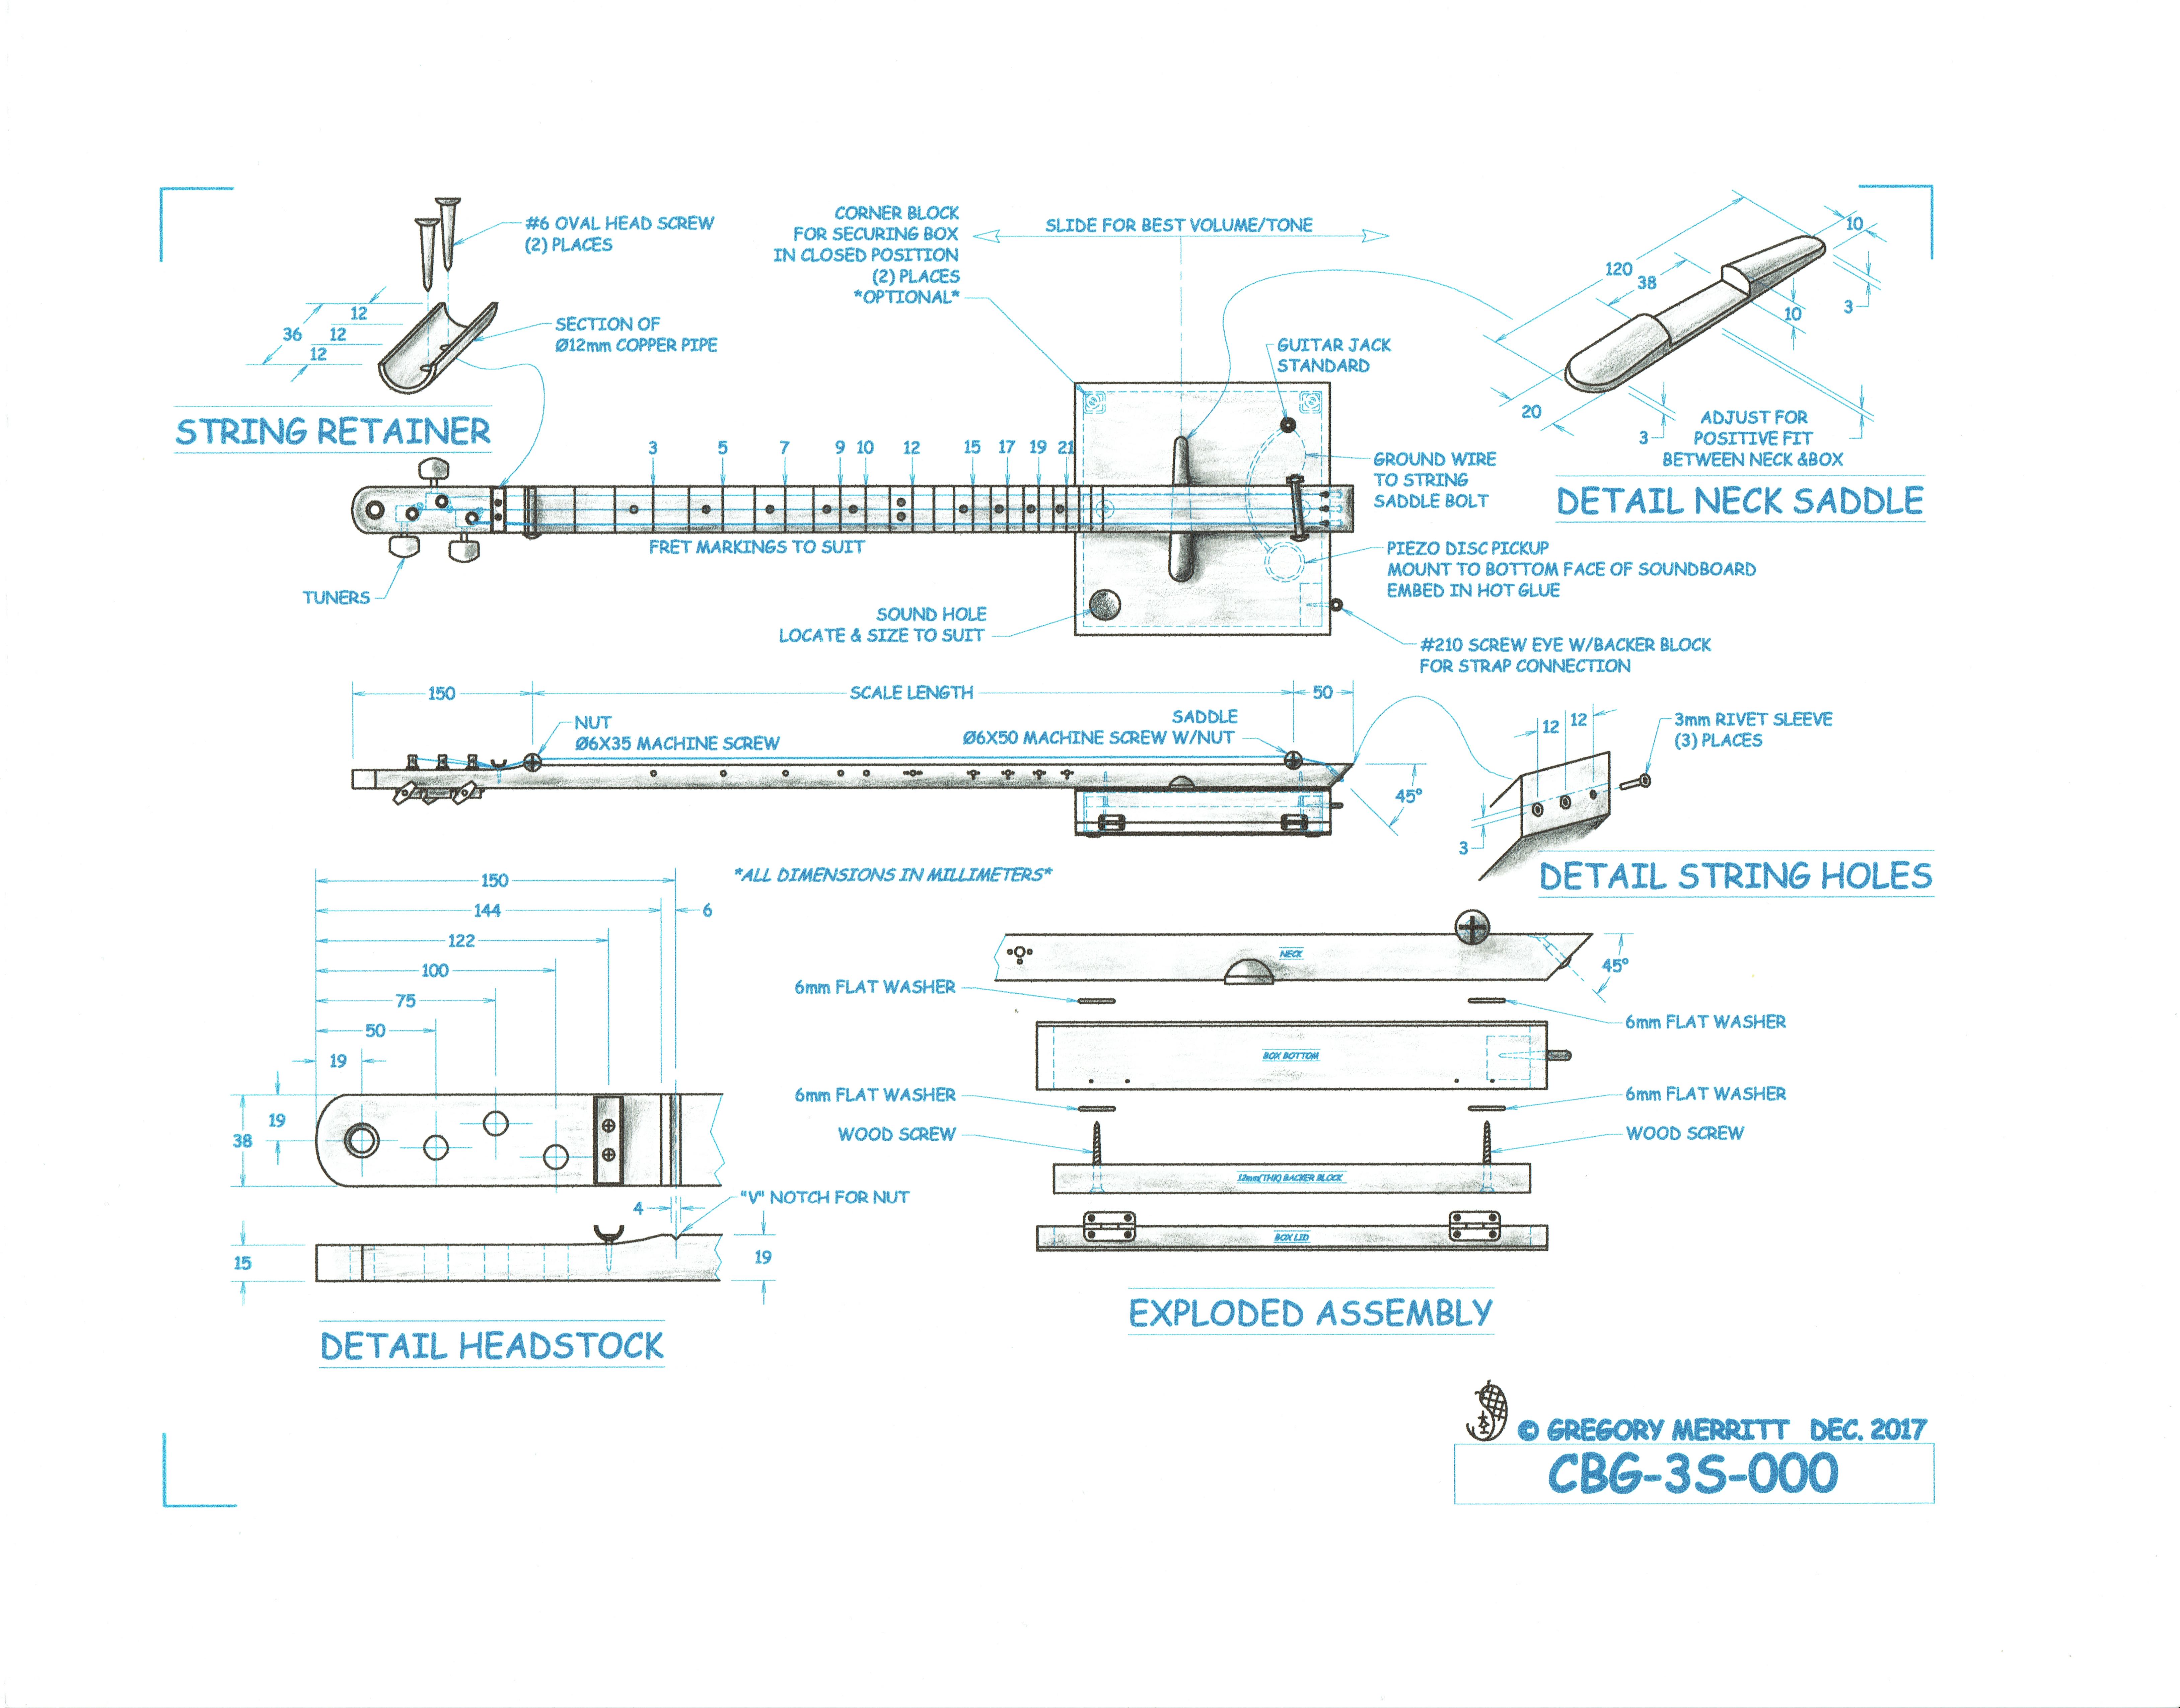
After pouring over several design options, I stumbled upon a simple design that has become known as the “Uncle Crow Style“. A simple, no frills, stick on top design complete with eye bolts for tuners. So simple that Uncle Crow builds his versions in an hour. What caught my attention, beyond the simplicity, was that the videos of this style had a much better tone. At least to my already admittedly musically lacking ear. So I began to explore and develop my own version of stick on top cigar box guitar.
The tuners were the first change that I made. I quickly realized that actual guitar tuners would cost only slightly more that the eye bolt version. Plus there was the added usability of purpose built guitar tuners.
The box is where I started having issues. After checking with the local tobacco shops and coming home empty handed and finding few reasonable options on the internet for actual cigar boxes, I began exploring other possibilities. Of course I could just make any size box that I wanted, but the cost began to rise up and building a box would do little to encourage others in building their own guitars who did not also have the ability or tools to build their own box. Craft stores, Wally World and Amazon all carry wooden craft boxes that are about the same size as a standard cigar box. Upon further investigation, they all carry the same box, from the same supplier. The box is basically 8.25″ square and 1.75″ deep and is offered in two versions, finished and unfinished. I have tried both. Both work, but the finished (lacquered) version seems to of a little higher quality material.
The neck is just a simple stick of 1″x2″. Oak works well, as does poplar, but just about any wood will work. Although, hardwood will be much longer lasting and resist any bowing from prolonged string tension.
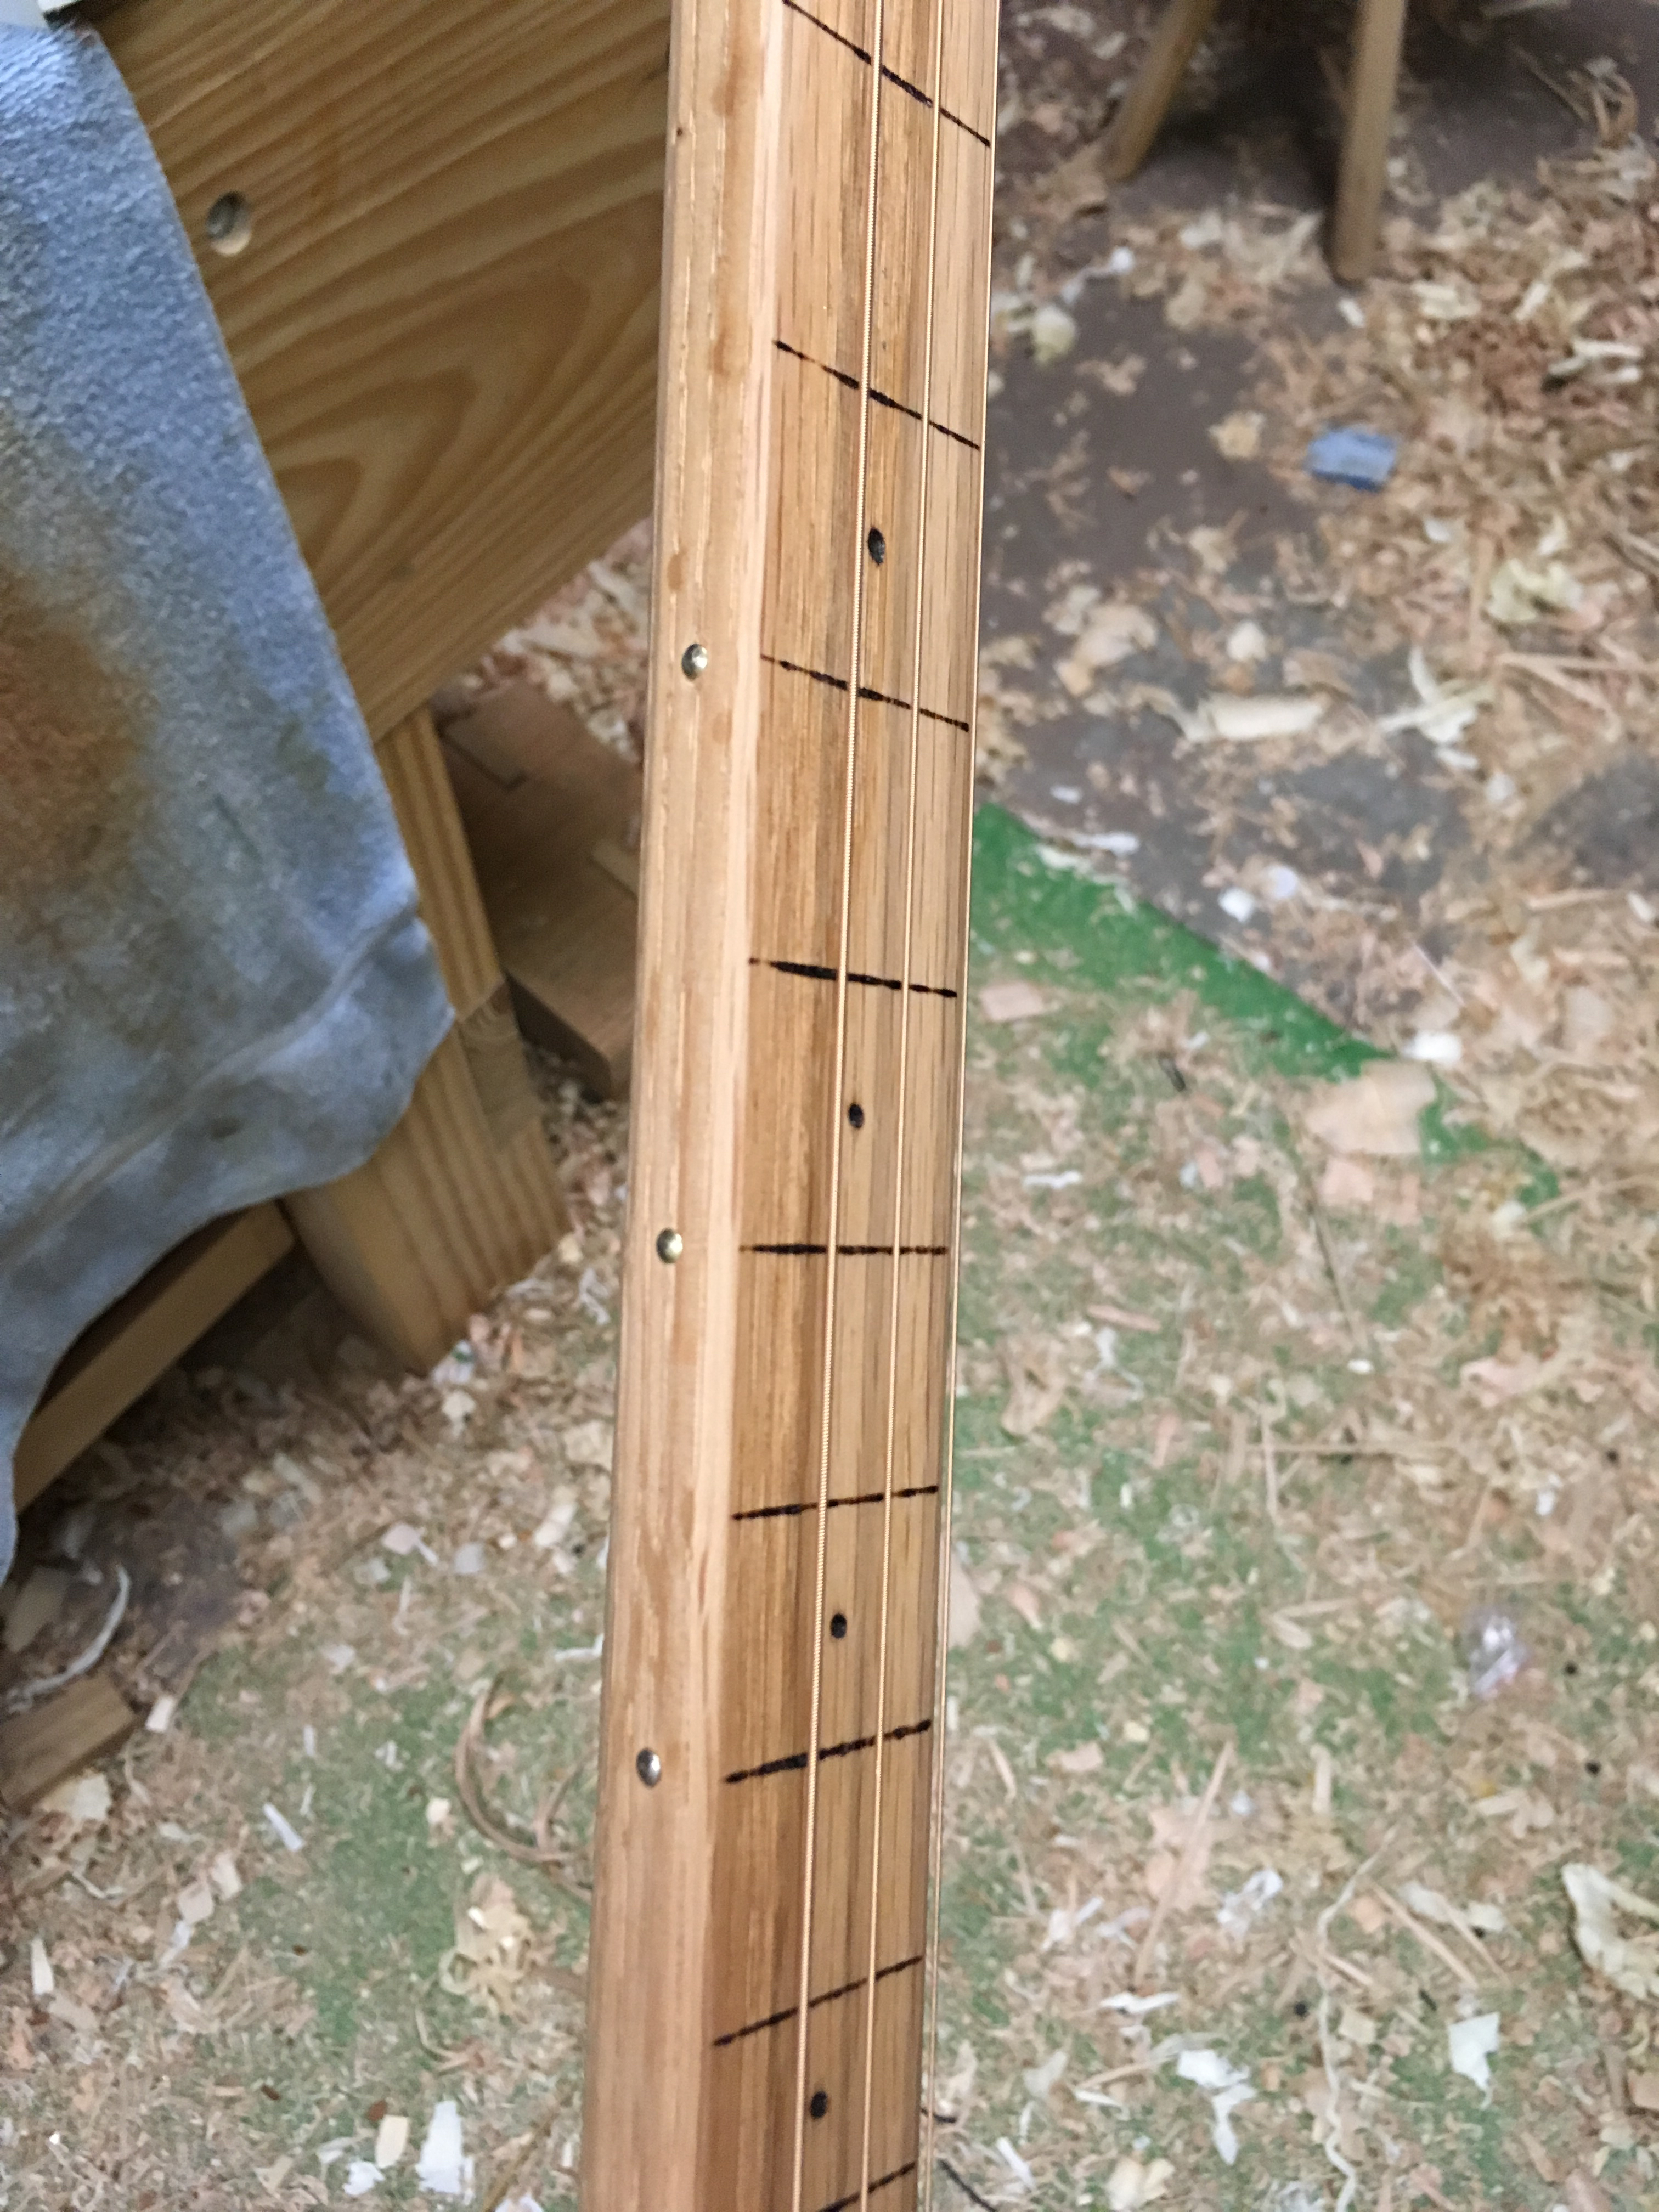
The only critical bit to making a cigar box guitar that sounds good is the scale markings. If the scale length and markings are off it will make playing extremely difficult. The good news is that getting the scale and associated fret markings accurately laid out is pretty simple. Choose a scale length, something between 23″-26″ (standard guitar scale lengths) and plug that into an online fret calculator. Then follow the layout that is generated from the calculator.
While marking the fret locations is not absolutely necessary, it does make playing much easier. I have used a couple of methods to mark them, burning and kolrosing. Both methods work equally well.
I also like to add the dot locators as you see on a standard guitar. On the “fretboard” I like to burn them in. Along the side of the neck I use gold-colored upholstery tacks and place them so they are in line with the actual fret location.
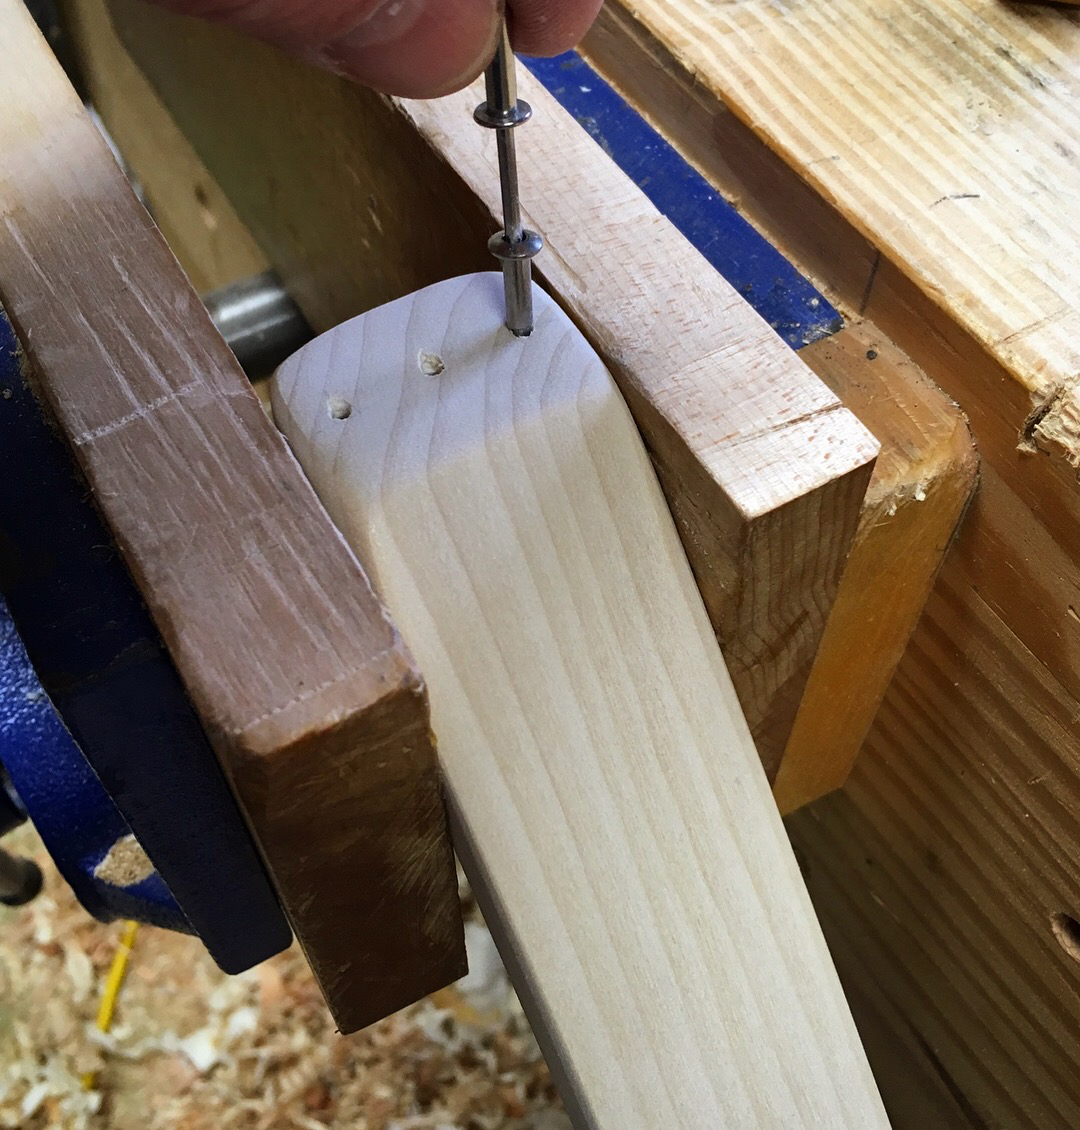
Once all of the elements for the scale and fingerboard are established, I turn my attention to the headstock. The headstock needs to be thinned down to about 5/8″ thick for mounting the tuning machines. I make quick work of this at the shaving horse with a drawknife. A little cleanup with a spokeshave and card scraper is all that is needed to complete the task.
The tuners are simple to install. Three holes are drilled through the headstock. These tuners are mounted with a threaded bushing from above and a single screw below.
In order for the strings to ring true they need to have a sufficiently steep break angle coming off of the nut. Most guitars achieve this by angling the headstock back. I achieved the needed break angle by adding a string retainer guide. It is just a simple half-section of copper pipe secured with a couple of screws.

At the other (saddle) end of the neck the needs to be a way to secure the strings. I cut the end of the neck at 45deg and drilled three holes through which the strings will be threaded. To strengthen the bearing surface and prevent the strings from digging into the wood I added stainless steel rivet sleeves. Simply knock out the rivet pin and drive the sleeve into a friction fit hole.


Now it is time for the box. As I stated, my chosen design mounts the neck on top of (actually the bottom) the box instead of through the box. Yes, you lose some volume, but you gain, IMHO, much better tone. This arrangement resonates the vibrations of the strings as they are filtered through the neck. Resulting in an instrument with a tone that sounds bigger than it actually is. A fair amount of cigar box guitar examples sound a bit too much like a banjo for my taste.
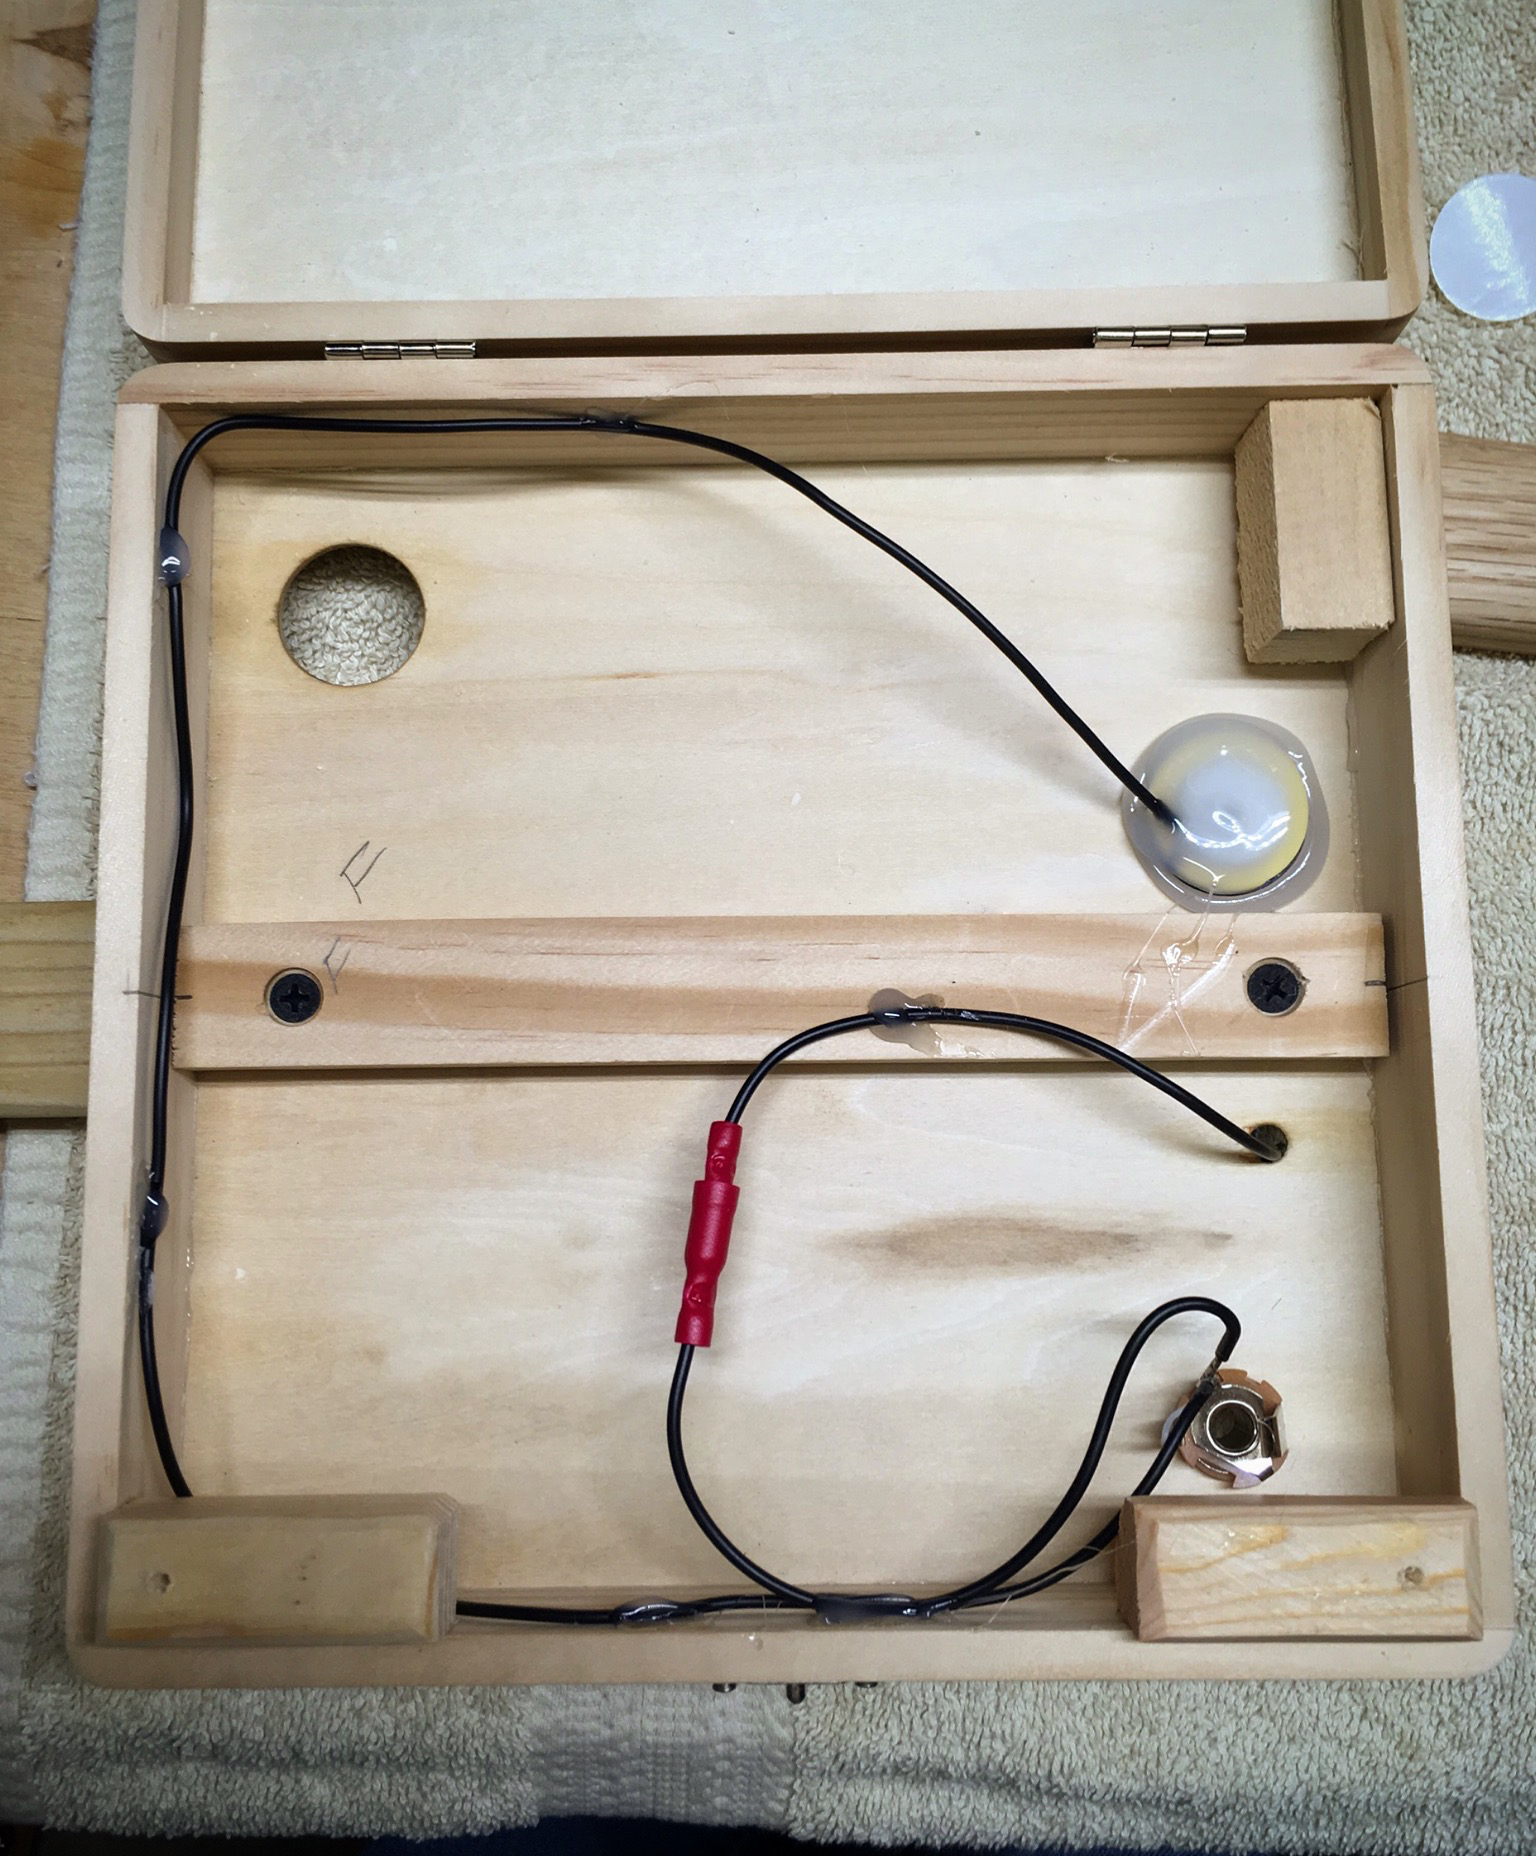
Through a lot of experimentation I arrive at what I think provides the best volume and tonal balance. My first step was to place washers between the neck and soundboard and between the soundboard and the backer block located inside the box. This allowed the soundboard to vibrate a little more freely.
After a good bit more experimentation I found that a shaped “neck saddle” placed between the neck and the soundboard increased the volume and tonal response. I also found that I could change the tone of the guitar by sliding the neck saddle either towards the nut or towards the bolt saddle on the neck. After several builds I can say that the sweet spot is different for every box, but you know it when you hear it.

I also added an electric pickup. These are inexpensive piezo disks and I bought them prewired to a standard 1/4″ guitar jack. Piezos work by converting any and all vibrations to an electrical signal and have a reputation of being harsh sounding and prone to feedback. Both are true, but can be mitigated. The neck on top arrangement helps to mitigate some of it. I further reduced the issues by mounting the piezo in a bed of hot glue. This acts as an insulator and dampens some of the vibrations that the piezo picks up and amplifies. Particularly the unwanted vibrations from handling the guitar.
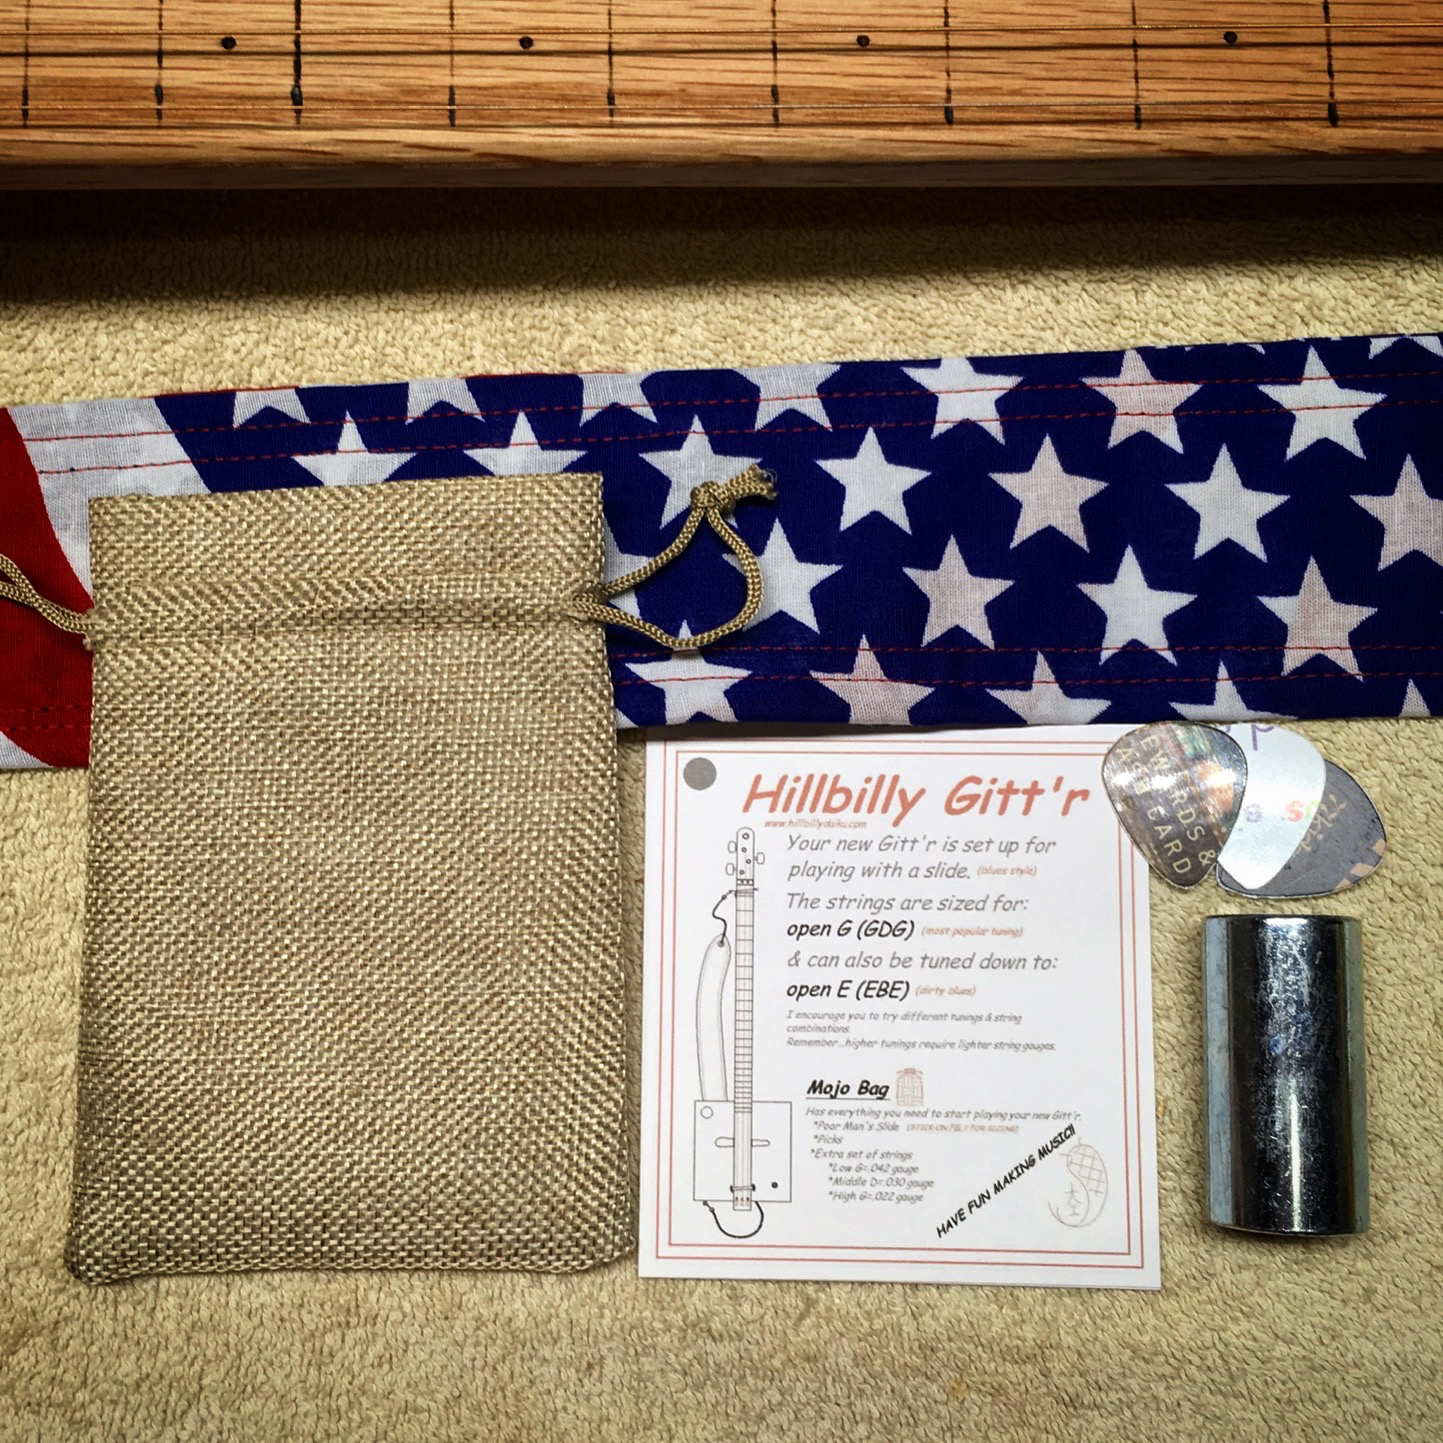
A cigar box guitar will never sound like a finely built instrument, but I am quite happy with what I achieved with such a simple arrangement. It is a lot of fun to play! All told, I ended up building fourteen of them for Christmas. Most were given as gifts and I even sold some. Everyone seemed to be thrilled with their new instrument. Each guitar that I gifted or sold was delivered with an information card, a strap fashioned from a bandanna, a slide and picks punched from old gift cards.

Part 1 Greg Merritt

Pingback: Homemade Music-Part 1 | HILLBILLY DAIKU
That’s awesome Greg! Oh do tell your secret in such fine drawings. They look hand drawn and I thought maybe you’re using the toons plugin in a 3d program. So I examined the arrow and saw minor inconsistancies and thought, ok maybe after all it is hand drawn, but the dimension lines are just perfect so; What is your secret? Are they drawn by hand or cad?
My guess:
0.9944 probability hand drawn
1.0000 probability NOT hand lettered
The most expensive text book I ever owned was for first year Engineering Graphics (all hand drawn) at Purdue University in 1967. $65 (usd) was a lot of money for a book at that time. That semester has served me well.
I just love his art work. It’s so precise that it tingles my ocd. Precise and beautiful
See my reply to Salko. Most of the line work and all of the lettering are CAD. Time is the biggest issue. The main goal is to record and convey information. This allows me to do so with some efficiency.
Thanks Salko.
The drawing is a mix of CAD and hand drawing that I have been working on over the last few years. I finally have a mix that I like. I simply do not have the time to do these drawings entirely by hand and those don’t scan well anyway. So this is my “compromise”. The plan is to convert all of my existing drawings to the above format. Then see about getting them printed and bound.
Wow you’ve actually accomplished to do a mix, that’s impressive. I’d like to change my drawings to 3D but I only know how to do that in 3dd max and not CAD. Doing 3D models would be a great addition for the magazine.
Nice details, thanks. I love the use of a pop-rivet as a sleeve for the strings. Many years ago I built my kids a rough small guitar using a chipboard side wall (cut to shape with a coping saw) and very thin plywood for the body, and a piece Douglas Fir for the neck. I glued straightened copper wire into grooves for the frets, and there was no internet to help me in those days. I just scaled down the spacing from my guitar. Drilled through plated copper machine screws running in stiff nuts worked for the tuners. It still works, but needs a screwdriver to tune!
For UK readers, it seems the finished boxes are not so available, but the unfinished box you mention is available here:
Sound like a pretty cool little guitar…I bet your kids loved it!
Good looking results!
HOWEVER… I used to say “no pictures: didn’t happen!” Now, it’s time for “no audio or video: didn’t happen!”
C’mon Greg. The proof is in the playing. We’re waiting….
You will have to excuse my lack of musical ability…
https://www.instagram.com/p/BcYX-HkDK3f/?taken-by=hillbillydaiku
Sooooo, you aren’t as musically deficient as you claim. Sounding good! Thanks for answering the challenge.
Your efforts in obtaining a sound you like have paid off well.
Great illustration and I’m impressed that you have added these to your range of woodworking projects. I have this guy on one of my YouTube playlists…
Thanks Jeff. These are simple to build and a lot of fun to bang around on.
Justin Johnson is crazy talented!
Pingback: More Cigar Box Guitar – Preindustrial Craftsmanship
I really appreciate you sharing your experience making CBGs!
I was smitten with CBGs back in 2010 – I tried making one, before I knew snot about woodworking. With the wrong tools for the job, and no technique, it was incredibly frustrating and produced an awful sounding thing. I’ve always wanted to revisit making them.