
Hear ye, hear ye, hear ye. On this, the 31st day in the year 2014, the first iteration of the Hillbilly Tansu has been completed. 🙂

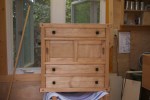


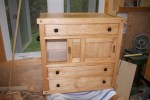
I started with an idea born from my admiration of the Japanese frame and panel tansu. After hours of searching and coming up empty as to how these tansu are constructed, I elected to develop my own joinery for constructing a cabinet that mimicked the Japanese form. From there the project became a quest for developing an entire system of construction. This led me to developing joinery, framing elements and even jigs and tools to facilitate the construction of what I have dubbed the Hillbilly Tansu. Overall I think my efforts have been fruitful.
The construction methods and joinery that I developed all worked out very well. There were some silly mistakes on my part as to the execution, but the methodology is sound. This system allowed for very quick build process. The key to this, IMHO, is that the construction is modular. Each module, front frame, rear frame, drawers and doors, is a simple and easy to handle assembly. With the exception of some dependent layout elements, each module can be fabricated independently of the other. I found this much easier to manage in my small workspace.
Another item of consideration was material. I wanted to be able to build this project from readily available material. For me this means lumber from the big box stores. I opted to purchase my birch ply from Woodcraft due to the poor quality of the plywood available at my local big box store however. The difference in the plywood is not something that would have been critical though. All the other lumber was purchased from the local Home Depot. I actually designed the framing elements so that they could be constructed from 2x construction lumber. As luck would have it, my local Home Depot carries 1.5in square x 8ft lengths of clear pine. So that is what I used to build this first HB Tansu. Another option for the framing lumber is to purchase turning squares. These can be mail-ordered in 1.5in squares x 36in long and are available in several different species. At a price of course.
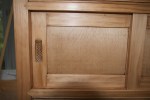
I like to fabricate my own hardware when possible. For this project I did just that. I employed my knot tying skills and fabricated the drawer pulls and the lifting handles. Both of these were tied using tarred nylon twine. This type of twine is strong but also gives the impression of iron hardware. The sliding door pulls were carved into the door frames themselves. I added some incised crosshatching to provide an element of texture and to increase the color value to better blend with the other hardware. I’m not totally sold on this method and will be trying to come up with something else in the future.
The finish was an experiment that I do not recommend. Unless you want to develop a complex concerning your surface preparation abilities. The idea was to use two tinted waxes and burnish them in with the polissoir. Pine and birch are notoriously temperamental when it comes to dyes and stains and I should have known better. My thinking was that the tinted wax would offer a bit of control in uptake of the color. It didn’t! In the end I was able to use a final application of clear wax, applied with steel wool, to blend the colors as best I could. This lightened the color as well. I’m not thrilled with it, but it’s not too bad.
This first HB Tansu was built as a proof-of-concept and overall I’m happy with the results. The design lends itself to being scaled and there are almost endless possibilities as to configuration. I’ll be building one more of this configuration just to verify my initial findings and to try another finishing technique. I’ll be sticking with clear shellac and wax on the next run.
Thanks for following along.
Greg Merritt

Despite your dissatisfaction with the finish, I think it turned out very well! The many interesting features of the piece itself, and its unique joinery, lead one to not even notice the finish.
Well done! Thanks for taking us along for the ride.
Thank you Bob.
The finish was a learning experience. It actually looks better now that the cabinet is installed in the house. The better half claimed it as her new bedside nightstand.
I’m biased, this is my baby, but it’s a lot of fun to build. The joinery is actually fairly simple to execute in practice. I’m working on a post that discusses the joinery in a little more detail. Specifically the cutting and fitting. I was surprised by how quickly the process went once I got started.
I’m glad you enjoyed following along.
Greg
Beautiful work.
Thanks Bill. It was a lot of fun to build.
Greg
I’m a fan of this style of japanese woodworking too. You definitely made a piece that looks good.
I thought your drawer pulls were knotted too until I read the write up. I initially thought you had drilled holes in the handles recess and wove your line through them.
Thank you Ralph. The door pulls came out OK but….I really would like for them to have been lined up vertically with the drawer pulls. Most of the antique tansu that I have been looking at have the door pulls installed in the panels. I think that you just gave me an idea how to solve my problem.
Stay tuned.
Greg
Greg your piece came out beautifully, and look at what you’ve learned. I applaud your willingness to venture forth independently, in design, and joint-making and the whole process. Grab a Guinness my freind, well deserved.
Thanks Brian. Nothing ventured, nothing gained. I’ve had a lot of fun with this project. It’s the first piece of furniture that I can truly call ‘my own’. My Guinness inventory has been depleted accordingly. 🙂
Greg
Greg
You should be very proud of the competed project it looks great , to design and manufacture not just a unique piece of furniture but also the special manufacturing aids you have made along the way shows a special skill. Thank you for the regular posts I have very much enjoyed following your progress . I look forward to your next project
Thanks so much David.
I am a little proud of the whole process I must say. Like I said before, this is the first project that I consider mine and it feels pretty good.
Your most welcome for the posts but the thanks goes to you and many others. The comments and encouragement from everyone is what made the whole process worth sharing. So thank you for that.
Best,
Greg