
 I’ve been working with wood for a lot of years. Most of those years consisted of fits and starts with no real skill building taking place. There were several reasons, but past is past. This all changed a few years ago when several things came together for me. I built a small shed in which to work, Paul Sellers started Masterclasses and I could afford to purchase some hand tools. Once I could put serious focus on woodworking I knew that, beyond developing the basic skills, joinery was of primary importance.
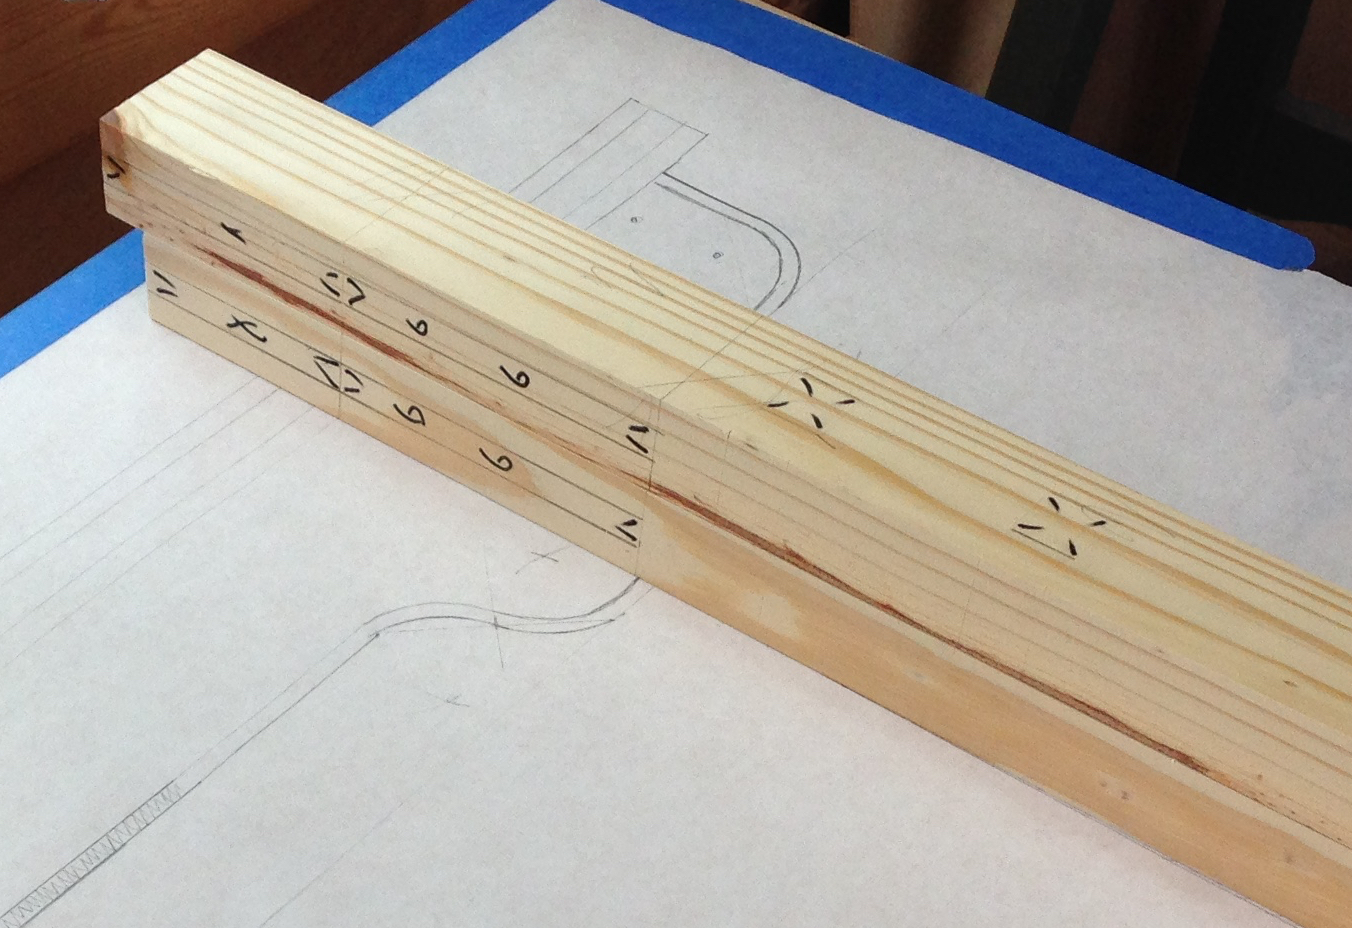
As I began to build projects with more and more joinery one thing became obvious. I needed a way to keep track of what went where. A good deal of woodworking articles and videos make mention of using a lower case cursive “f” for marking the face side of a board in conjunction with a “v” to indicate the face edge. Most woodworkers are also aware of using an indexing triangle to keep pieces oriented for assembly. Laying out of joinery is pretty well covered too. What is rarely discussed is how to mark the waste. An “X” or a quick scribble or, more often than not, no mark at all. If you are cutting your joinery shortly after marking it out than this may not be that big of a deal. If, like me, hours or days may pass between the marking out and the cutting than problems start to crop up. I was spending a good bit of time reorienting myself with what was what. Another issue was that I would occasionally cut on the wrong side of the line.
If you’ve visited here before you know that I have a deep-seated, obsessive has a negative connotation, interest in Japanese and Chinese woodworking. There are a multitude of reasons but their use of joinery is what keeps me hooked. As a result of this interest I purchased a video by Jay van Arsdale titled “Japanese Hand Tools & Techniques“. In that video he touches on how Japanese carpenters mark in the waste to communicate what is to be removed. They use these methods because the master carpenter is the one doing the layout. However, he is rarely the one who actually cuts the joinery. So a system was developed to readily and clearly communicate where and how the joinery was to be cut. This method seemed like it would be worth a try.
 After sketching ideas on paper I devised a basic system that I could put to the test in the shop. The first trials were using a pencil to create the tick marks. This worked but were simply not bold enough to give the visual contrast needed. I then tried a Sharpie marker. This worked fairly well. I also ordered and tried a brush tip pen. This worked great. The tick marks took on a tapered form. Fat at the beginning and thinner at the end. They looked like, well, brush strokes pointing to the center area of the waste. In the video, van Arsdale used the traditional sumisashi and ink pot to create the marks. I like this method too. So much that I made my own ink(sumi) pot. It’s more work to get the equipment ready but is fun to use.
Since I began using this marking system confusion and errors have dropped dramatically. I can still produce some bone-head moments but they are coming with far less frequency. By taking the time to mark the waste my focus on what I’m doing increases and I, by default, recheck my layouts. I’ve discovered caught potential errors this way. I’m also able to pick up a piece and quickly understand what joinery needs to be executed. No matter the how long the delay between the marking out and the cutting.
Below is an example of a project piece with the joinery marked using my system. Note the visual contrast between the pencil lines and the ink.
Here is a quick reference drawing that I put together to help illustrate the system I use.
I don’t expect anyone to adopt my system. If you do however, let me know how it works out for you. What I do want is for you to consider at least how you currently keep track of your joinery layouts. Maybe you could benefit from creating your own system as well. I can attest that using a system to mark my joinery waste has benefited me greatly in my own work. Something for you to ponder on at least.
Instructional Drawing PDF:Marking Joinery Waste
Greg Merritt

In timber framing, two v’s at the reference edge become an x. make them triangles, color one in for primary layout face. mark cardinal directions w/arrows on every piece. For door assemblies, use an exploded triangle, old joiner’s method. mark mortices with chalk, crayon, or Prismacolor.
Dovetailed boxes have four distinct corners, use x, =, o, ^ (actually a triangle…), so that the closed forms are one side. Marking along the waste side of a line to be cut with carets ^^^^^ avoids confusion, especially if there are two or more lines. #705 bottle of ink in a pencil and a spritzer bottle will make accurate, indelible bright green marks.
Wow…that’s a lot of info packed into one comment. Thank you for that.
I had completely forgotten about ink pencils. I may have to lay may hands on one again.
I spent the last couple of hours reading through your blog. Good stuff you have on there.
Greg
Interesting. I had never seen such a marking method before. Handsome illustration.
Thanks Jeff.
The system works well for me and has kept me out the weeds on several occasions.
Greg
When doing dovetails I learned quickly to letter or number mating parts. Once I start up mortises I may try the four corner marking. An enlightening read.
Thanks.
The important thing is to find a method that works for you. The more parts and joinery the more chance for confusion and errors.
Greg
You might like to underline the numbers 6 and 9 to avoid ambiguity.
Sylvain
Thanks for the suggestion. It would be just a matter of time before that eventually bit me.
Greg
Pingback: HB Tansu #3-Progress 1 | GREG MERRITT – BY MY OWN HANDS
Greg, do you know how Japanese craftsman deal with the thickness of their lines? Knife lines have no thickness, but ink lines do, even if small. Japanese joinery is extraordinarily precise…so precise that I don’t think they can ignore line thickness. So, if one person covers the material in a complex layout of lines (which is common in J. joinery) and another cuts it, how does the cutter know whether to cut on the left of the ink, the right of the ink, or to split the ink? Is there a system?