
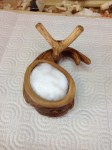
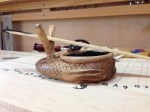
My little sumi pot is complete. Over the last few days I added a couple of coats of Tried and True original finish and then finally a coat of paste wax to the outside surfaces. I like the way it turned out, functional with a bit of whimsy. Now its time to see if I can get the sumisashi to work too. Otherwise my sumi pot is going to be relegated to being a knick-knack on a shelf.
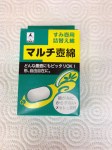
My order from Hida Tool arrived this week and I have been anxious to try all of this out since I opened the box. I’ve only ordered from Hida tool a few times but I am impressed with their speed and their careful packaging. Anyway, I now have silk wadding, sumi ink and (4) sumisashi pens. I ordered (4) because I’m sure that I’ll make a mess of at least one trying to get a handle on how to sharpen and prepare it.
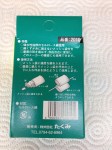
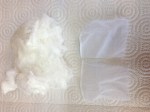
The raw silk wadding is just a bunch of fibers. These will act like a sponge to hold the ink in the sumi pot. The packaging and directions are in Japanese only but there is a drawing that gives you the setup. There are two small micro mesh bags included in the box. The silk is to be divided and stuffed into these bags. If I was setting up a traditional sumitsubo with an ink line, one bundle would be placed below the snap line and one on top. The idea is that as the line is drawn between the two bundles of ink soaked silk it will be completely coated. Since I’m just setting up a sumi pot I’ll only need to use one bag.
I placed the bundle of silk into my pot and added some ink. The ink has a watery consistency and I took my time adding it. Each addition of ink was worked into the silk bundle with a scrap piece of wood. The idea is to saturate the bundle so that it will release ink to the sumisashi but not be a sloppy mess.

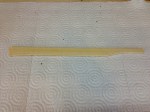
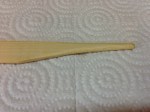
The sumishashi came pre-shaped but still needs to be prepared for use. Like most Japanese tools, the end-user is expected to make their own final adjustments as they see fit and to suite their needs. I left the line flat, wide line drawing end alone for now and focused my attention on the writing end. I used a sharp knife and shaped this end so that the mark produced will be more on scale with the size of joinery that I typically do. The final step to preparing the marking end is separate the fibers on the tip so that it will hold ink. Most sources agree that this is best accomplished by laying the sumisashi on a hard surface and tapping the first 1/2″ or so of the tip as you roll the sumisashi. So that is what I did.
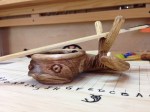
Time for a test run. I loaded the line drawing end with ink and lightly pulled it along the edge of my square. The result was a nice thin line. Success! Then I dipped the marking end in the ink and drew a centerline mark on my line. Success again! I’ll have to spend some time developing a feel for the sumisashi. It’s very sensitive to the amount of ink and pressure applied.

My first impressions are very favorable. The system works as intended. Do I think the sumi pot and sumisashi will make me a better woodworker? Of course not. I do however think that they will be beneficial to my layout routine. An accurate layout is very important. Any errors will haunt you throughout the entire project. The ritual of preparing the ink and the sumisashi will add an air of importance to my layouts. Forcing me to slow down and focus. Another benefit will be the greater visibility of the ink vs. a pencil. Pencil lines tend to wear off as a project progresses. The ink will not. I work under artificial light most of the time and pencil lines tend to glare in these conditions. The ink will not. I’ve been using a fine tipped marker for layouts and a brush tipped marker for marking the waste and numbering parts. That works but removing and replacing caps and switching pens is cumbersome. The sumisashi combines the two into one marking tool. So the actual layout process should be more efficient for me. I already use a light pass with a plane to “erase” my layout lines. The ink does not soak into the wood so this method of removal will still work just fine.

I had a lot of fun with this little project. Maybe I gave you some ideas or a least introduced you to something new. I need to get a few projects through the shop before any final decisions are made as to the efficacy of the sumi pot and sumisashi for my layout routine. For now though, I’m quite happy with what I have created.
Greg Merritt

Greg, it’s great that you been able to find some real authentic traditional means and methods to add to your repertoire. I think its great you have stayed true to what you set out for since starting this blog. Thanks for taking us along for the ride.
Your most welcome Brian. This project has been a lot of fun and I hope that you found it interesting. I like the old ways best. They have never let me down yet.
Greg
Beautiful! And I love the whimsy of your sumi pot.
Thanks Bob. I had a blast making it and can’t wait to use it on the layout of my next project. Whatever that may be.
Greg
Wonderful job! I gotta make one of these.
Thanks so much.
You should make one. Let your imagination run wild and have fun with it.
Greg
Hi Greg,
I’m not understanding how this holds and dispenses ink. I keep thinking of a nib on a fountain pen, is this similar?
That’s exactly how it works Ralph. The wide end for drawing straight lines comes with multiple splits already installed. The other end is prepared as I have outlined above. Both ends wick up the ink into the splits when you touch them to the ink soaked silk bundle in the sumi pot. It works really well.
Greg
I saw one of these used in a video and it seemed like a neat way to do a layout.
What do you do to keep the ink from drying out between uses?
Nothing. It’s going to dry out. Sumi ink is water based so all you have to do is add a little water and work it in. After several cycles of drying and adding water you will eventually need to add more ink into the mix. The even more traditional approach uses bits of charcoal or sticks of dried sumi ink. I’ll know better after a few uses, but it should only take a couple of minutes to have it ready to go for each use.
I would compare the ink to the dried water color paints that we all used in grade school.
Greg
Pingback: Marking in the Waste | GREG MERRITT – BY MY OWN HANDS
Pingback: HB Tansu #3-Progress 1 | GREG MERRITT – BY MY OWN HANDS
Pingback: Charpoy-Part 1 | HILLBILLY DAIKU