My affinity for Japanese tools and methods began several years ago when I first read Scott Landis’ “The Workbench Book” that I had checked out of the local library. For you younger readers, the library is how us old folks used to get our hands on books if the local book store didn’t have what we were looking for. No digital download or instant access. Just go to the library and hope for the best. Anyway, in that book there is a photograph of Tosio Odate working with low horses in his shop. That image sparked something in me.

In that image I saw a completely new way of woodworking. Seemingly simple and fluid. I read and re-read that section of the book many, many times. I paid several library fines because of that book. At that time the book was the only insight available to me on Japanese woodworking. It wasn’t until much latter that, with the internet, I was able to finally gain more knowledge of and even access to Japanese methods and tools.
My first purchase was a Shark brand replaceable blade Ryoba saw. The first time I used I knew that the pull stroke was for me. That saw cut every piece of wood when I built my current shop and is still used for cutting plywood panels for my projects. I’ve never replaced the blade and it’s still razor sharp. I’ve since purchased Gyokucho replaceable ryoba. They are more refined, better balanced and cut very, very well. But this post isn’t about Japanese saws.
A few Christmases ago I was gifted three Japanese planes (kanna). A regular 65mm kanna, a small block plane and a sole conditioning plane. In my enthusiasm and ignorance I promptly made a mess of them. Sharpening was easy. I could get the blades razor sharp, but fitting the chip breaker to the blade and the blade set to the dai (body) of the plane was a disaster. I had read all the information I could get my hands on, but still lacked the basic understanding as to how all of the parts worked together. I could get them to plane wood, but only at a rudimentary level. I set them aside and went back to using their western counterparts. Every few months I would take them out and fettle a little more, but still no real success.
Still firmly convinced that a pull plane is something that I need to add to my tool set I began considering building a Krenov style plane. I read as much as I could find and asked questions (thanks for taking the time to answer them Bill). I was ready to order a Hock blade set but just couldn’t bring myself to do it until I had one more go at the kanna.
After several hours of reading and watching I was ready to try yet again to make these “simple” planes perform. I decided to tackle the block plane first. I apologize now for the lack of photos for this process. Once I started, I became engrossed in what I was doing. I’ll do better on the large kanna.

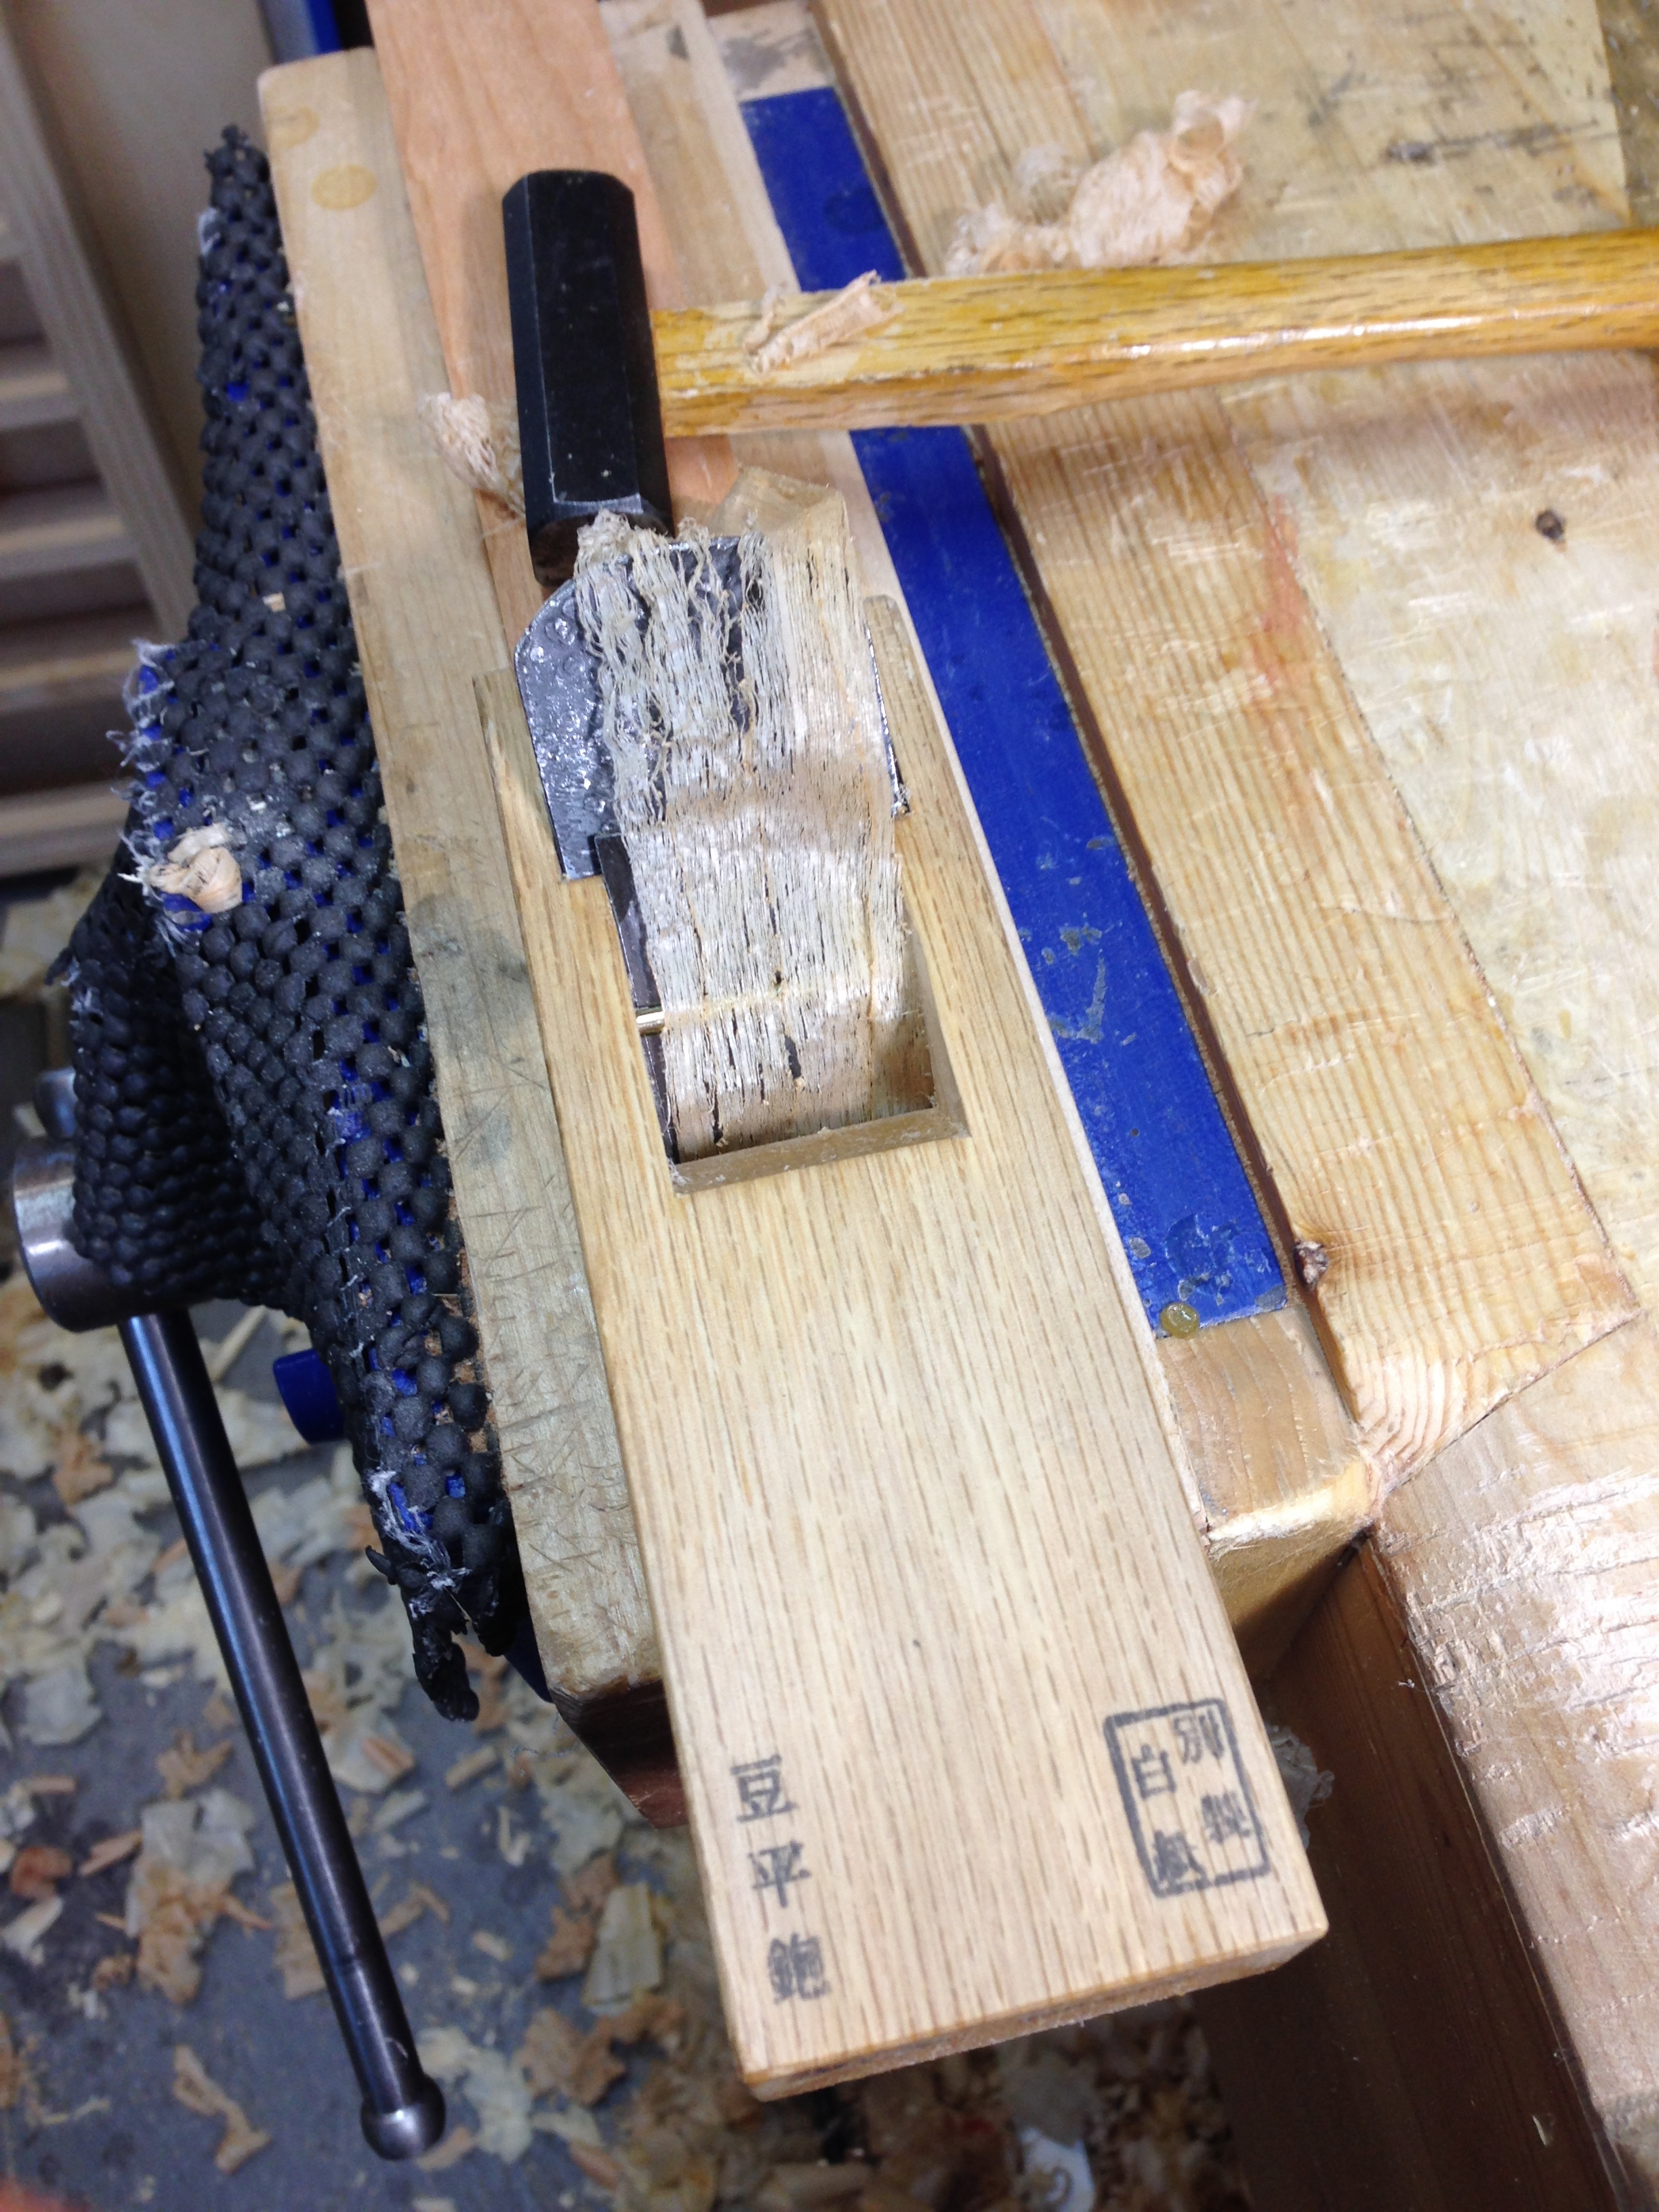
The first step was to correct or at least mitigate any damage I had done up to this point. The blade of a kanna is wedged shaped and is self wedging in the dai block. When you first receive a new kanna the blade is generally too tight. The idea is that you should fit the blade by slowly removing material from the blade bed of the dai. Properly done, the blade, when installed with hand pressure only, should still be 4-5mm short of protruding through the mouth of the dai. I screwed that up long ago. The blade of my block plane is far too loose. The common remedy for this is to glue a strip of paper or a wood shim to the blade bed. I opted for the paper shim.
-
- Blade protrudes through the mouth with just hand pressure.
-

- Paper shim installed.
The paper shim tightened the fit to the recommended position. Then I concentrated on the fit between the bad and the chip breaker.
The Japanese version is the same as all other versions of planes that have a chipbreaker or cap iron. The leading edge of the chipbreaker must fully mate to the back of the blade. I had worked on this area before so the two mated pretty well already. All I needed to do was touch it up a little.
I then installed the blade and chipbreaker into the dai block tapping them down until they were just shy of coming thru the mouth. Using sandpaper on a glass plate, I sanded the sole until it was dead flat. A Japanese plane sole is conditioned to that it only contacts the surface of the wood in two or three places depending on how it is to be used. I decided to condition this one for three contact points. One at the toe, one at the heel and one are just in front of the mouth. To achieve this I used a card scraper and removed just a very little bit of material from the areas between those points. Checking my work with the edge of my square.
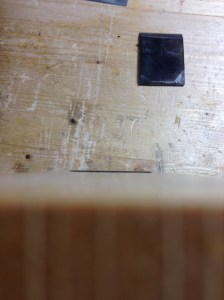
I then removed the blade and honed it once more. Time to see if my work will pay off. I tapped the blade down until it just began to protrude through the mouth and checked that it was protruding evenly. Then I backed it off until I could no longer see it and tried for a shaving. No shaving. Tapped the blade down a little. No shaving. Tapped again. I pulled and a shaving jumped from the mouth of the plane. Thick, but a shaving. Then I backed the blade up a little and installed the chipbreaker. I tapped it down as close to the edge of the blade as I dared. Pulled the plane and got a wispy, but curled shaving. One more light tap on the chipbreaker and I got this from my piece of cherry….
Not perfect, but I’ll take it! There is still some fiddling I can do to fine tune it from this point. My enthusiasm for these planes is back and I’m excited to go to work on my larger kanna. I’ll try to do a better job with taking photos of that process.
Greg Merritt

I love my Kanna, it’s so fun to use. I agree though, setting them up is quite intimidating, and I’m looking forward to tuning another one to incorporate some of the things I learned from the mistakes on my current setup.
I want to love mine, but its been a struggle. My lack of understanding has been the biggest hurdle. Funny thing is that this round it was obvious to me what I had been doing wrong. If I can get my bigger kanna up and running and maintain consistent results, I’ll start to feel the love. If I had it to do over I would have bought a junker off of eBay and worked on that until I had it figured out.
Greg
Great story Greg.
Must give my kanna another try.
What system do you use to sharpen your japanese plane blades ?
I have some japanese style and some western style saws and i must say i do like the way the japanese ones cut and the handles just feel more natural in my hands.
Great story Greg,have to give my kanna another try also.
What sharpening method do you use on your japanese plane blades ?
Thanks Juryaan. I’ve been using diamond plates followed by a strop. It works pretty well. I do have a waterstone for polishing and will use than if I need an edge that is super fine. Most of the time I just use the diamond plates and the strop though.
I do like my Japanese saws. The pull stroke and the handle arrangement just feels right to me. I find them much more comfortable and controllable.
Greg
Sorry for the double comment.
do your sharpening the Paul Sellers way or do you sharpen your tools with a straight bevel ?
Really like what you are making.
I use Paul Sellers’ method for western style plane blades and chisels. For Japanese laminated steel I stick with a flat bevel. Since the Japanese steel is much harder, it doesn’t need nor benefit from the rounded bevel. IMHO
Greg
The Krenov’s seem to work just as well on both the pull and the push, the Bailey’s are a little more awkward in my opinion. I look at both the Japanese planes and the Krenov planes basically as block planes if that makes any sense. From 6 inches up to the 20 they seem to handle like block planes, and that’s how I like to use them. While I love the Bailey planes as well, it seems that the Japanese/Krenov planes are more adaptable. But all of that is what makes woodworking interesting, in particular when we discover something new.
Bill
Block plane is actually a really good way to describe it. I see these planes as a specialty tool. My metal western planes will continue to be the workhorses and these will be brought out as the need arises. I truly believe there are times when you need to pull a plane. Like you said. The Bailey pattern is awkward in the pull stroke.
Greg