
I’m not gonna sugar coat it, I have struggled with the Japanese common plane. Getting it to cut is easy. Getting it to cut consistently and predictably, that’s a whole other thing all together. The learning curve is steep and my lack of understanding and skill has made it a slow process. Past is past and I have resolved to remedy this shortcoming.
As I told you in a previous post, I received my first two kanna as a Christmas gift several years ago. Not long after that I purchased a used kanna off of eBay in hopes that it would be in a usable state and that I could learn something from it. Soon after opening the package though, I was bitterly disappointed. The blade was great, the dai on the other hand was a Greek tragedy in wood.
The dai was twisted almost a full 1/4″ along its length and the mouth/throat opening was big enough to drag a cat through. When I inserted the blade into the dai, it almost fell completely through. While not exactly the leaning opportunity I was hoping for, it has proved useful. Over the years I have trued the block and shimmed the bed to get the plane at least usable. I used the blade for sharpening practice and to keep it in good condition. Still, it has never become a usable tool. Until now.
In one of his videos Jay van Arsdale states that he likes to make new dai for his plane blades and bed the blade at 50deg. This makes the plane useful for a wide range of woods and eliminates the need for the secondary blade/chip breaker. Hmmm. So I re-read the dai making section of Odate’s book. Hmmm.
Up until the early 1900’s the Japanese common plane was a single bladed tool, no chip breaker. The addition of the chip breaker is speculated to be a result of a few factors. The result of western influence, the lack of skilled craftsmen and the lack of quality timber are often listed as factors leading to the addition of the chip breaker. Here is the tricky bit. To be effective the chip breaker must be set 0.3mm or less away from the cutting edge. It’s not as hard as it sounds, but it takes practice.
With those few pieces of information I began examining how I use western style planes and speculating.
Generally western plane blades are bedded at 45deg. The Bailey pattern planes have a cap iron (sudo chip breaker) and the more modern versions have actual functioning chip breakers. When the chip breaker is properly set on western or Japanese plane the shaving ejected is quite different. Instead of the familiar curled shaving a continuous ribbon of wood is ejected from the plane. I have to admit that it is quite satisfying to set a plane up to this way, but I have rarely, if ever had the need to do so. The idea is that the chip breaker allows the planing of difficult grain and reduces tear out.
I work mostly in radiata pine, SYP, fir and SPF (spruce,pine,fir) construction lumber and have had little need for such a fine plane setting as described above. What I have found is that the 45deg bed angle of western planes and a sharp blade will serve me quite well in all but the most gnarly of grain. So I wondered if van Arsdale’s recommendation of a 50deg bedding angle would work for me?
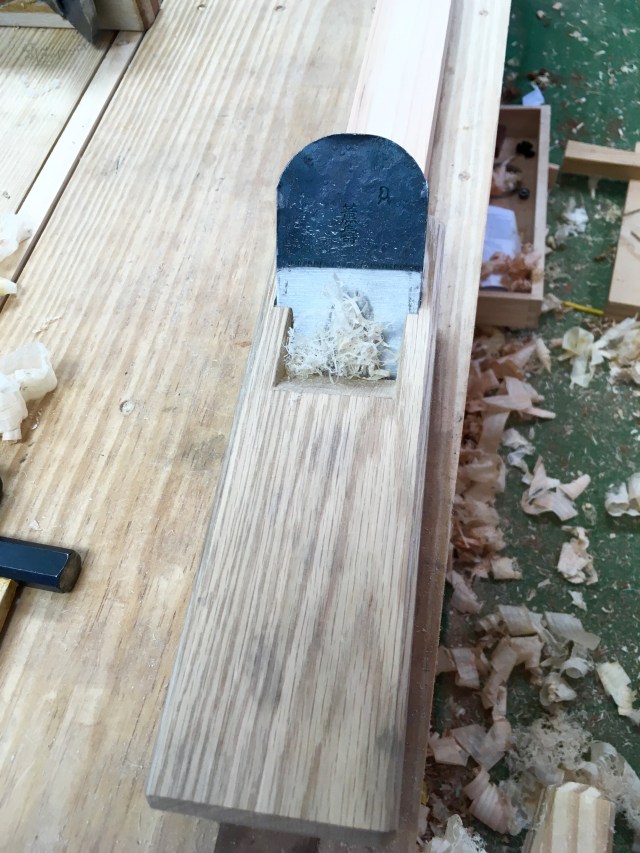
The only way to find out was to make a new dai for my orphaned Japanese plane blade. It just so happens that I have a small stash of well seasoned 1-1/4″ thick white oak in the shop. So after work one evening this week I knocked out a new dai.
I made a few mistakes, but I learned a lot. I’m not going to go into the how of this build, but focus on the results of this first experiment.
The 50deg blade angle works well and once I had the sole of the new dai conditioned I was able to produce a wispy shaving. My sharpening needs work though.
Then I set the cut a little deeper.

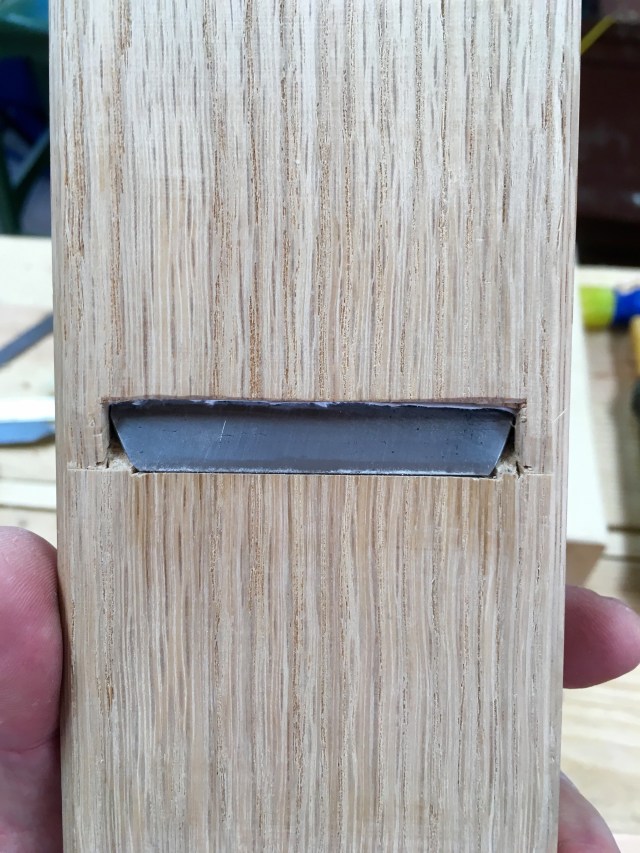
This new dai has a tight mouth/throat opening and this plays a role in controlling any tendency for tear out.

As a comparison I set up one of my original planes complete with the chip breaker properly set. OK, I could probably get the chip breaker set a little fine, but I wasn’t going to push my luck. This blade is bedded at around 40deg.

So here is what I learned. For starters, I learned that I could actually make a dai. I’m real happy with that. The 50deg bedding angle is OK, but there is a sacrifice in the surface quality that it produces. With a little more sharpening I could improve on that, but I don’t think it will produce a smooth polished surface anywhere near the quality of the lower angle plane.
So tomorrow I’ll make another dai. This time I’ll bed the blade at 45deg and see how that plays out.
Greg Merritt

I’m happy that you learned how to build a plane I am looking forward to that day, I’ve gone as far as building a moulding plane but haven’t ventured any further than that. I use a 50deg angle on my blade in my low angle jack, it helps a great deal and leaves a good polished surface so I’m not sure why your not getting equally good results. I know the higher the angle the closer to a scraping action it is but it’s not that high that it can’t produce a polished surface.
I’ve finally bit the bullet today and formatted my system, I hate doing this because the reinstall of all my software is a pain in the backside. If it wasn’t for this blog and all my drawings I would rid myself from it.
Great post Greg keep em coming.
I would say I am learning to build a plane. I made a lot of errors on this first attempt, but the fact that I was able to produce a usable tool is encouraging. I should have been more clear as to the surface quality produced by the 50deg blade angle. It actually is quite smooth and somewhat burnished. More than acceptable for just about everything I normally do. The 40deg plane produces a much smoother surface with a higher level of polishing. My hope is that the 45deg will split the difference and give a nice all-around plane to work with.
Dang, I thought maybe you were able to get the computer sorted without resorting to the dreaded reinstall. Hope all goes smoothly.
I’m still reinstalling. Bloody computers I hate them to bits.
I remember when Windows 95 was released few months later it’s on the news your computer can catch a cold, guess who propped up with a cure. Norton.
Greg, nice work. I made a few dai recently, it’s satisfying to pull shavings with a plane you made yourself. It helps to de-mystify the plane a bit.
I’m curious as to the problem that you’re solving by raising the bedding angle? Are you having tearout? Working construction timbers is not the easiest thing since they will tear out around knots but for the most part I think the lumber you end up selecting for your projects is the creme of the crop.
Your dai looks nice, the mouth is very tight (well done!) and it appears to be scraped hollow between the front two points and the back. Did you go with two contact points or three?
Brian you are too kind. Just had a look at your sight (not sure how I have missed it thus far) awesome work. The main problem I am trying to solve is ignorance. LOL. The blade I am using needs a dai, one way or the other. Plus, I like simple and the idea of working without the chip breaker appeals to me. So I am experimenting with the bedding angle to see what works best for the lumber that I typically use and in a single blade configuration. I may well end up back down to 40deg, but I will know and not be distracted by the “what if”.
I’m using the two contact point setup for testing.
Thank you for your compliment! I definitely prefer two contact points, myself, in this case (finish plane). Having used both, I prefer the chip breaker because it saves you when you run over an undulation in the grain. I’m building shoji at the moment and even having straightened the grain of nearly every piece of AYC there are still situations where tearout would occur because the grain rises then falls again. I could get pickier with the lumber but I’d probably end up at about 50% waste, which is too much for my conscience, lol.
If you can acquire true VG lumber you could probably do without the chip breaker.
I raised the bed on mine to 42 so that I could use it with hardwoods with a little more ease.
I guess somehow, Your are ‘resetting and formatting’ a few skills a making a ‘new’ tool box full of new learnings. Well done!
You probability know about it but just in case… HNT Gordon recently made a couple of videos about sharpening, irons, angles etc…
And traditional continental Europe smoothing wooden planes are 50º and jack planes are 45º!
Good luck with your “Dai Quest”! 🙂
Thanks Antonio! The Japanese plane has eluded me for quite a while. I think I may finally be getting a handle on it though. At the very least Im having fun and learning something new.
Pingback: The Great Kanna Experiment-Part 2 | BY MY OWN HANDS
“The Bailey pattern planes have a cap iron (sudo chip breaker) and the more modern versions have actual functioning chip breakers.” What is the distinction that you are making between pseudo chipbreakers and functioning modern versions?
Depending on which resource you consult, they are all cap irons. The Bailey pattern version was designed as a blade tensioner and shaving diverted, but can be pressed into to service to act as a true “chip breaker”. However, for optimal performance, a chip breaker needs to have an 80deg bevel and be set 0.3mm or less away from the cutting edge. The Bailey cap iron is of a fixed shape and the contact edge cannot be altered to include the required 80deg bevel.
This is really great, Greg. There is something hugely satisfying about making your own tools – especially one as demanding as a plane. Great job on that and keep the learning coming.
Thanks Matt! It is very satisfying, that is for sure.