
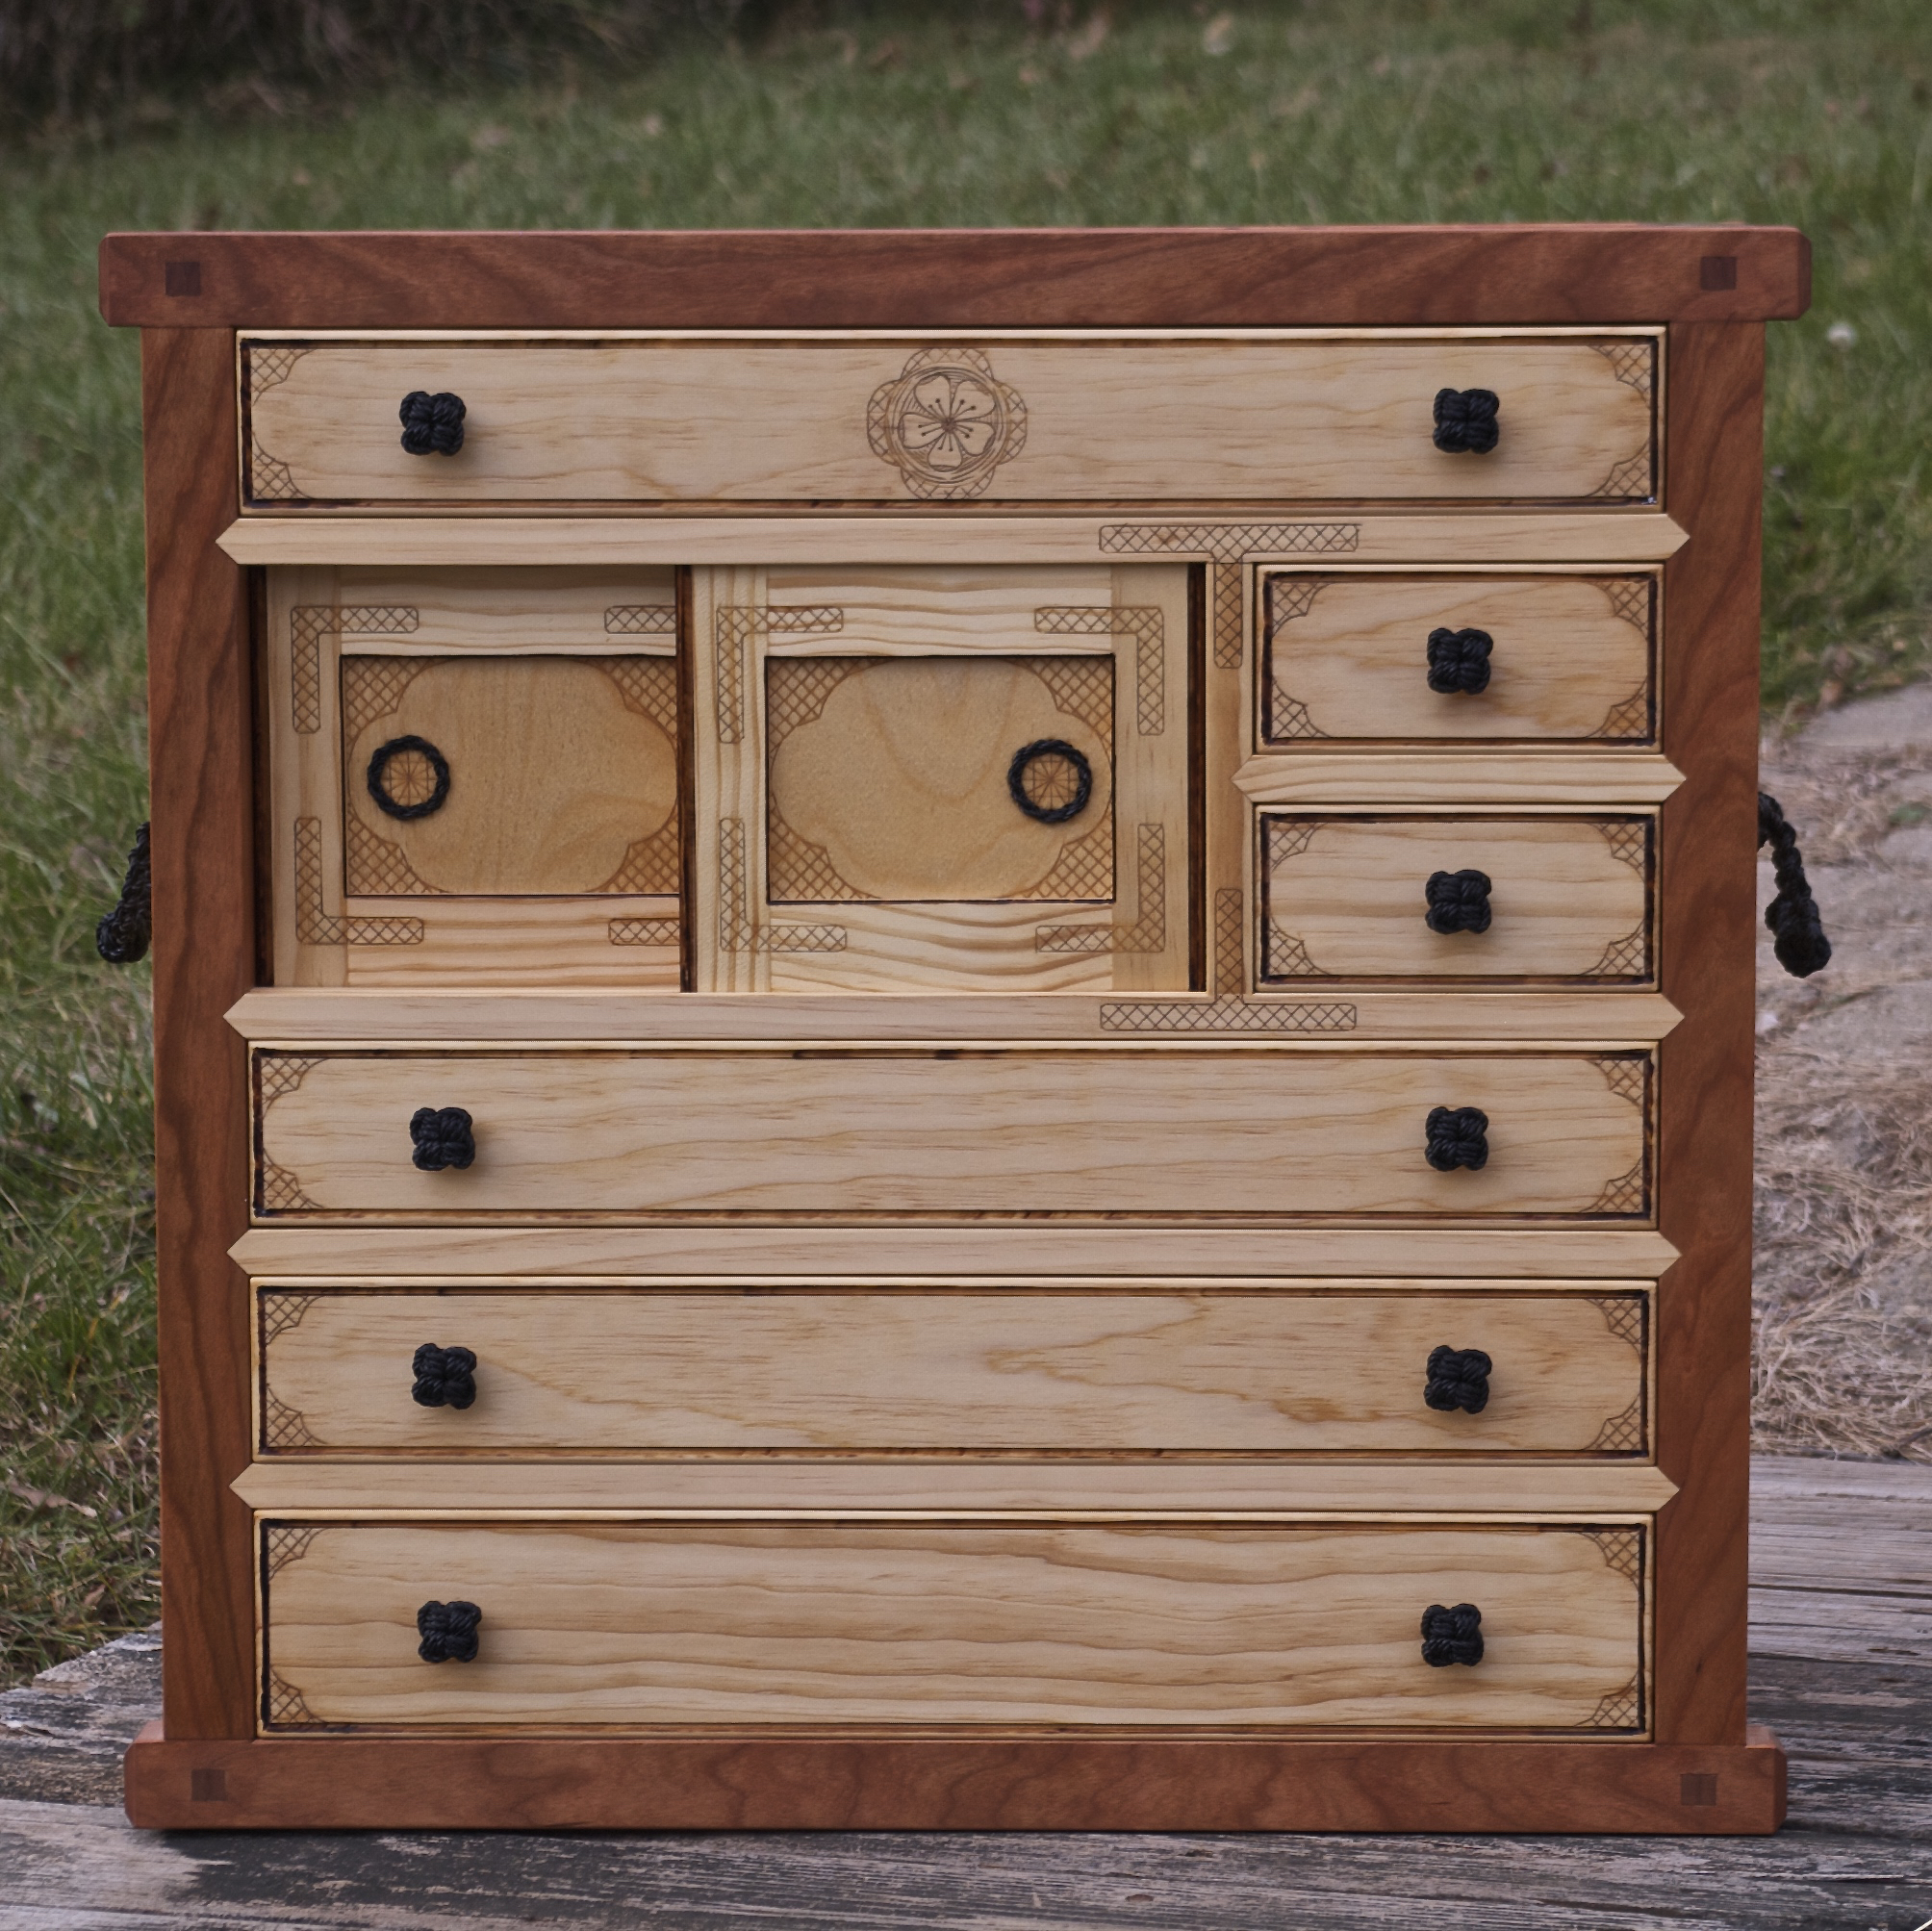
Three coats of BLO and two coats of the Tried and True Original finish, lots of hand buffing and rubbing, the “hardware” installed and I’m calling it done. The oil finish is exactly the look and feel I was after. The only changes I’ll make in the future is the type of BLO that I use. I used the plain-jane hardware store BLO on this. It’s what I had. Actually, I’ve had it for quite some time. If you’ve been reading vary many of my posts, you know I have a goal to use only non-toxic substances/finishes in my shop. The hardware store BLO contains heavy metal driers. Not a huge issue but still doesn’t meet my requirements for non-toxic. I’ll be ordering a supply of chemical free BLO for future use. The Tried and True product does meet my non-toxic requirement and the addition of beeswax in this product makes for an excellent finish coat. Just the right amount of low luster I was looking for. The general idiom for oil finish is as follows”
“One coat a day for a week, one coat a month for the first year and one coat a year from there on.”
I’m off to a good start. Five coats of oil at this point and I’ll add additional coats over the next year. I doubt I’ll be on any kind of fixed schedule though. Just add a coat when the mood strikes me.
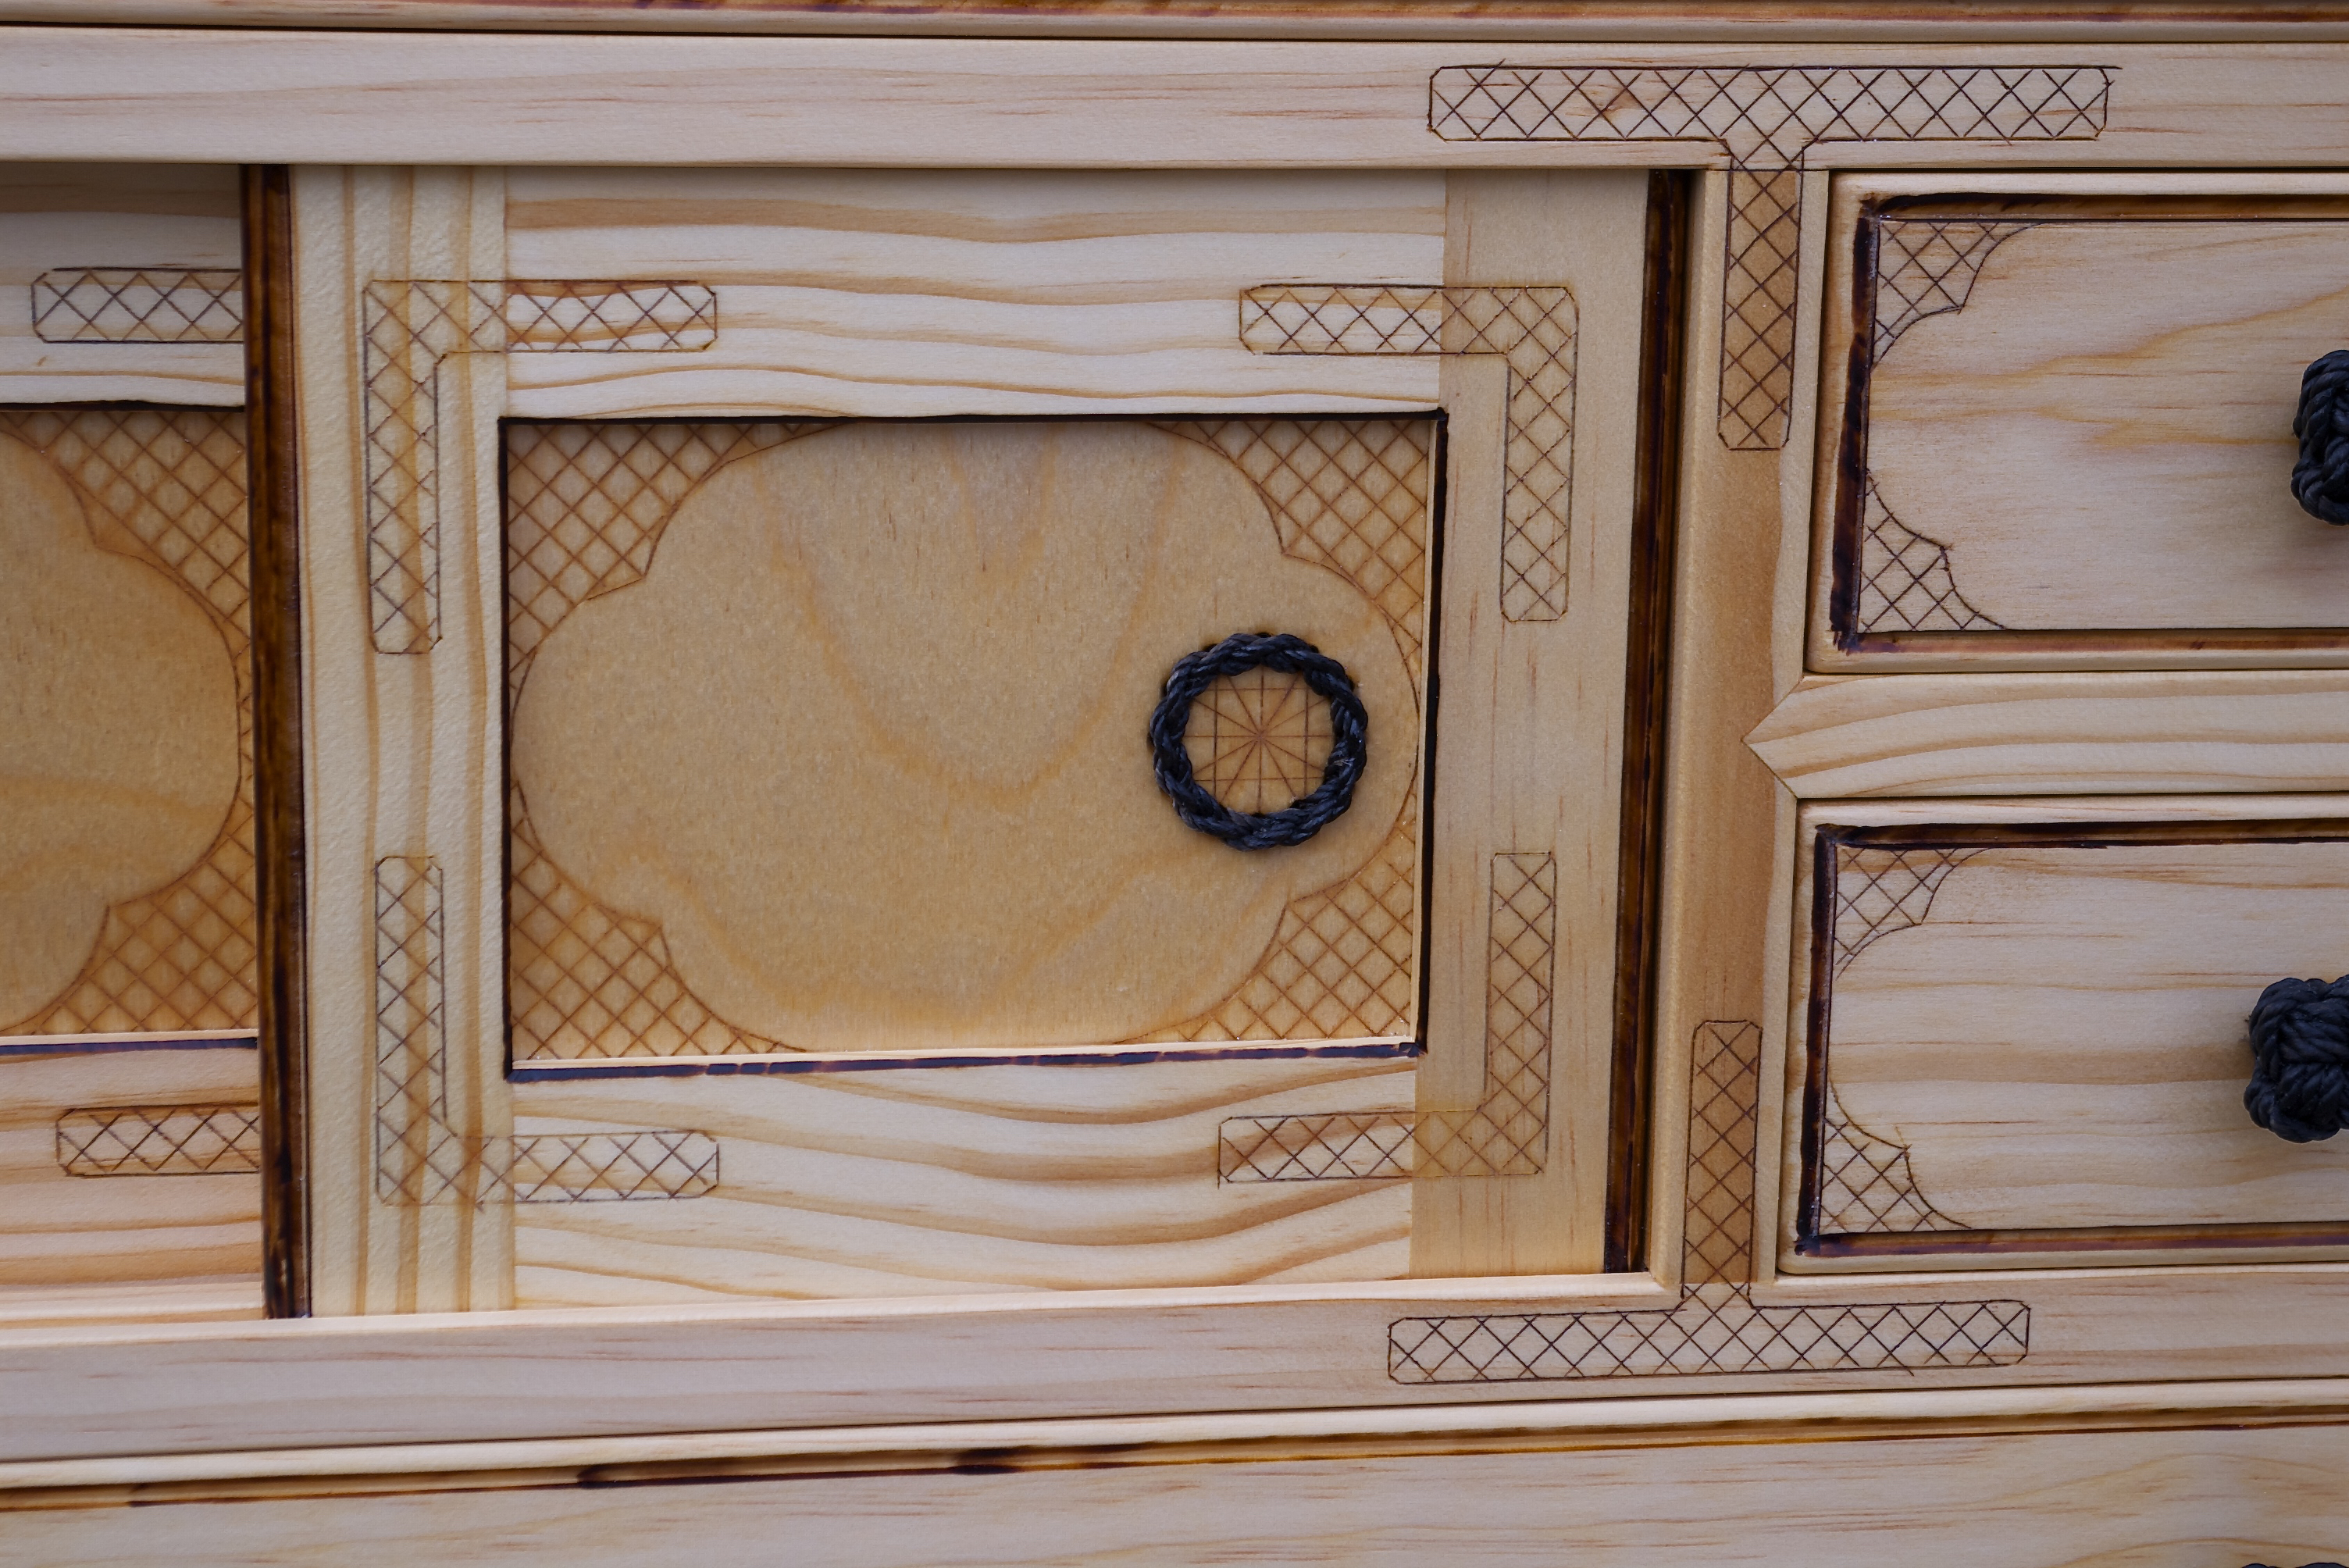
With the last coat of oil buffed out, I began installing my “hardware”. The knobs are all four-strand star knots hand-tied from #72 tarred nylon twine. These are then hardened with coat of CA glue. Installation is pretty easy. Thread the tag ends through the hole, secure with a wall knot, lock it down with CA glue and trim off the excess. The sliding door pulls take a little more work. For these I used #36 tarred nylon and braided it through the holes that I had previously added to the sliding door panels. There is nothing difficult about it, just a little tedious. It does produce a nice effect and provides just enough of a finger catch to operate the sliding door.
On with the dog and pony show.

This piece is a milestone for me. I consider it the best work I have done to date. A turning point. This is not meant to be braggadocios but a personal retrospective. Up to now I have considered everything I have done to be categorized as handy and/or crafty. This piece is the first that I consider to be proper furniture and truly my own. It’s a beginning with vast room for improvement. I designed it and drafted all of the plans for its construction. I executed those plans to the best of my ability. Limited as they may be. My years of studying knot tying resulted in the “hardware”. The kolrosing decoration that I added is a further result of my trying and developing of new and different skills.
This piece tells my story in wood, twine and incised lines. It’s fitting that it will be my personal cabinet. It will contain within it the tools and the bits and pieces that I treasure and use to express myself. The story is mine and maybe I’m the only one who will ever be able to read it in this Hillbilly Tansu, but it’s there non the less.
My apologies for the philosophical tangent. I hope that you have enjoyed following my progress as much as I have enjoyed sharing it.
p.s. I like cherry!
Greg Merritt

Very nice
You should be proud
Thank you Joe.
Very well done. I totally understand about projects that test the woodworker. For me, there is a struggle between making things quickly and building more epic projects which utilize joinery that takes time and care to execute. Good job!
I fully understand the need to get something done. My house is full of those types of projects. I’m just now reaching the point that I am beginning to replace those with more substantial pieces. Some have been around for 20years now.
Great work! How long did it take from start to finish?
Thanks. It depends on how you look at it. Construction took me about 60hrs spread over the last couple of months. I see it as taking a lifetime to get to this point.
Greg
Top notch work! That is a piece that you will be proud of for the rest of your life.
Thanks Bill. There are several comments about being proud of this project and the only thing that keeps going through my mind is:
“Pride goeth before the fall.” LOL
What I’m really wondering is if this was just just a fluke. Time and projects will tell the tale.
Greg
Very nicely done Greg. Something to be proud of, and something ‘tangible’ for your own personal use as a one of a kind treasure for you. I have yet to venture as far down that road… But will. You have provided a fine milestone to strive for. Btw….. How did you like working with cherry???…lol
Thanks Brian. Please set your goals much higher than my example. One thing that I have learned, especially over the last couple of years, is that skill builds on an exponential curve.
Greg
Well done Greg. You have every reason to be pleased with the product and your progress. I’ve enjoyed watching the development and I continue to be inspired.
Where have you been? I was just thinking about you the other day and wondering how you class had/is working out.
Thank you for the kind words. I just keep plugging away.
Greg
well done .it looks great
Thank you David.
That’s a very handsome piece Greg!
I think you did a great job with the tansu genre. While it’s not one I would pursue, I really like how well you did it. Beautiful workmanship!
Thanks Bob. I know that the tansu style is not for everybody. Same could be said for most styles I guess. It’s always appealed to me though. The only thing authentic about mine is the general shape. I’m pretty sure a Japanese master craftsman of tansu would beat me about the head and shoulders for the liberties I’ve taken. 😉
Excellent job and well executed details. Thanx for the link on the BLO.
Thanks Ralph.
UAU!!!!
Lovely (full of love) work.
One question about BLO…
When making spoons I tried some oil finish Colza, sunflower, olive and Linseed (my favorite for now) Its cheap because its all in my kitchen pantry …
And after some experiences I use Linseed oil (the same I use for coking) for wooden toys. I’m searching more and more to use all non-toxic stains, finish, glues etc…
Whats the difference in BLO and coking Linseed oil?
Thank you.
Food-grade linseed oil is raw linseed oil. The boiled linseed oil has been processed further to speed up the drying process. Most commercial BLO use heavy metal dryers to change the raw to boiled. The link I provided above does not. Heating the raw linseed oil was the traditional way to create BLO. It’s not actually boiled. Just heated and maintained at a certain temperature for a length of time.
This looks awesome; congrats on completing it.
Thank you!
Greg, that’s spectacular! I can’t believe how quickly you put that together, with all of the handwork and joinery. It all looks crisp and accurate, the proportions are good, the contrast between the cherry and pine is really nice too.
Thanks for that Joe. I think the cherry brings out the red in the pine. Same goes for the birch ply. I’ll be repeating this combination for sure.
Beautiful work Greg.
I really like the look of the 4 stranded start knots and the beckets for lifting the unit.
Brgds
Jonas
Thanks Jonas.
Sometimes being a cheap SOB leads to something better than money can buy.
Greg
Beautiful. Simply amazing work.
Thank you so much!
Greg
Pingback: Chinese Gate Bench-Progress 1 | GREG MERRITT – BY MY OWN HANDS