
 I woke up Saturday morning and changed my mind. I was originally going to finish this project with Tried and True oil. But I decided to go with clear shellac. The entire mini tansu already had two coats of BLO and that had dried for at least 48hrs.
Once the shop was warm enough to work in, I glued and pegged the rear panel in place. Once that was done I added the first coat of clear shellac. I have never used shellac over a base coat of BLO before and I like the difference it makes. I usually apply shellac directly to raw wood. Consequently, several coats are required to obtain a workable film thickness. The BLO sealed the wood and resulted in the need for only two coats of shellac. There is the added benefit of the BLO enhancing the grain as well. So two coats of shellac was all that was required. I then left the cabinet alone to dry overnight.
This morning I began rubbing out the shellac with 000 steel wool. It took a couple of hours to get into all the nooks and crannies. It was worth it though. Working shellac this way results in an absolutely silky smooth surface. With the shellac rubbed out I added a couple of coats of clear paste wax and buffed every thing to a sheen. Tomorrow I’ll have to inspect everything and clean up any residual wax residue that has clumped and turned white. You’ll see some examples of this in the photos below.
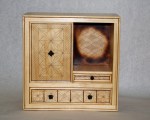
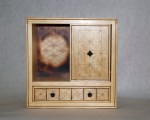
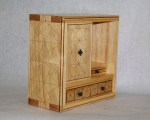
I ended up using three different styles of knotted pulls. The one on the sliding door is a modified (4) strand star knot. The pulls on the larger drawer are standard (4) strand star knots and the pull on the small drawer is a (4) strand tack knot. All of these are tied with #18 tarred nylon. I also added blue felted drawer liners to the two drawers.

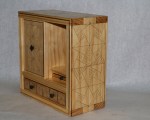
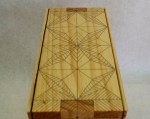
With the pulls in place the Hillbilly Mini Tansu is complete. My goals were to prototype this new design and to try out different decorative patterns. I like the design. The parts function and fit as intended and I will be able to use this design as a base for other small cabinets. It will be easy to scale and add drawers. I had a lot of fun playing with the Hillbilly Inlay designs. My goal here was to try several designs and play with scale and shading.
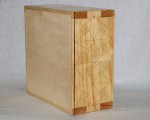
All-in-all I’m calling this one an overall success. The design and construction are fine. My execution will need a little more polishing though. This design could easily be modified to display a specific item or altered to be a jewelry cabinet. There are many possibilities with this design.
Christopher Schwarz recently published a post entitled, “How I Evaluate My Own Work“. In that post he shows photos taken with overhead fluorescent lights with a plain white paper backdrop. My photography skills are poor at best so I thought I would give his technique a try. At the very least this methods eliminates any distraction and should provide a consistent baseline for evaluating my own work as well.
-
- BLO with shellac and wax


Greg Merritt

Greg, Looks great. I didn’t know what a Tansu was and had little idea what they had to do with a hill-billy as well! Very nice work. Nice methods, Neat ideas: the carving, the joints, the staining of the carving, the finish work… I’ve certainly picked up some ideas. I’d like to see how you made the knobs. Those look fascinating. I’d assume you could make them out of all sorts of material – para cord, leather, etc… very interesting.
Thanks Dan.
Tansu is a generic Japanese term for any cabinet. I thru “Hillbilly” in there for fun and to set it apart anything that is actually authentic Japanese. What I do is an interpretation of the Japanese methods and techniques only.
You most certainly can use just about any cordage for making the knotted pulls. There are some illustrations on my site as well as a few post about the pulls. I have yet to do any instruction on the star knot though, but there are several resources for how to tie a star knot on the internet that you can take a look at.
https://gregmerritt.wordpress.com/project-and-method-illustrations/knot-tying-illustrations/
https://gregmerritt.wordpress.com/category/knot-tying/
Greg
Man, this is really nice. You captured the aesthetic of the tansu, but it’s definitely your design.
Thank you! Yep, the blame is all mine. 😉
Greg
Amazing work! The carving is beautifully done.
Thank you Robert.
Greg
Sorry, Greg but this one I just CAN’T/WON’T show it to my wife… or I’m in trouble
Deep, deep trouble, because she remembers quite well the HT #2!
Nice, photos as well!
Go ahead and show it to her Antonio. I’ve seen your projects and I’m confident that you could build her one. If all else fails, send me an email and we will discuss options.
The photos are better than my usual but I need more light in my shop. It’s too dark and the camera flash creates harsh shadows and glares.
Greg
Sorry I miss the evaluation:
Evaluating…..
Evaluating……
Evaluating……..
Processing……..
9.1; 9.4;9.0;9.2
This is water jumping evaluation right?
😉
Awesome work. Congrats it looks great.
Thanks Jeff,
Greg
Fantastic end result I do not know how you can get the Kolrosing inlay so neat and precise.
I see you are getting close to 100,000 views of your site congratulations it is a very good site
Thanks David. It’s just a bunch of knife walls. So a sharp knife and a straight edge makes easy work of it. The trick is to do it all in pencil first so you know where to make micro adjustments to bring all of the points together.
When I started this blog back in April I wasn’t sure if anyone would read it. It amazes me that I’m almost at 100,000 views from just over 90 countries. I have no idea if that is good or bad, but I find it humbling. I’m very glad that you and few others find it worth reading on a regular basis. Thank you for your support David.
Greg
Great looking build Greg. The blue felt lining adds an entire new dimension to the chest. It looks fantastic.
Brgds
Jonas
Thanks so much Jonas. Most people expect to see red or green felt, so blue adds a nice surprise when the drawers are slid opened. At least IMHO.
Best,
Greg
Greg real nice, glad you are happy with the way it came out. I would be thrilled if it were mine.
I think this brings you steps closer to wherever you see this going. Its been great to watch you develope, thank for choosing to share with us.
Brian
Thanks Brian. The process is leading me, not the other way around. So I’m not sure where all this is heading. I am surprised that so many have taken the time to have a look at what I’m doing. Thanks for the support.
Greg
Pingback: Hillbilly Mini Tansu-Progress 8 | GREG MERRITT – BY MY OWN HANDS
Greg, I’m so pleased you started this blog. You’re work is terrific and I am always inspired by your continuous progress. I learned a great deal which I’ll apply to my own work from this post. I like how you described your finish process for the Tansu – 2 coats of BLO, clear shellac and wax. I sometimes shy away from shellac because it takes too many coats to get the build I want. I look forward to applying your process to a project real soon.
Also, I’d like to get better at reviewing and presenting my work. Thanks for sharing Chris’s blog post. I’ll find a way to follow this advice for my next project (and blog post). Keep up the good work.
Hi Denise! I just keep plugging away and figuring things out as I go. Here is what I figured out about shellac. Unless you are going to french polish a piece, shine is not what you are shooting for. What you want is a film thick enough to rub out with 0000 steel wool. On raw wood this usually works out to be about 4-5 coats. Depending on the cut. The BLO reduces this to about 2 coats. The BLO makes the grain “pop” and begins filling the pores. Thus the reduction in number of shellac coats needed. The drawback is that the BLO adds time to the process. 24hrs between coats at a minimum for the BLO. Once I have a film I just rub it out with the steel wool until it is a uniform matt haze. It looks scary at this stage. Then I add 2-3 three coats of clear paste wax. I end up with a glass smooth surface and a uniform satin/semi-gloss sheen. Works every time without fail.
Photographing and creating a comprehensive or logical presentation is something I continue to struggle with. Working alone in the shop makes it all the more difficult. I am just now starting to experiment using a tripod and camera timer to obtain “action” shots. Heck, I even tried my hand at a video. Loooong way to go with that medium.
Anyway, thanks for the continued support and I look forward to seeing new blog posts from you soon.
Greg