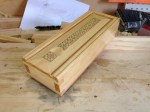
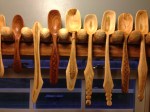
 If you’ve been following allowing with my wood butchery you’ve seen and heard me make mention of kolrosing. Something I affectionately refer to as my Hillbilly Inlay. I first stumbled upon the technique while researching spoon carving. I tried it and it quickly became my preferred method of adding a decorative element to my projects.
Kolrosing is an ancient Scandinavian technique dating back to the time of the Vikings. Traditionally, patterns were incised into wood and bone then coal dust, hence the name, was rubbed into the incisions to highlight the pattern. The same idea was employed by ancient sailors and we know that as scrimshaw. The examples that really drew me to kolrosing were those done by the Sami people of Scandinavia. This link will bring up an image search for sami knife sheath.
Kolrosing can be simple or as complex as you wish to make it. The patterns can be geometric or free-form. Your only limited by your imagination. At its core though, kolrosing is very simple to execute and you know how much I like simple. The following should give you the basic steps so that you can give kolrosing a try.
Here are the tools of the trade.
Begin by sketching your intended pattern onto the wood with a pencil. This is not absolutely necessary. Sometimes I do, sometimes I just start with the knife.
The next step is to incise the pattern into the wood. A sharp knife is all that is really needed for this. There are specialized knives for the process. I have one but only use it for adding by logo. It excels at cutting a curved line. For most of my patterns I use my trusty utility knife. It works just fine for the geometric patterns that I tend to favor. Don’t forget to make use of any tool that you have at your disposal. Gouges and awls are another favorite of mine.
The gouge.
The awl.
Now its time to add the colorant. My preferred colorant is instant coffee crystals. Their cheap and work great to produce a black line. Just about any fine powered substance will work. Paprika will produce a reddish-brown line and cinnamon will produce a dark brown line. Whatever you decide to use rub it in with a circular motion to ensure that the colorant is driven into the incised lines.
Once you’ve added the colorant, give the surface a light sanding. When you incise the pattern you will raise areas along the incisions. A light sanding levels these out.
All that remains is to add the finish of your choice. The finish will wet the colorant and bring out the contrast. The effect can be dramatic. I can attest to using oils and shellac without any issues. If you plan to use something else please do a test piece. The first thought most people have is that the act of applying the finish will drag the colorant out of the incisions. I’ve applied finish over the kolrosing with both a rag and a brush and I have never had that happen. This example piece received a wiping coat of BLO.
Here are some of my examples. They are very basic but should give you an idea of how kolrosing can enhance the look of your projects.
If you have any questions just ask. I’ll try to help the best that I can. I hope that you give kolrosing a try. It’s a handy technique to have at your disposal.
Instrctional Drawing:
Greg Merritt


That is truly amazing.
Great tutorial, and no expensive fancy speciality tools. My favourite part is that you can use instant coffee. That is not even a hazardous material 🙂
I think I’ll have to try this with the children at home.
Thanks for posting this.
Brgds
Jonas
Thanks for that Jonas. In the winter I try to keep a kettle on the space heater. So instant coffee is something I keep in the shop anyway. Looking at your last blog post, you have all the tools you need to give this a go. Please post what you and the little ones come up with. I love to see.
Best,
Greg
Hi Greg:
Just want to say thank you very much for your posts and help for anyone.
Your website atmosphere is very friendly, quiet and just kind. It worths much.
Many lucks and new ideas to you!
I was wondering how you did that. Thanks for explaining, I’m definitely going to give this a shot! I think this technique can really add something extra to a work piece.
Glad you found it useful. It’s a great way to add a personal touch to a project.
Greg
Very nice indeed! I’m definitely going to steal this and use it in my bag of tricks.
Thank you. I hope that you can have some fun with it.
Greg
Thanks for the tutorial Greg.
Being a little familiar with scrimshaw, I suspected this work was similar. Good to know how.
I’ve always thought this form of decoration suits you well since you enjoy drawing so much.
Thanks!
Your most welcome Bob. My work falls squarely in the “folk art” category. About 99% folk and 1% art. 😉 Kolrosing is a great way to make a piece truly your own.
Greg
Cool. Reminds me a bit of tramp art.
What did you call me? LOL
Tramp art tends to incorporate a lot of chip carving. Chip carving and kolrosing go hand-in-hand. In fact the two techniques are often used together.
Greg
Great post on this, something I’ve yet to try… Now… Back to the something different post from a few days ago….. Hahaha
Thanks Brian. LOL I’ll have part one of something different posted by morning.
Greg
Thanx for the post Greg – even I can follow these instructions
Your welcome Ralph. LOL
Greg
Thanks for this Greg! Do you seal the surface first on open pore woods such as oak before doing the incising? Or is this not a problem in your experience? Any suggestions for materials that would contrast well with dark woods?
Thank you.
This technique lends itself to tight grained and light colored woods. I’ve done it on red oak but the results were less than favorable. I’ve also not had any luck finding anything that produces a light color as a filler.
Greg
Great easy to follow “How To Kolrosing” post.
I did try it following a post you did on Masterclasses a bit back and found it worked just fine .
Thanks for the support David. 🙂
Greg
Hi Greg,
Fantastic post. I really enjoyed reading this one. I had been wondering how you did this as I have seen it on many of your projects. Thanks for posting this.
All the best,
Jonathan.
Thank you Jonathan and your most welcome. I hope that you can find some use for it.
Greg
Great tutorial Greg, always wondered about how you did this. Now I have to buy some instant coffee!
Thanks Dave! I hope you can get some use out of it.
Greg
Thanks for the tutorial. It answered all of my questions.
Your most welcome. Glad you found it of use.
Pingback: Bookcase-Progress 7 | GREG MERRITT – BY MY OWN HANDS
This is a year later after the post but i think it deserves mentioning. I am a woodcarver. i practice chip carving but it is not my best work. i have practiced a technique like this before i learned chip carving. all sources say to just make one cut along the lines but i like to make a return cut to cut out the burr that is left in the wood. Another thought is to color these lines with a colored powder of some sort. we have to keep in mind to not use powder that is toxic especially if it will be used on a spoon when somebody will be using it for cooking or eating.
Pingback: Seizing Inspiration when it Presents | BY MY OWN HANDS
Pingback: My Stamp of Approval | HILLBILLY DAIKU
Pingback: Inspiration Kolrosing – Le Chantier Clair
This is so cool! Will surely be using what I learned reading this. Thanks so much.
Thanks!
Thanks for the tutorial. Where did you get the parallelogram layout tool in the photos? Thanks.
Going to this tomorrow!