Knotted Pulls are the Goal

knotted_knobs_front

Frome left to right. Four crowns and a wall knot, tack knot with wall knot neck, star knot with wall knot neck.

I can almost hear you screaming at me through the internet, “What’s with all the knot tying!?”.  So I thought I had better create this post so that you can better understand where I’m heading with all the knots that I have been posting about.

There is a long tradition of making your own hardware.  Early craftspersons probably created knobs and pulls out of necessity.  Then the blacksmith and silversmith came along and began forging and crafting hardware that could be purchased.  The shakers took knob making to an art form in their time, crafting elegant knobs on the lathe.  More recently James Krenov,  Paul Sellers and others have advocated crafting knobs and pulls in the shop.

Lets face it, we no longer need to create our own hardware, we can purchase just about any style we want.  So why go to the trouble.  I believe that by creating some of our own hardware we can put our own unique stamp on the things that we create.  More over, hardware can be expensive.

Since one of my hobbies is knot tying, I quickly became aware of how sailors of the past crafted knobs and pulls to outfit ships interiors as well as their sea chests.  So I took that information and developed a few simple knobs that I think are quite nice and can be created out of just a few pieces of twine.  You can stock up on quite a bit of hardware while watching TV in the evenings and you will have them at the ready when the time comes.

That is why I’m posting about knots.  I felt that the best way to show you how to create these knobs was to show you the basic knots that will be combined to create them.  Hopefully, that will make it much easier for you to create your own knobs.    By altering the size, number or type of twine used you can create a wide variety of knobs and pulls lending an element of uniqueness to your projects.  Very soon I’ll be posting the instructions for making the knobs I have pictured here.  These are just a few of the possibilities.  I hope that you give them a try.

Greg Merritt

knotted_knobs_side

Posted in Knot Tying | Tagged , , , | 5 Comments

The Wall Knot

wall_knot_image
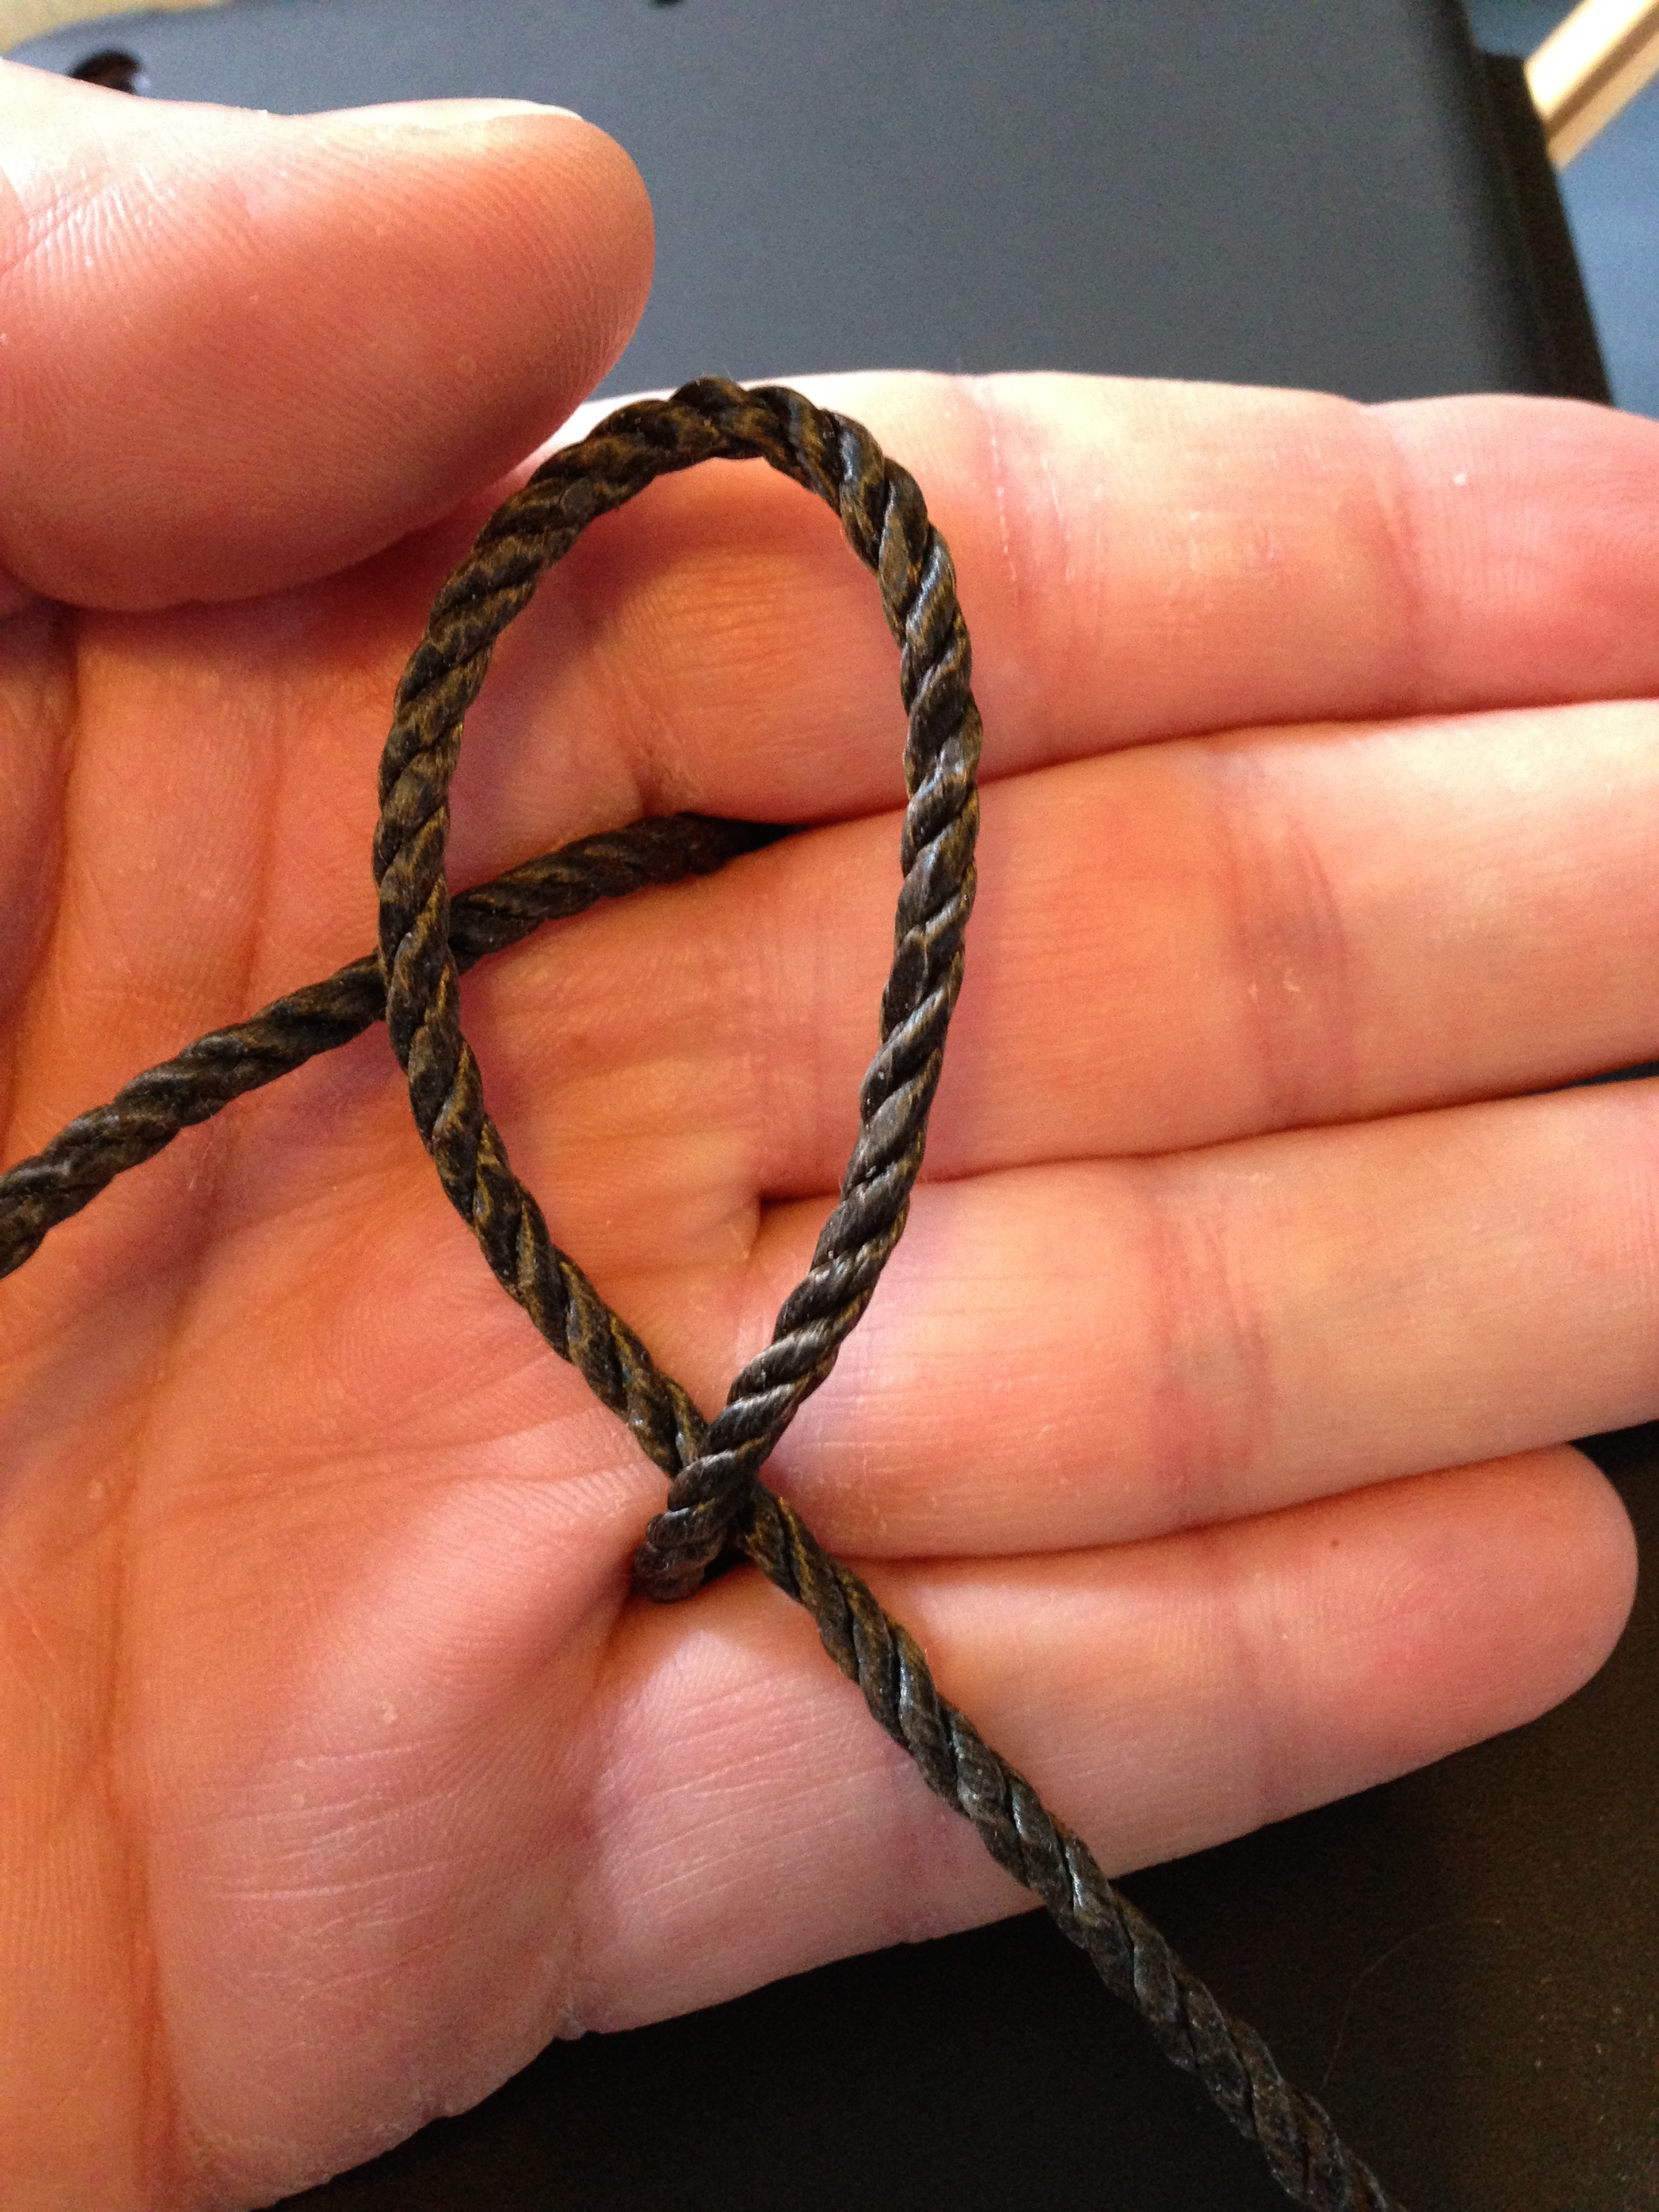
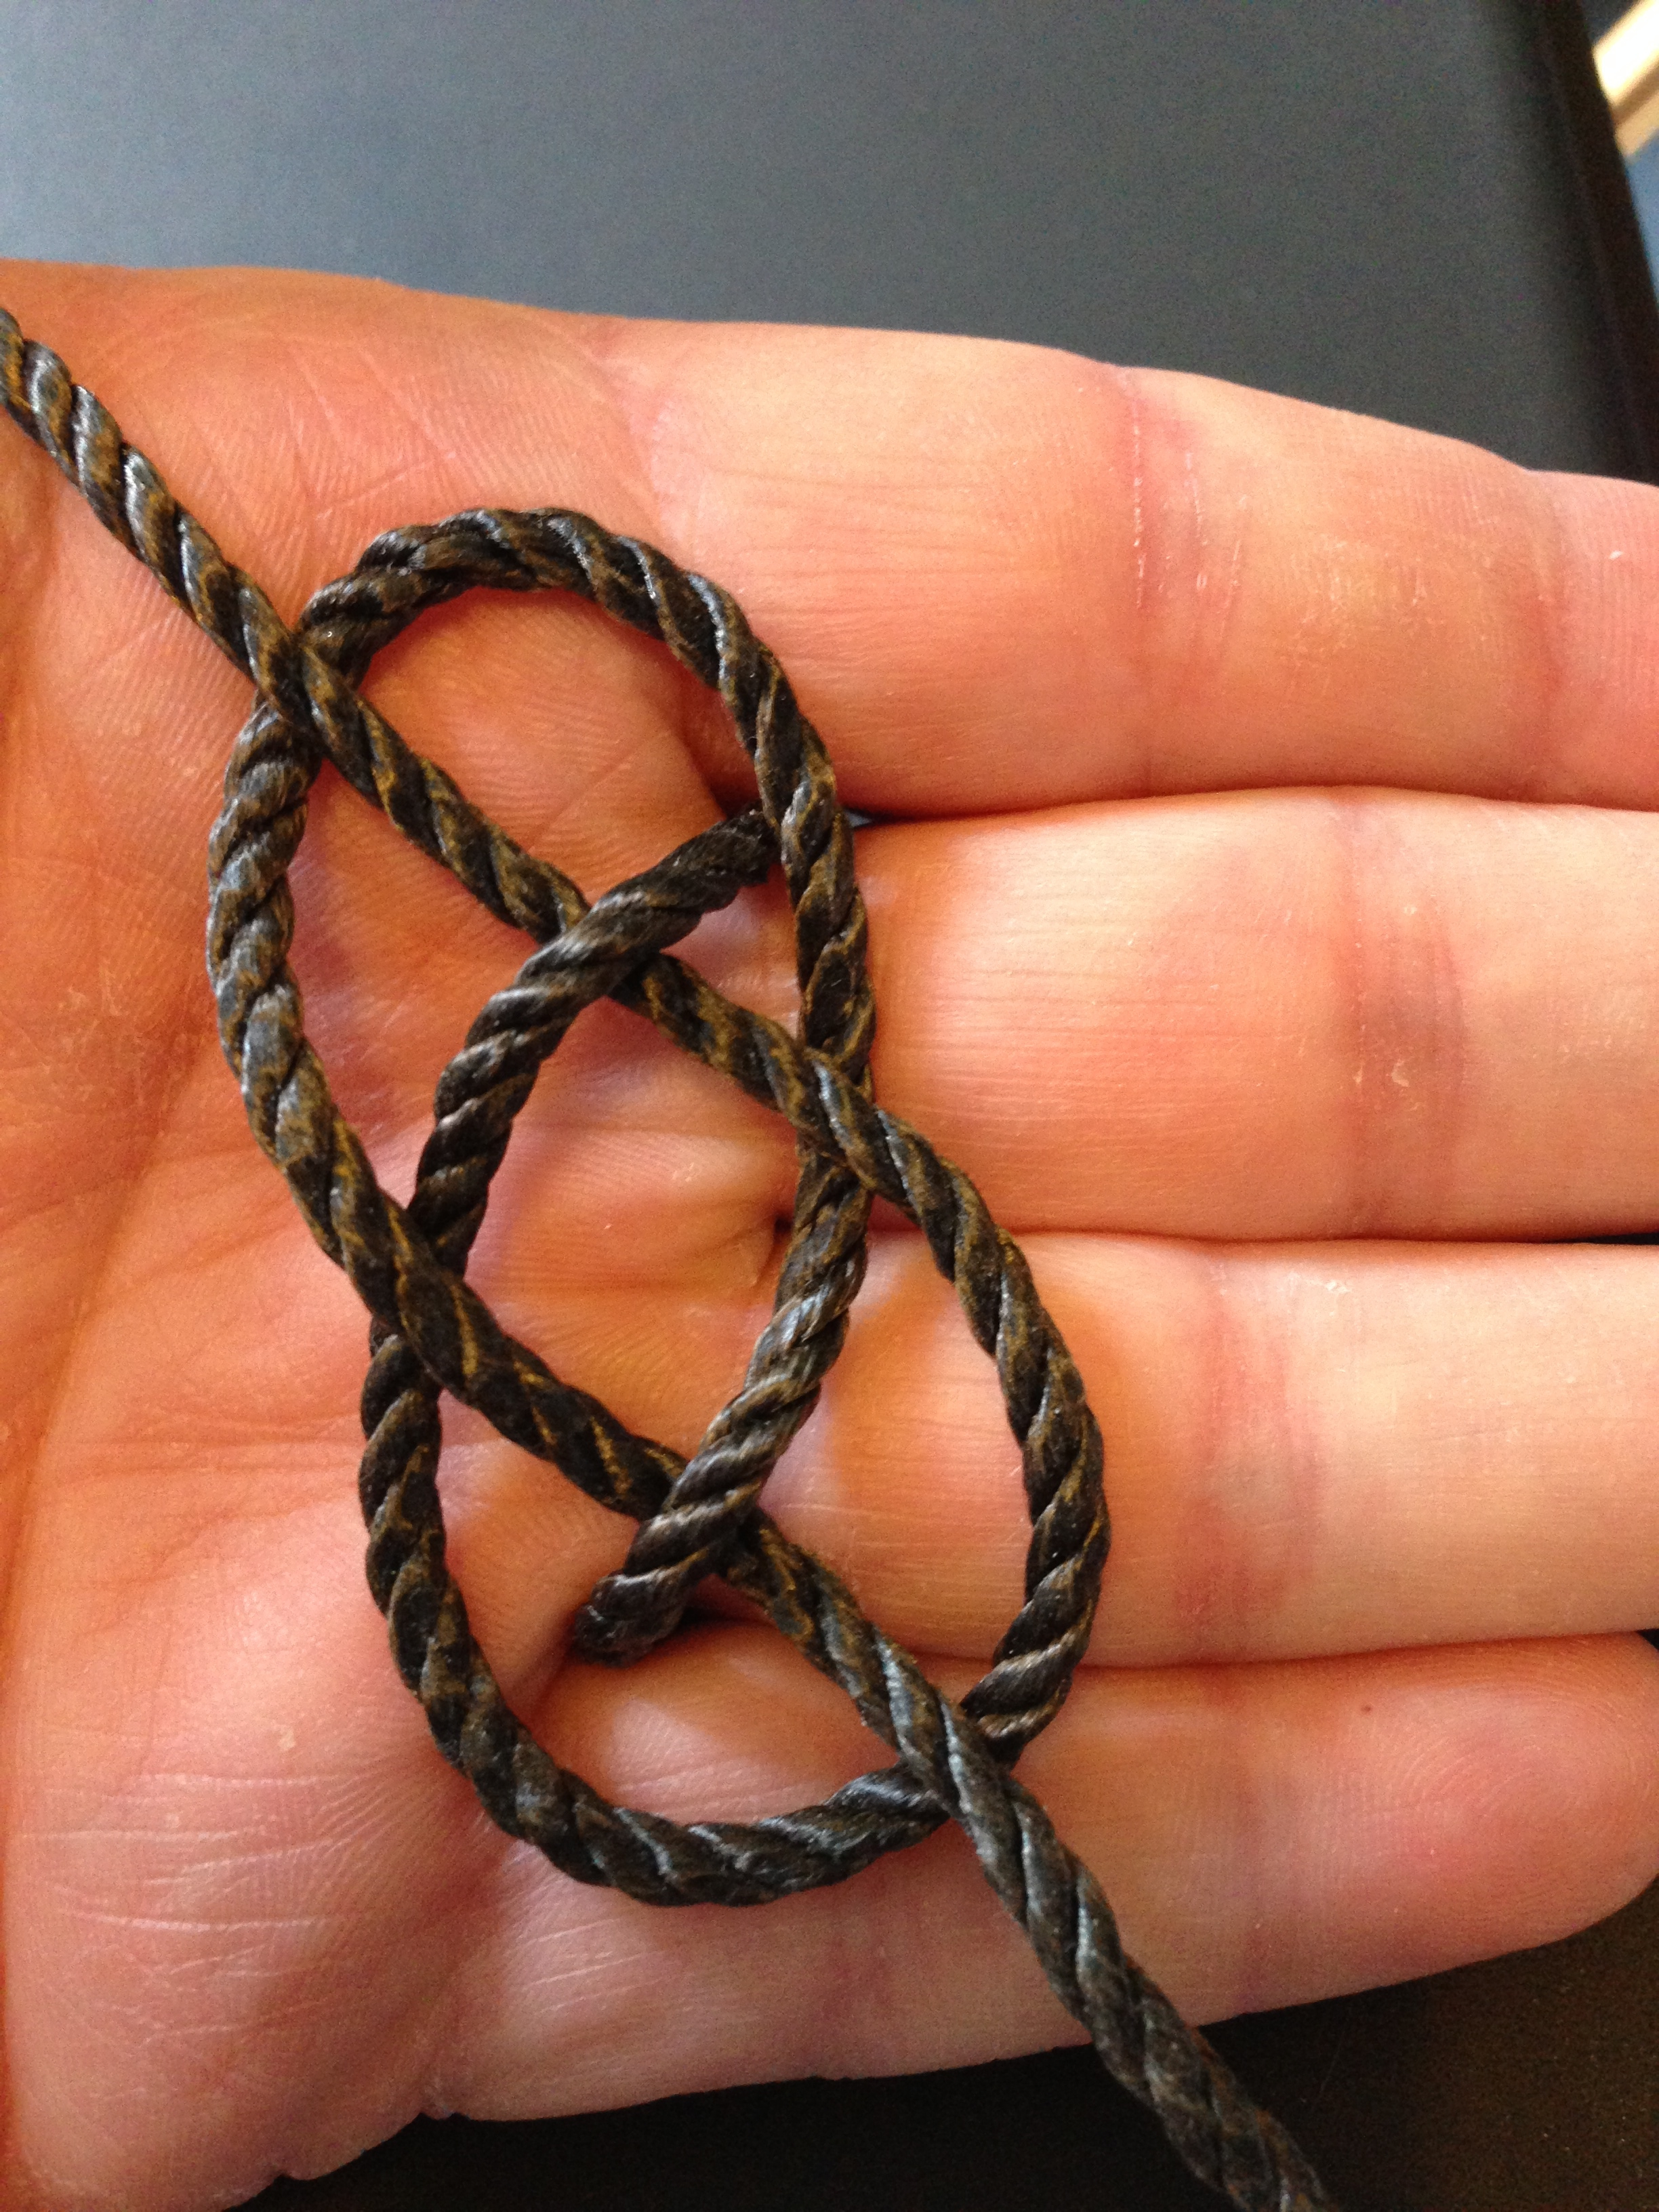
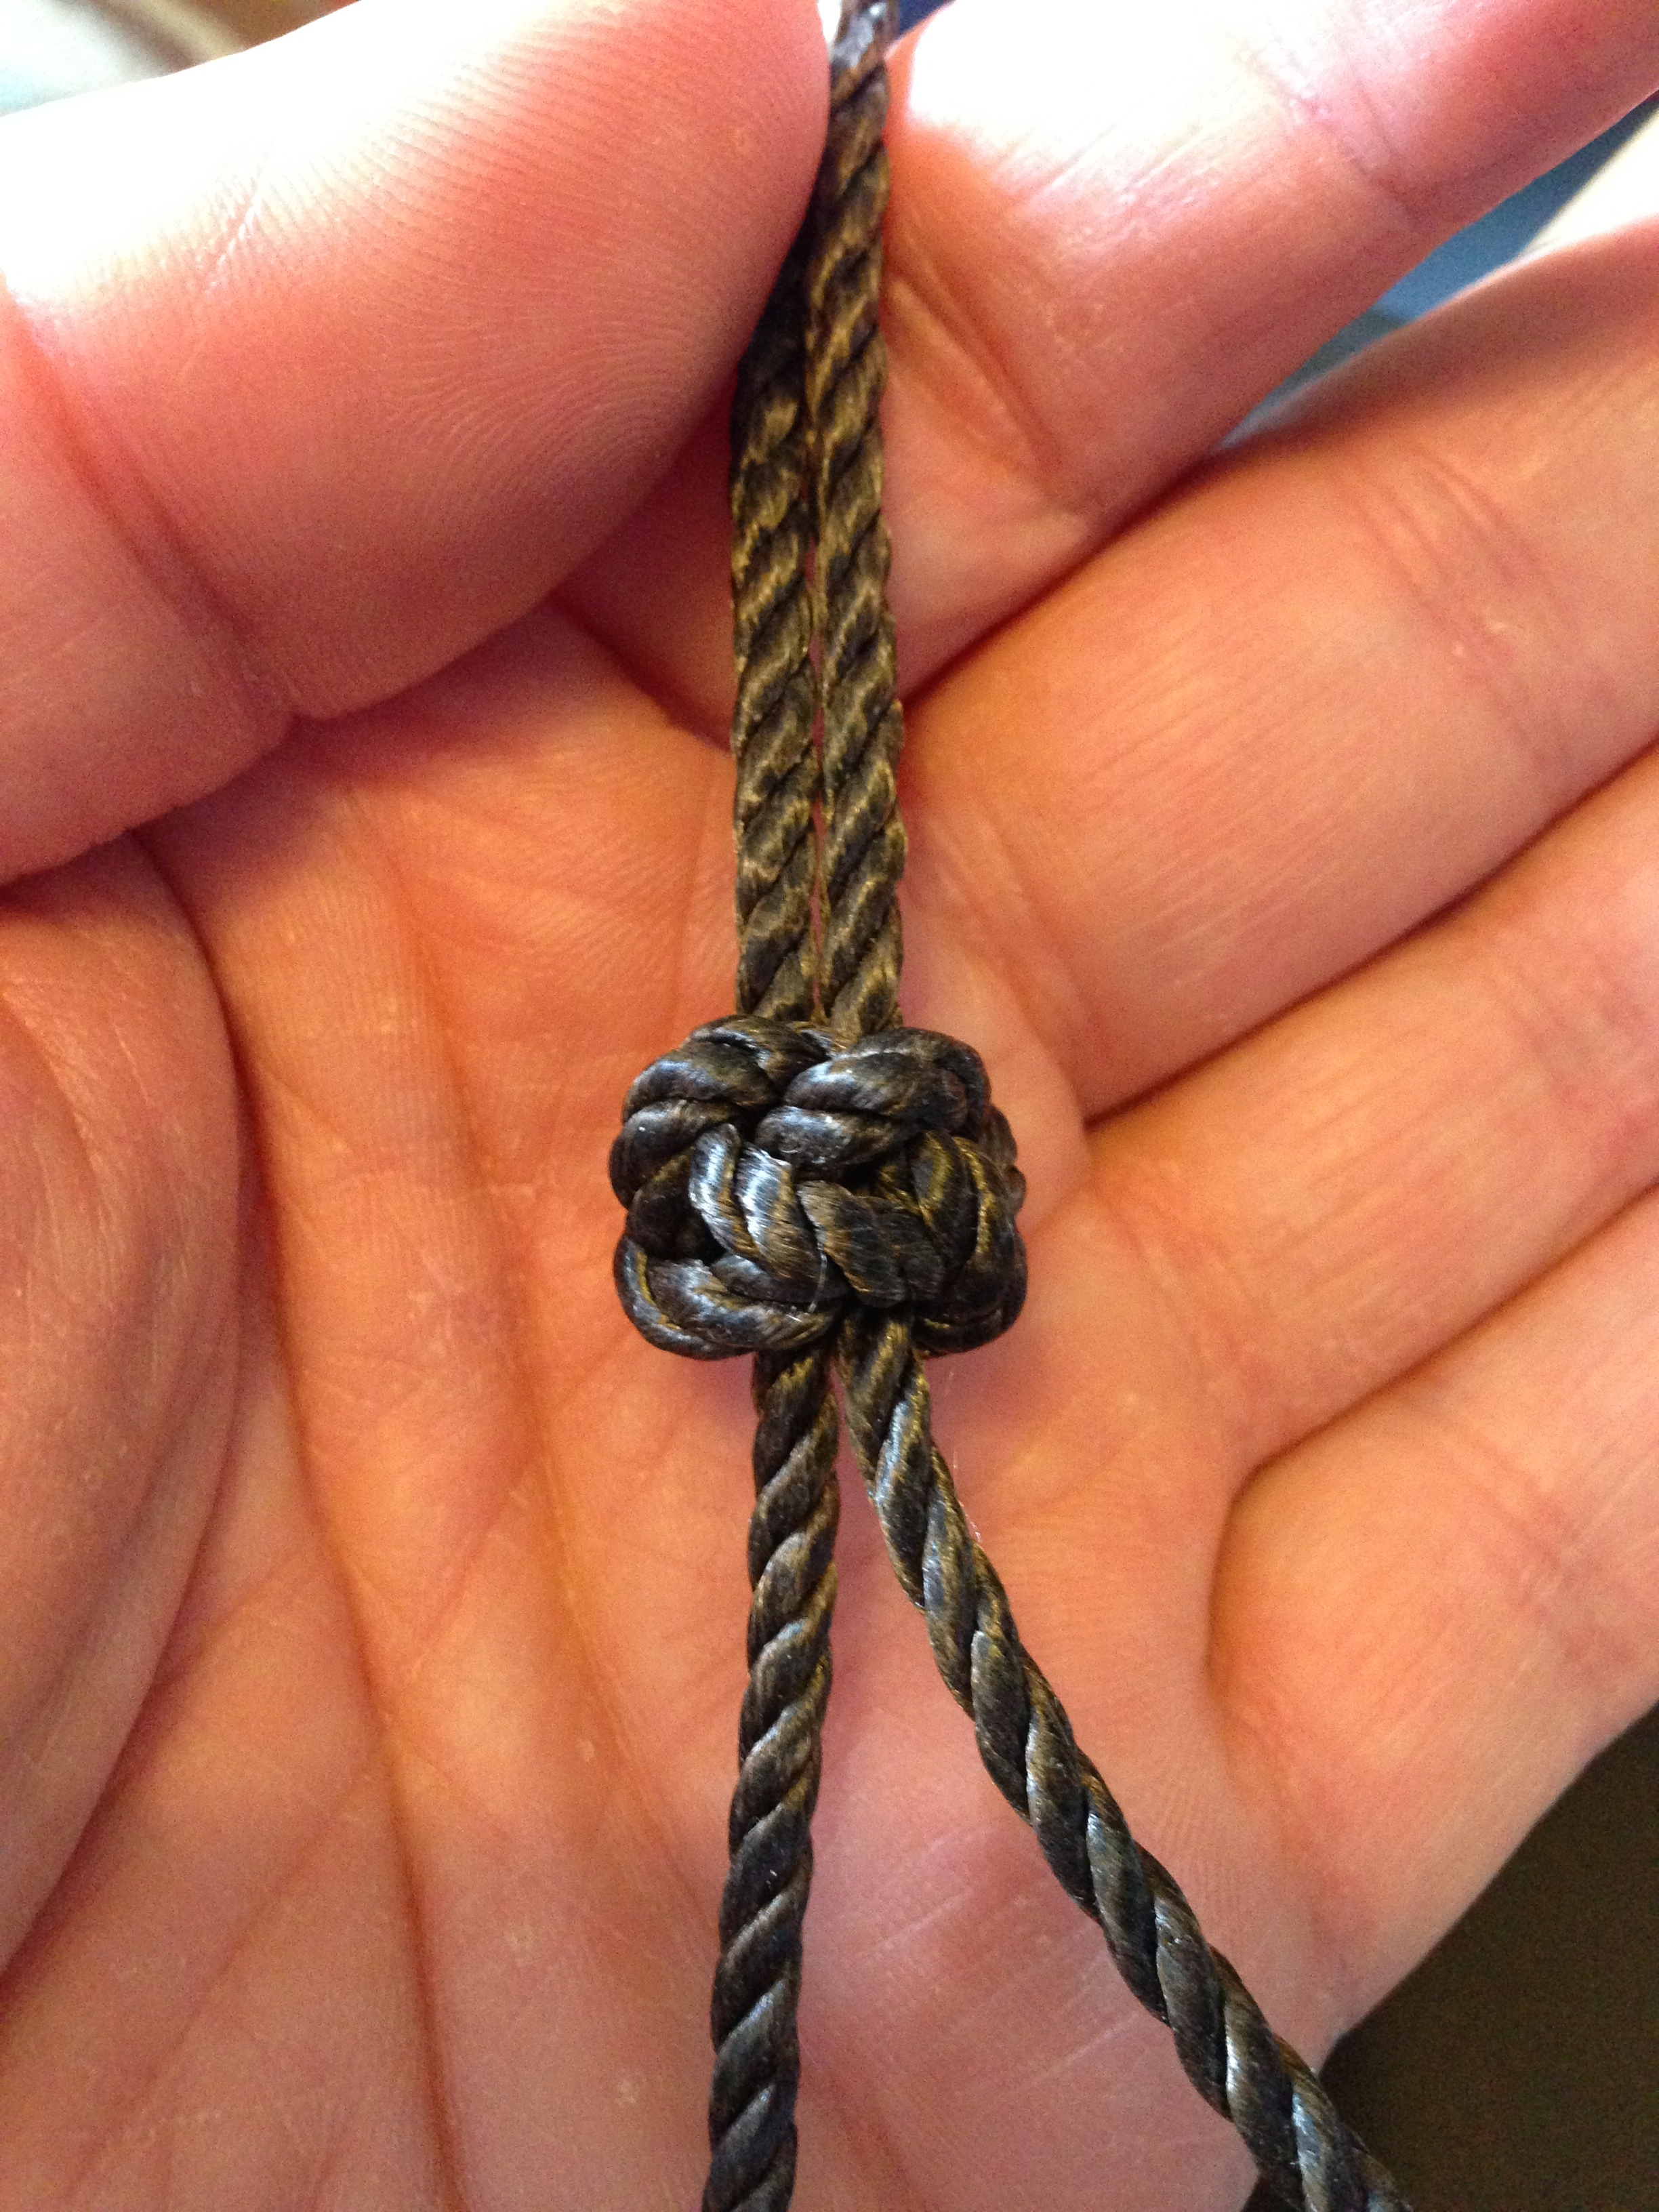
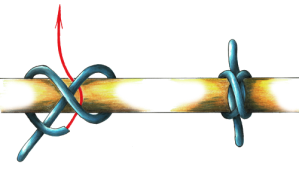
The wall knot is the reverse of the crown knot.  Like the crown knot, the wall knot is of limited use by itself.  However, when used is combination with other knots, the wall knot is the basis for a number of practical and decorative knots.  I have shown the knot tied with three strands but it can be tied in any multiple number of strands.  I find that three strands are ideal for learning this knot.

Continue reading

Posted in Illustrating, Knot Tying | Tagged , , , | Leave a comment

The Crown Knot

crown_knot_500x220The crown knot, in and of itself it has very little use.  So why did I go to all of the trouble of creating an instructional drawing and writing this post?  The crown knot, along with  the soon to be introduced wall knot, is the basis for a number of practical and decorative knots.  I have shown the knot tied with three strands but it can be tied in any multiple number of strands.  I find that three strands are ideal for learning this knot. Continue reading

Posted in Illustrating, Knot Tying | Tagged , , , , | 4 Comments

How Can I Make a Living as an Artisan?

workbench-paul-sellers-designThis is a question that is often asked on forums.  People discover that they like to work with their hands and dream about it becoming their day job. I think this notion is almost as popular as stealing away to a tropical island and living the good life.  I’ll admit that I’ve entertained both of these options.  In reality, neither of these options are as appealing as they seem in our fantasies.  The more appropriate and accurate question to ask is, “How much am I willing to give up to become a full-time artisan?”.

Of all the “big” names that we know in the woodworking community there are very, very few who make their living solely by building furniture. They teach, write, publish, entertain and build furniture to make their living. They travel quite a bit, going where the opportunities are. These are some of most established people doing this type of work and they are still doing whatever it takes to bring in an income. So where does that leave the rest of us?

Being an artisan has never been a lucrative career choice. Sure there are a select few who have made some big money, but most artisans toil away in anonymity all their lives and just do eek out a living. Is it a fulfilling life they lead? Do they wish they had chosen a different path that paid better? Chances are they would answer yes to both questions. At times anyway. Most of us who dream this dream of working as an artisan are middle-aged and deeply established on our current path. We have families, mortgages and car payments. We put in our forty to fifty hours a week, collect our pay and go home. Maybe we work a little in the woodshop, maybe not. That is a choice we can make because it’s our hobby. If we truly want to make this life/career change we first must take an honest look at what we are going to have to give up. Are we willing to give up a steady paycheck? Are we ready to work seven days a week? Are we ready to travel every weekend to craft fairs and trade shows, set up and take down a booth? Are we ready to fail for a while?  Small items are where most our money will be made.  Building one cutting board is fun.  Will it still be fun after building a hundred or more?  Are we ready to move our families to an area that offers more opportunities for selling our products?  Are our families ready to support us?   These are the hard questions that must be addressed before you can seriously consider this change.

So if you still want to take the plunge what are some steps that we can take to position ourselves for a better chance at success? First, we need to enter this endeavor debt free with several months to a year or more of cash in the bank to cover expenses.  Yes you read that correctly.  I said debt free with cash in the bank.  Are our skills at a level commensurate with that of a professional and can we honestly charge people money for what we produce?  This is the real world, we need a well thought out and executable business plan.  Where are we going to sell our products?  Consignment type shops, craft fairs and/or the internet.  Are we going to set up a true brick and mortar store?  No matter which path or combination of paths we choose, we need a website, email address and business license.  That’s the world we live in.  So that’s a whole other area that we need to get a handle on. I could go on but I think you have the gist of it.

Transitioning an activity from hobby to career is a risky proposition.  What is fun as hobby can quickly become drudgery once money enters the equation.  As for myself, I’ll work on becoming debt free and hone my skills.  I’ll continue to enjoy my time in the shop and share what little I know and learn here on this blog.  Maybe helping the next person with their dream.  If I take it further remains to be seen….of course there’s always Tahiti.

Greg Merritt

Posted in Thoughts-Views | Tagged , | 14 Comments

Geometric Construction-Octagon from a Square

If you work wood sooner or later you will need to create an Octagon from a Square.  Maybe you are preparing a table leg, creating a table top or maybe a lamp base.  You may want to layout a picture or mirror frame.  There are a multitude of projects where the octagon will come into use.  There are also several ways to accomplish this task, the one I have included here is quick and accurate. Continue reading

Posted in Design, Geometric Constructions | Tagged , , | Leave a comment

Lanyard Knot-Photo Tutorial

I thought a few photos may be useful for those of you who are trying to learn to tie the lanyard knot.  I do not show the loop being passed through an object here but you will obviously need to first pass your twine through your object (fid) before beginning your lanyard knot.  Once you do so that object will be on the back side of your hand while tying the lanyard knot.  So hope this proves useful…

lanyard_knot-01

Pass twine up between your fingers from the back side of your hand.

lanyard_knot-02

Begin the lanyard knot.

lanyard_knot-03

Start with the lower strand and form a loop.

lanyard_knot-04

Pass the upper strand under the tail of the first strand.

lanyard_knot_begin


lanyard_knot-05

Continue by weaving the strand over-under-over.


lanyard_knot-06

Take the lower working end, bring it up and then down under three strands and out through the middle of the knot. Be sure you pass to the left of the top strand coming up between your fingers.

lanyard_knot-07

Take the upper working end, bring it down and then under three strands and out through the middle of the knot. Be sure to pass to the right of the lower strand that is coming up through you fingers.

lanyard_knot-08

Slowly draw the knot taut. Take your time and work out the slack a little at a time. Once taut you can adjust the size of the loop by working slack in or out of the knot.

Posted in Knot Tying | Tagged , , , | 4 Comments

The Constrictor Knot

constrictor_knot_imageThe constrictor knot is a very effective binding knot and was first termed by Clifford Ashley in his seminal work, “The Ashley Book of Knots“.  Although Mr. Ashley implied that he invented the knot, further research has shown that the knot actually existed under other names many years before Ashley’s claim.  Although I agree that the history of such things is important for posterity, the actual knot is where my interests lay and I will leave its origins for you to discover on your own. Continue reading

Posted in Illustrating, Knot Tying | Tagged , , , , | 8 Comments

End Tables Part 1

The current Woodworking Masterclasses series is a sofa table.  The high narrow type that is most typically found placed behind the sofa.  The series is a primer on building tables and is presented in Paul Sellers usual thorough manner.  If you have not taken a look at WWMC, you really should.  Paul Sellers’ instruction methods are top-notch. Continue reading

Posted in Design, End Tables, Illustrating | Tagged , , , , | 5 Comments

Build Yourself a Fid

The fid is a simple shaping project that will yield a very useful tool if you are going to undertake knot tying.  In my layout 1/4D=6mm chisel.  You can use 1/4″-3/8″ or 6mm-10mm chisel to set the width of 1/4D.  Then complete the module and then the layout.  For my fid I used a piece of white oak but any hardwood will work just fine.  I shaped my fid by removing the bulk of the waste with a chisel, refining with a spokeshave and following up with a card scraper.  Then I waxed and burnished it with the polissoir and another piece of hardwood where the polissoir would not work (the rounded end).  You don’t really need to put a finish on your fid but it helps to keep it clean.  Wax and oil finishes are probably the best bet for a working fid.  I’ve tried using shellac and it tends to be worn off during use. Continue reading

Posted in 5-Tools, Fid, Illustrating, Knot Tying | Tagged , , , , , | 2 Comments

Fid and Marlinspike

The fid and the marlinspike are the knot tyer’s most trusted tool.  I suspect that its been that way since humans first started tying knots and discovered that a sharp stick could make it all the easier.  The distinction between fid and marlinspike is a little fuzzy. Essentially the fid, typically made of a natural material, is employed when working with fibrous ropes and lines.  The marlinspike, typically made of steel, is employed when working with wire cables.

fids

Fids from plastic pipe, wood and antler.

The fid was the traditional tool of the sailor from the dawn of sailing all the way into the beginning of the last century.  It was used to loosen and tighten knots.  It was used to separate the strands of rope for splicing.  The fid was used as a club and a temporary pull handle.  It was used to shape hand sewn grommets in sails and clothing.  After the knife, it was the sailors most important tool.  The fid was often a handmade affair and was sized according to the size rope that was being worked.  Wood, bone and antler being the predominant choices.  Its an easy tool to make for yourself and can be made from just about anything you have available.   This simple tool had a good long run and is still of use to those who work with traditional ropes and cordage.  As ships began to transition to mechanical power and rigging was replaced with wire cables, the fid fell out of favor.

marlinspikes

Marlinspikes from awls and sail needle. Center one is purpose built marlinspike.

The marlinspike is a modern version of a fid.  When steel cables began to replace fiber ropes in rigging operations it became quickly apparent that a tool would be needed to take the place of the trusted fid.  The steel marlinspike was the answer to that need.  It was specifically designed to aid in the spicing of multi strand steel cables.  Along with steel cable came the modern metal screw pin shackle.  screw_pin_shackleThe hole in the pin serves a few purposes, one of which is to allow the insertion of a marlinspike to aid in the loosening and tightening of the pin.  Just like its predecessor, the marlinspike is available in several sizes based upon the size of cable that you are working with.  The is also a popular folding tool configuration that combines a knife and on one end and a marlinspike on the other.  If this pocket tool appeals to you let me give you a word of caution.  Do not buy one of these unless it has a locking marlinspike.  If the marlinspike doesn’t lock in the open position it is an accident waiting to happen.

Since what I’ll be sharing on here will mostly concern working with twine, either a small fid or small marlinspike will serve you well.  I’ll soon be showing how I build and decorate a small fid that you can make from any hardwood scrap you have in your shop.

Greg Merritt

Posted in 5-Tools, Knot Tying | Tagged , , | 11 Comments