
 I really like the staked furniture method. I like the design process and the making. Consequently, I have several staked projects on the “to-do” list. Since I don’t own or plan to add a lathe to my shop, the tapered, octagonal leg is my leg design of choice. I also typically design my projects with proportions. So I am faced with a choice. Either design new leg proportions for each project or come up with a standardized method for making the legs.
The legs for the majority of my planned projects, even with unique proportions applied, are so similar that there is virtually no visual difference between them. So a standard layout method should be just fine for most of my planned projects. As a bonus, there should be less chance or error with an internalized standard method…at least in theory.
In my last post I discussed the “octagonizer”(aka spar gauge). A simple proportional gauge that aids in the speedy layout of an octagon. It’s a handy little thing but, in addition to laying out an octagon, I wanted to find a way to proportionally taper my legs as well. So I explored several different ways of solving the problem, but kept coming up short. Eventually I hit on a solution though. I had been expecting the solution to be complex and had continually overlooked a simple solution.
I recently built a couple of footstools, here and here. While laying out the legs I played around with a few different methods. CW presents two ways of making an octagonal, tapered leg in his “The Anarchist’s Design Book”. Those methods work fine, but still rely on dimensions as well as two rounds of layout. The first step in cutting removes half of the layout marks. So I pulled out some scrap paper, compass and straightedge. That is when I hit upon this:
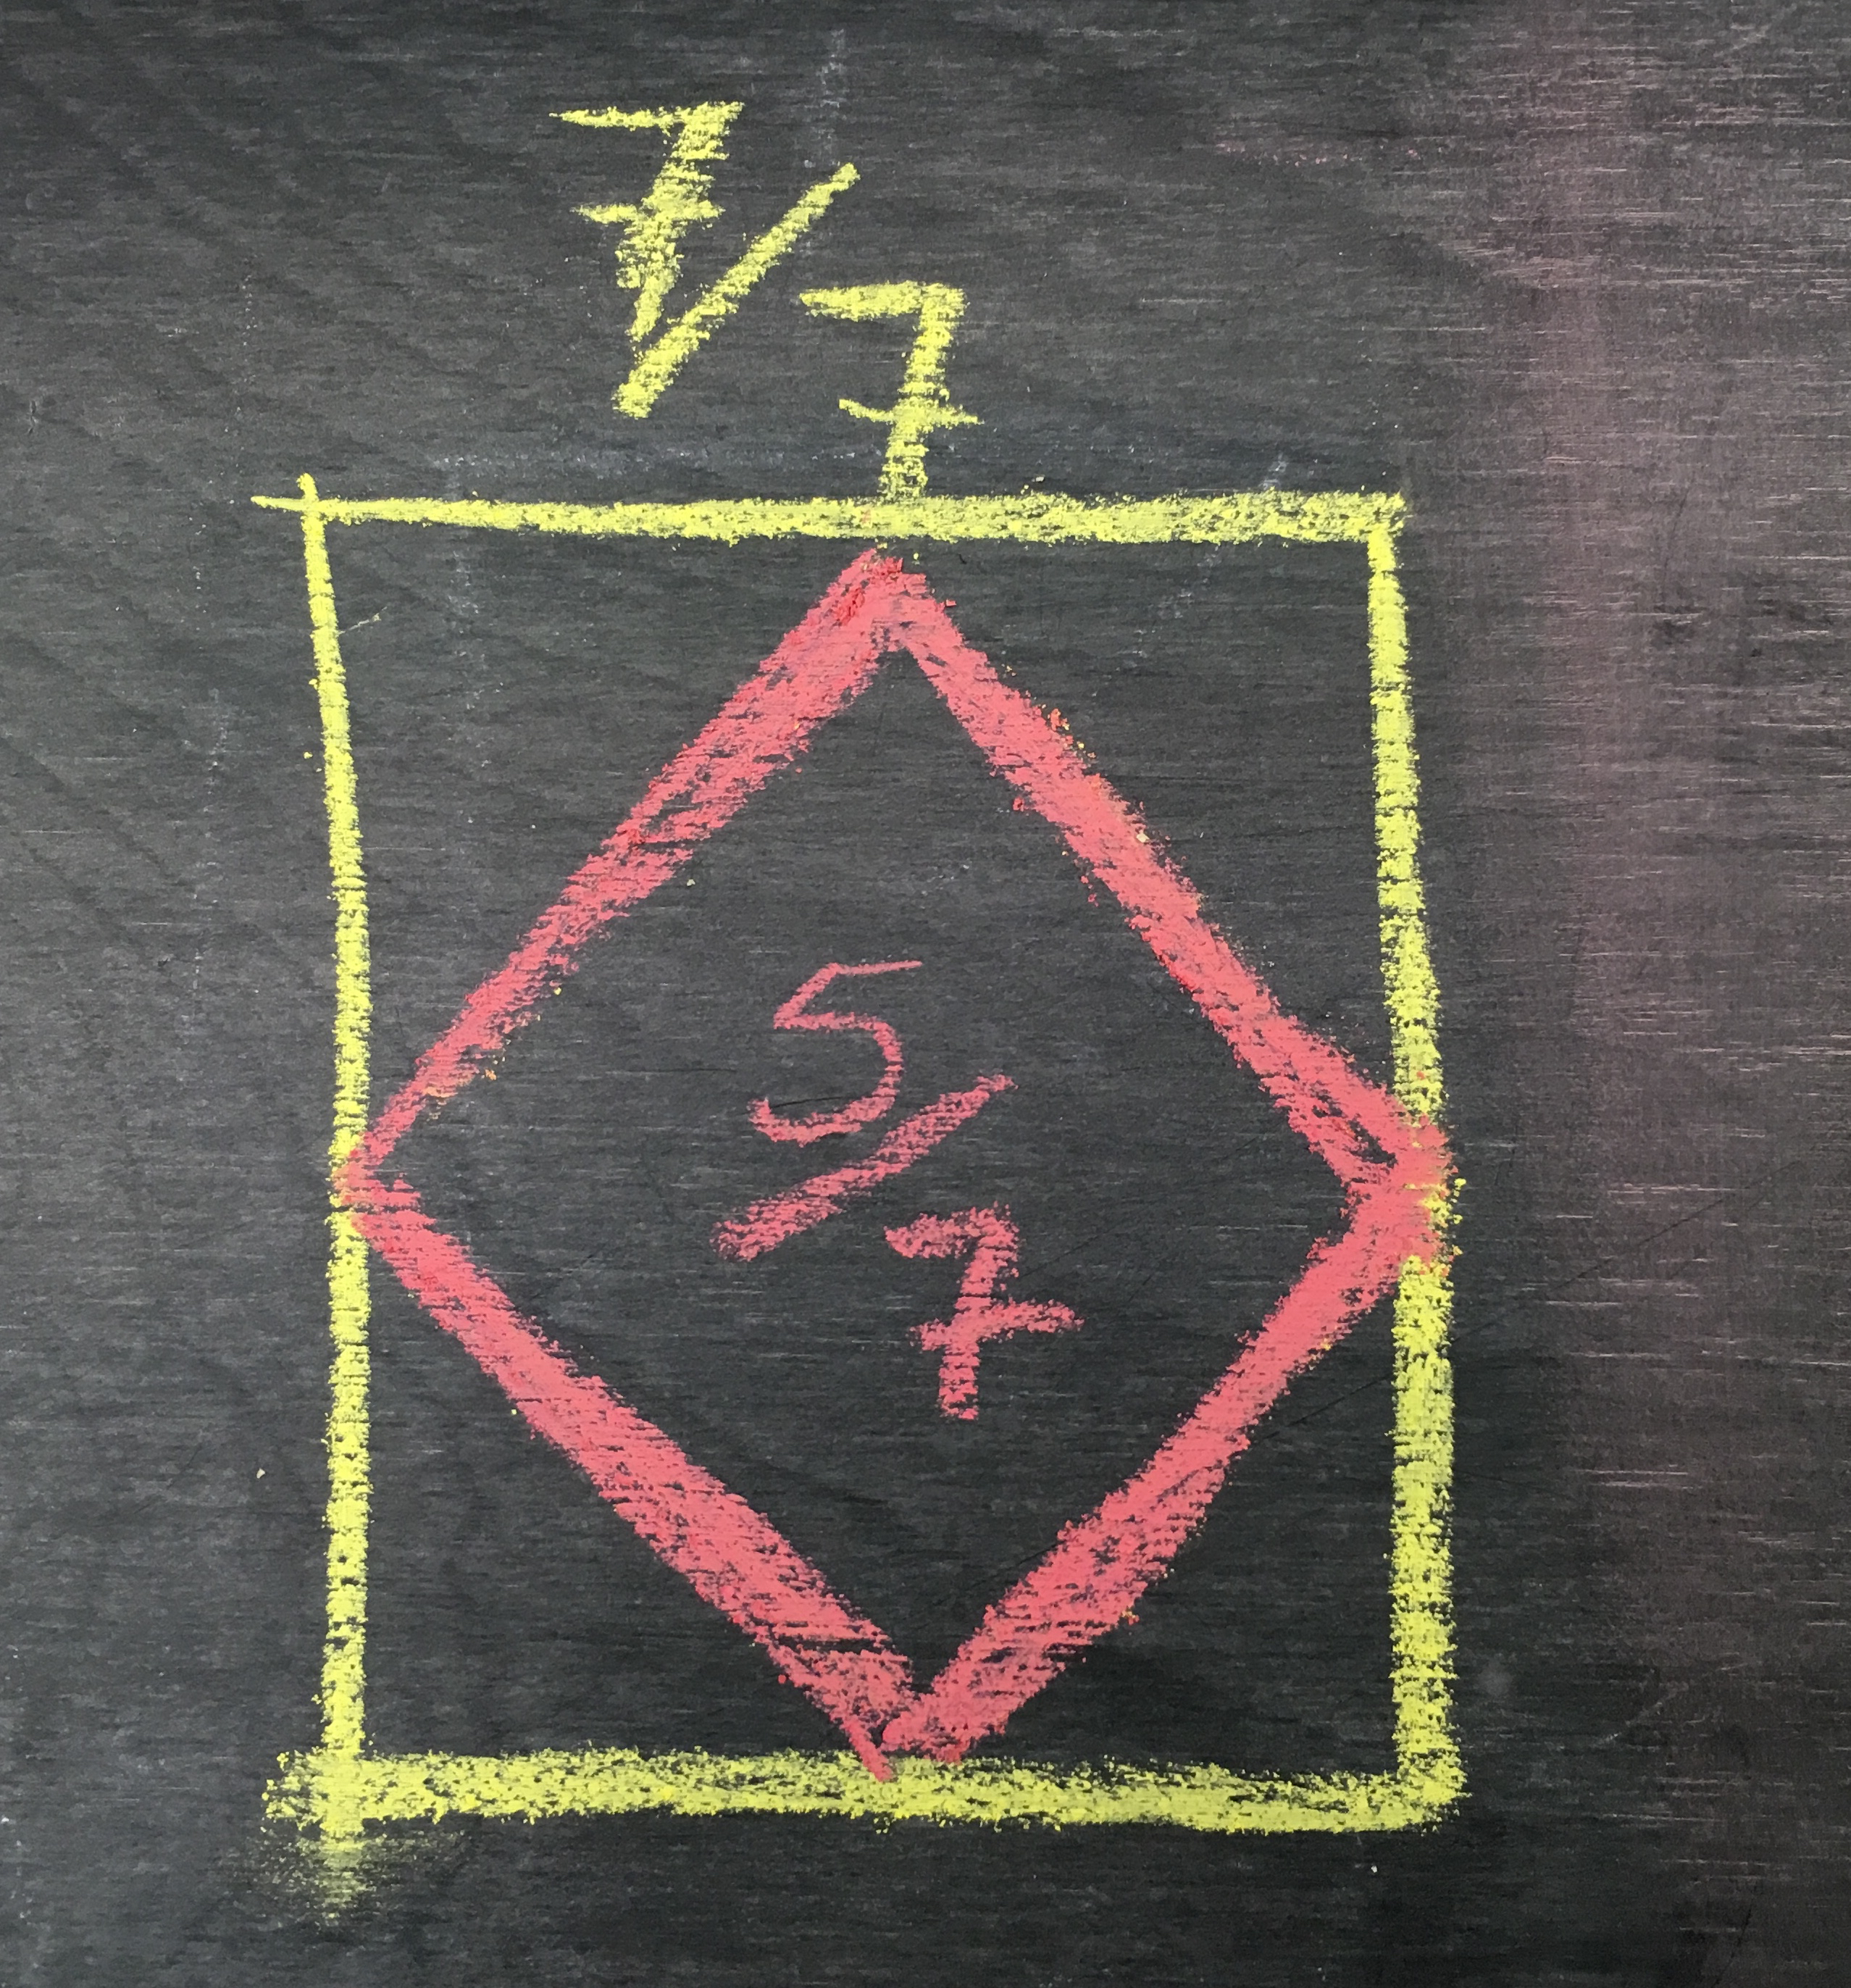
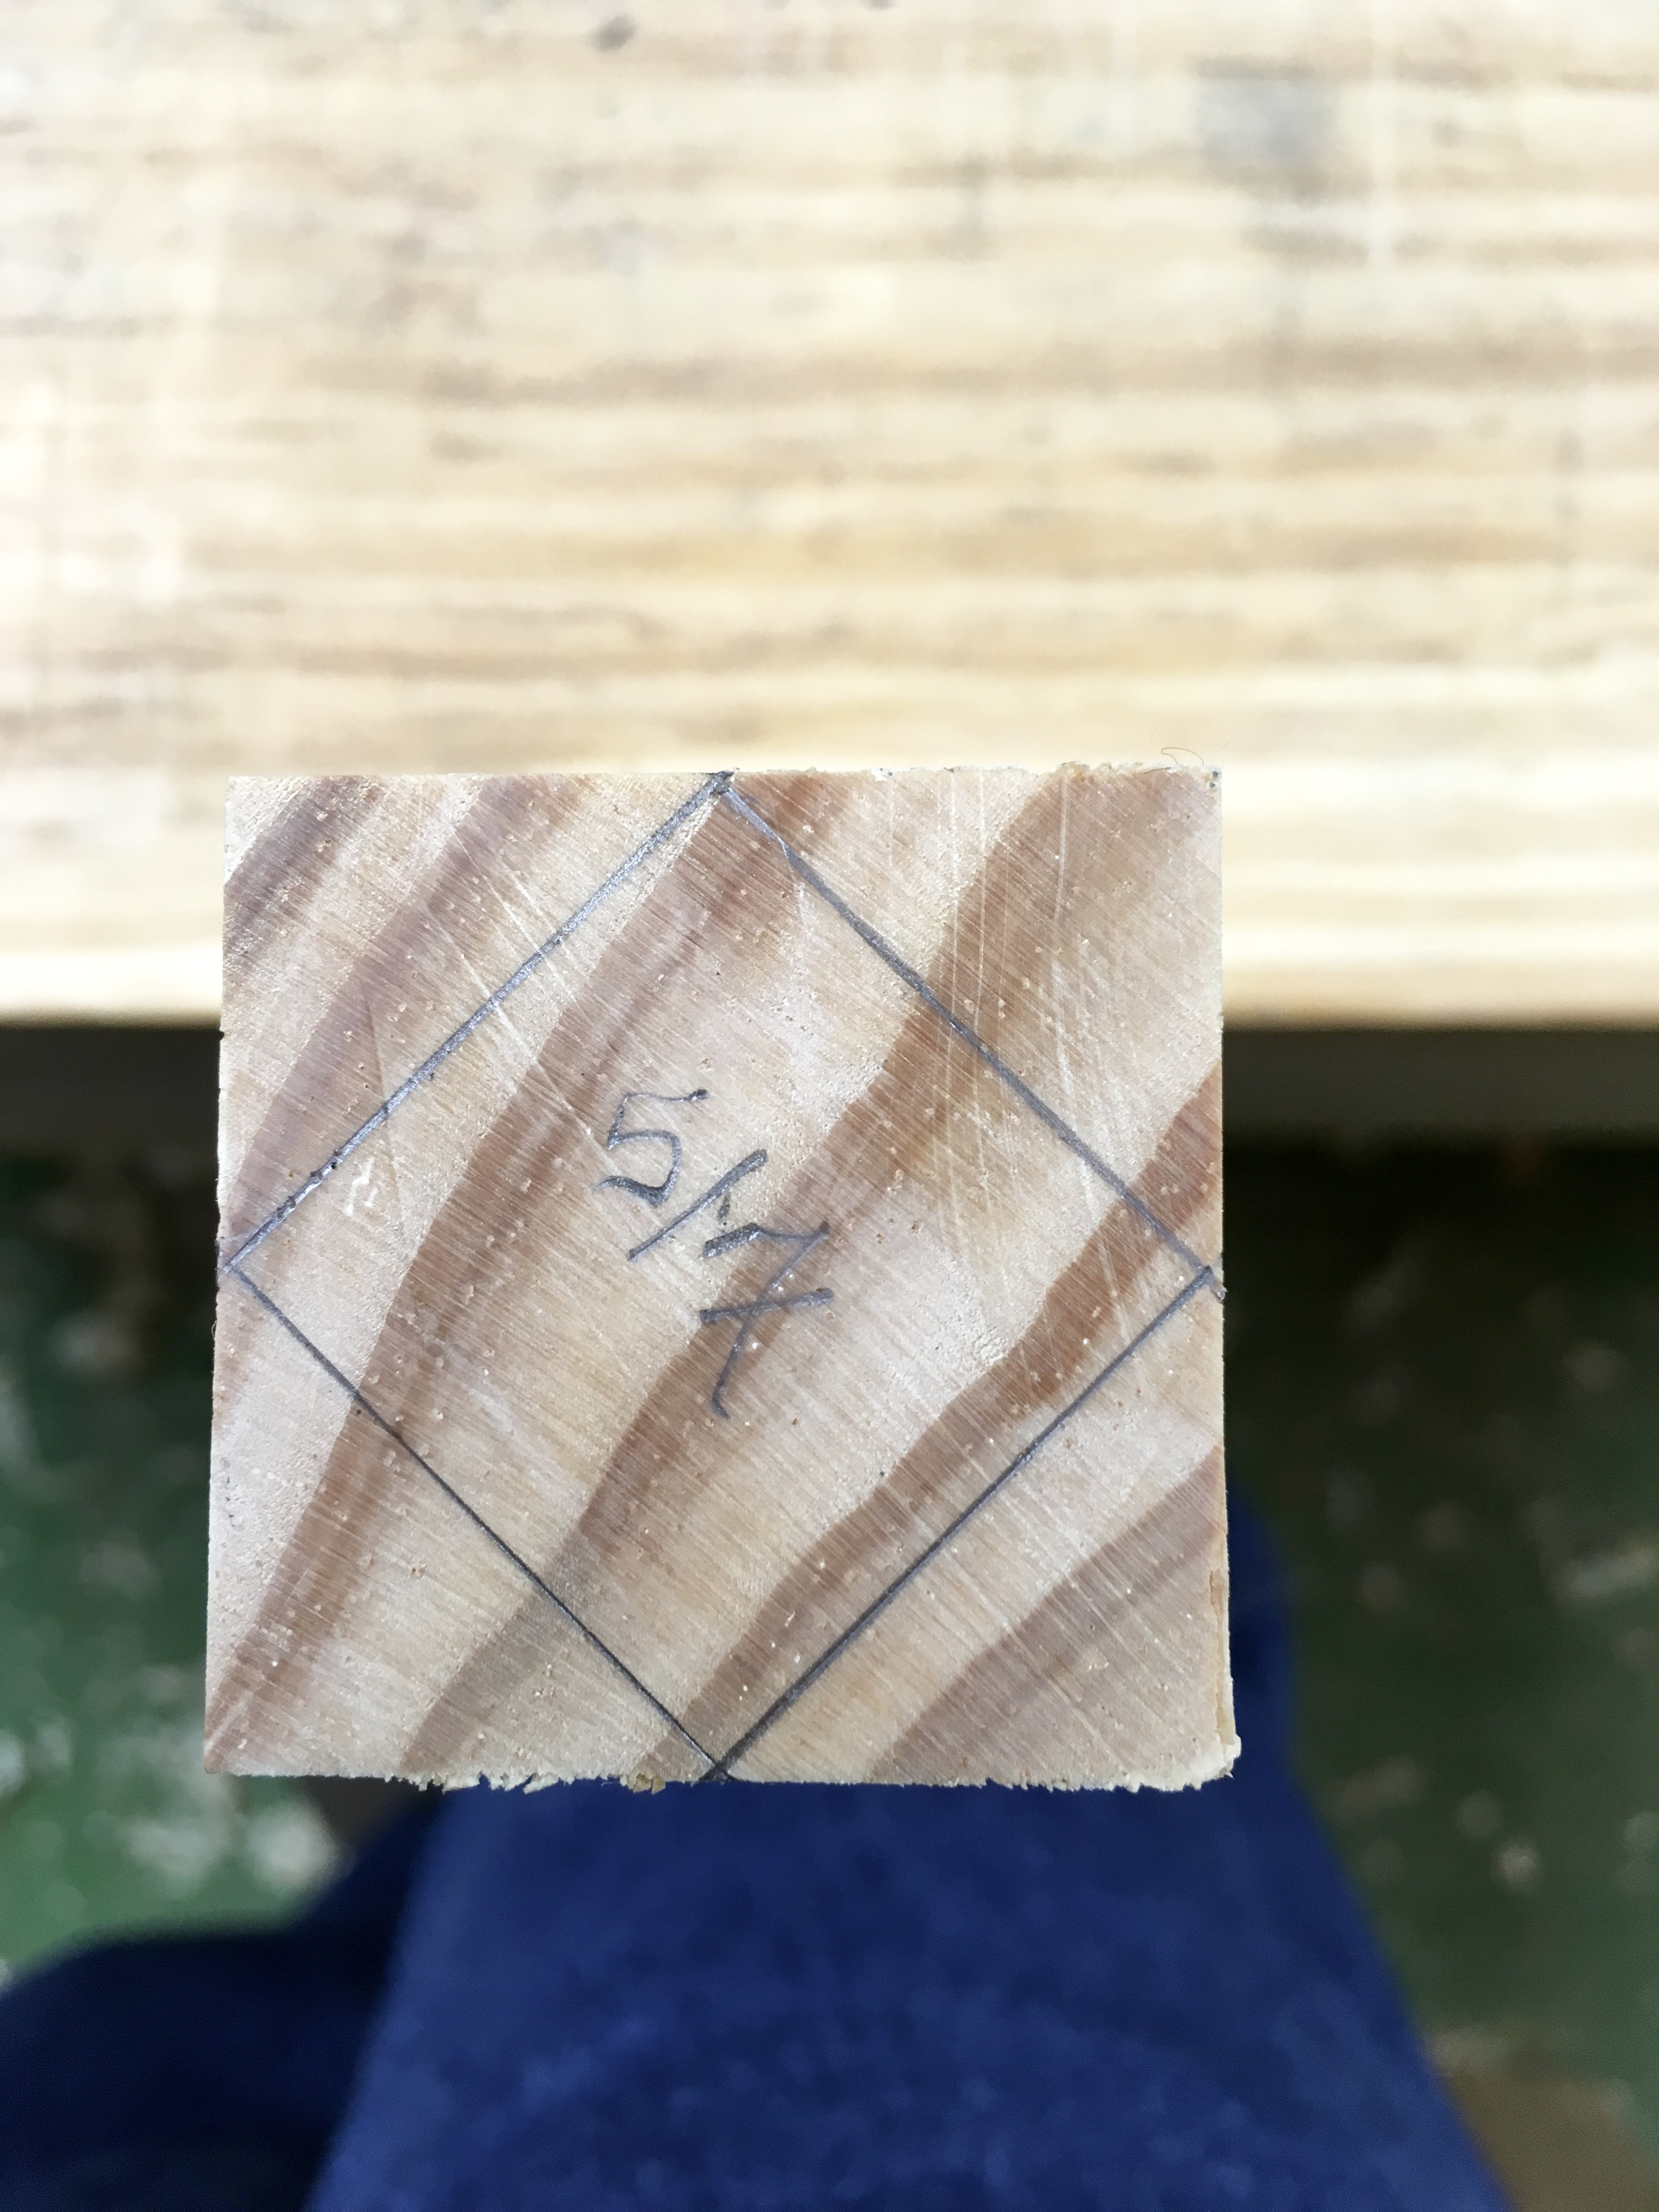
Doesn’t look like much, but it has a proportional relationship! The smaller, rotated square is 5/7th the larger, original square. So I tried laying out and cutting a leg using this rotated square method. Worked great! One round of layout and cutting was all that was needed. So now I had a proportional way of laying out my legs. Now, can I make it more standardized and faster to layout?
It was at this point that I became aware of the “octagonizer” and explored how to make it. While working on the layout for the “octagonizer” something jumped off the page at me. The “octagonizer” is really just a proportional gauge. I should be able to add a pin 1/7th the distance from the guide pins and gauge the taper for my leg. Sure enough, worked like a charm. Hey, I need the center marked too. Might as well add a pin for that too!
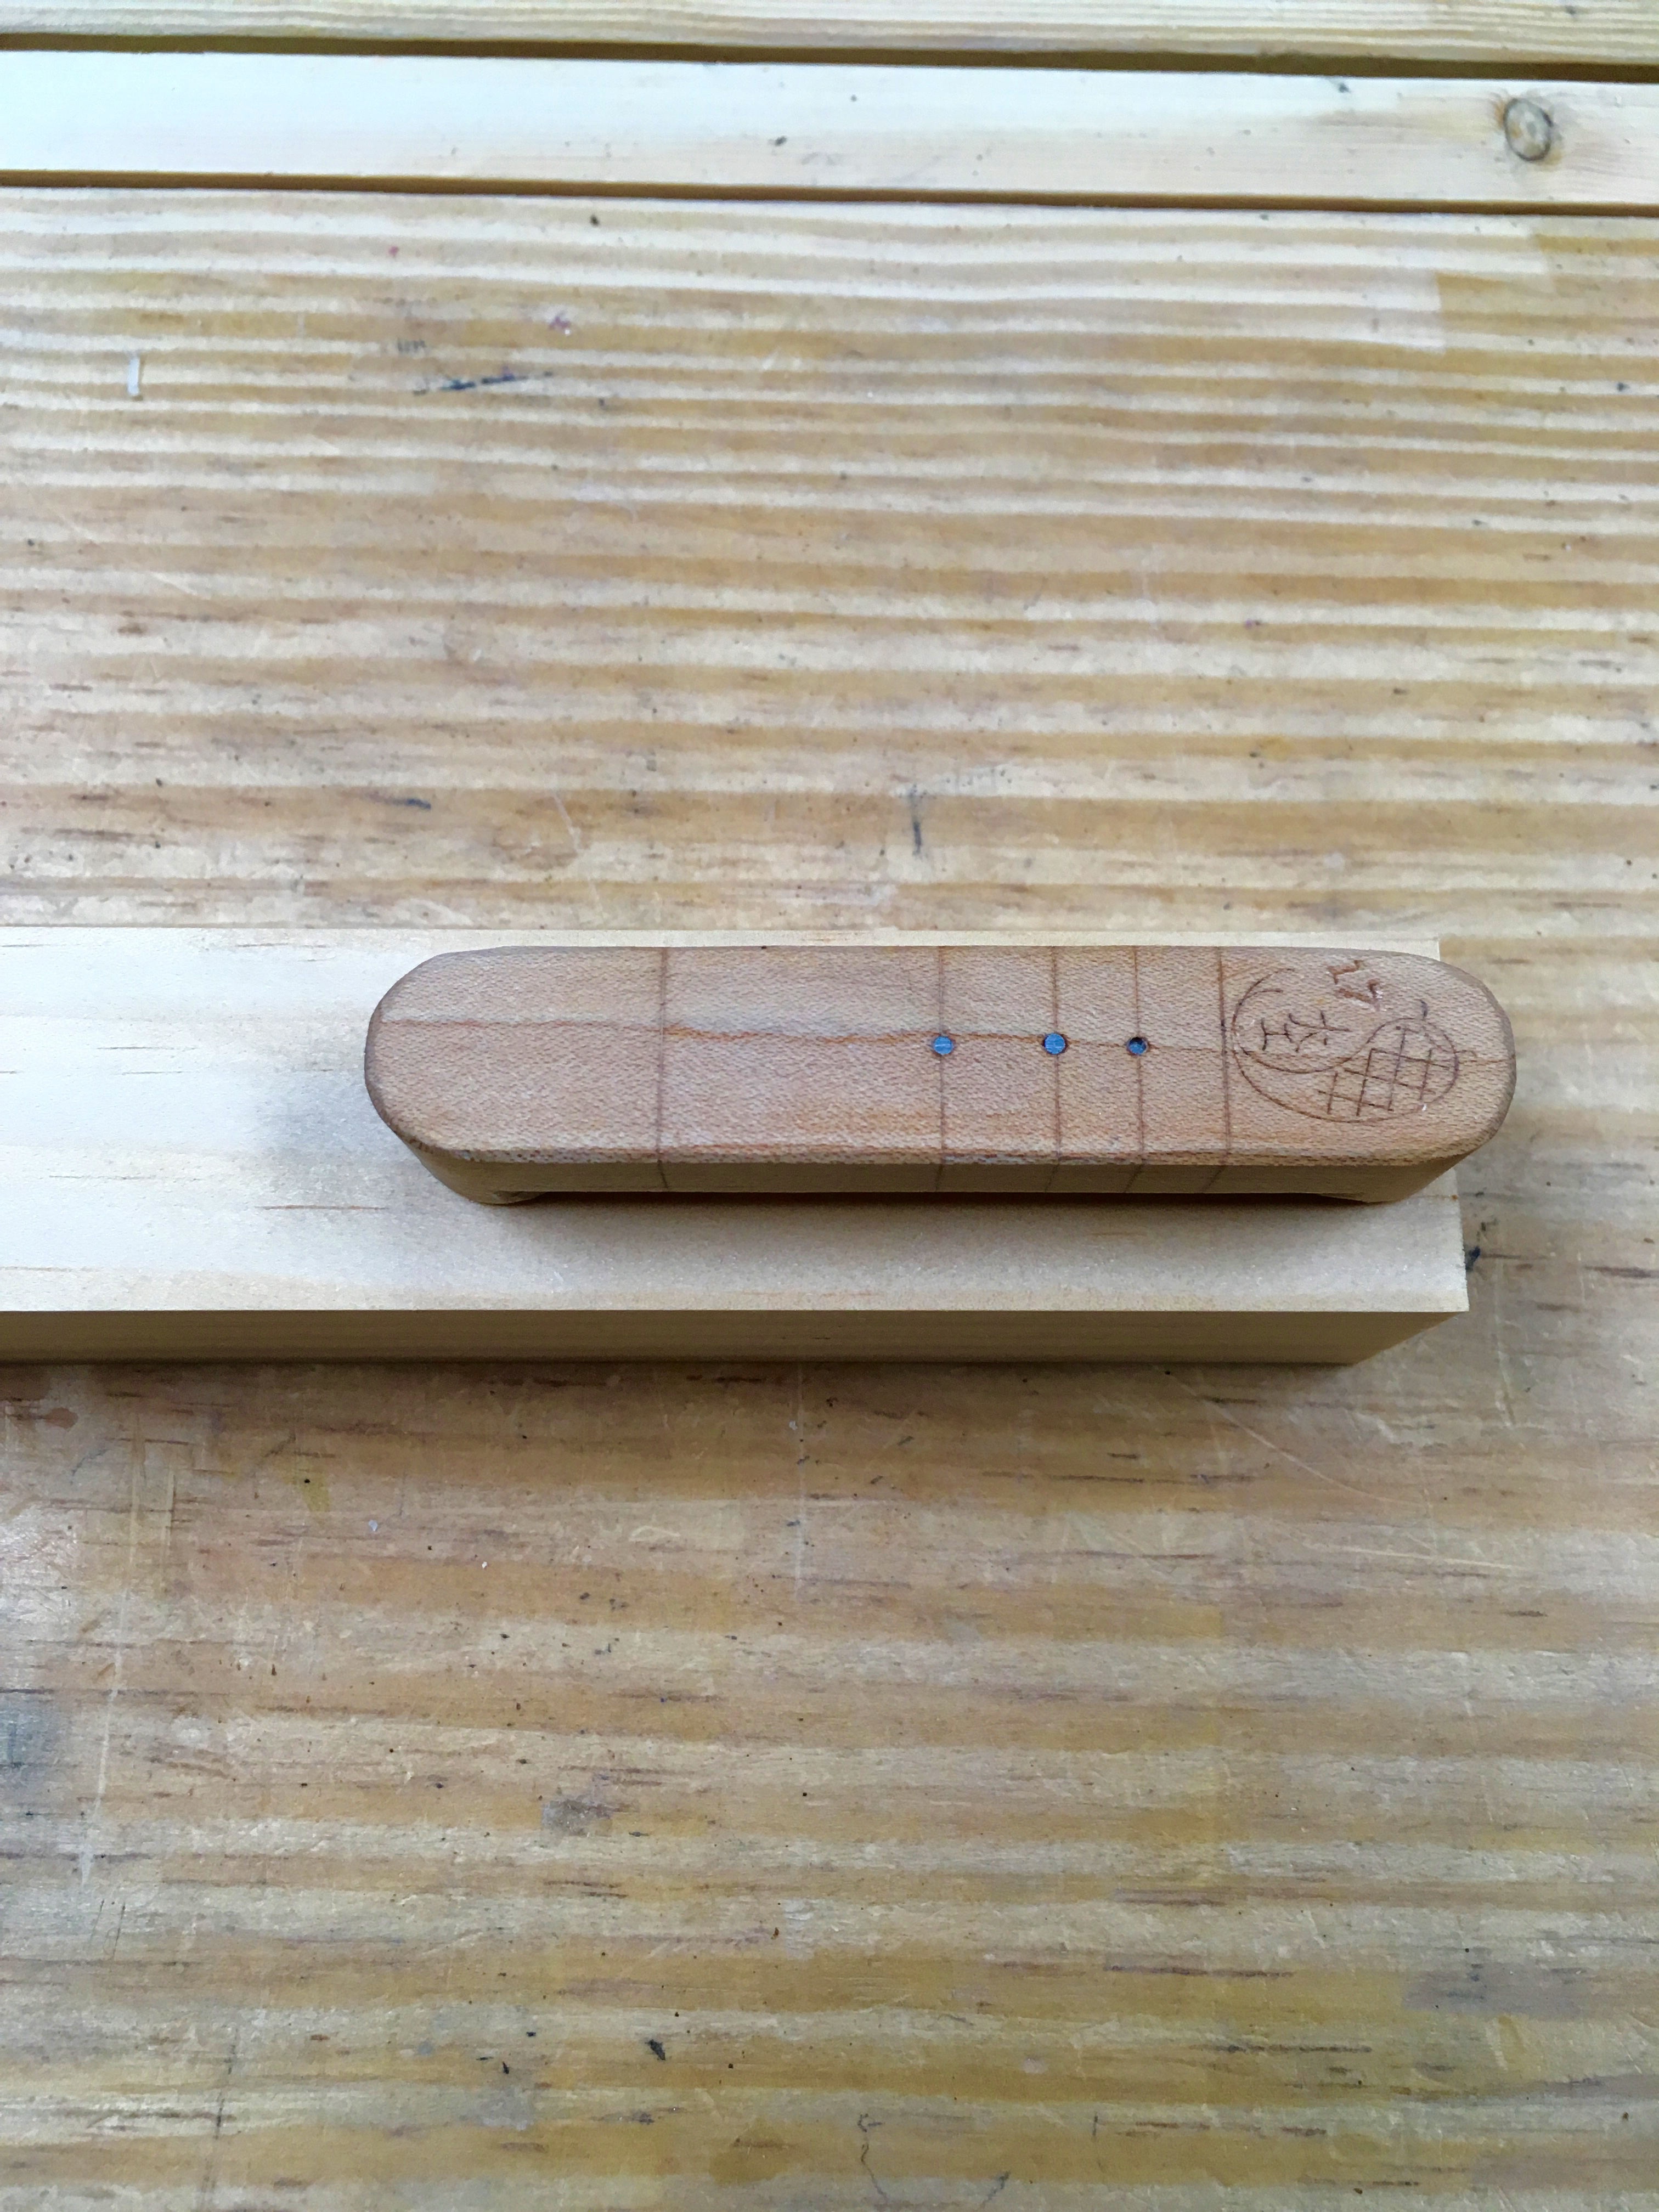
So I redesigned the gauge to produce all of the information I need to layout an octagonal, proportionally tapered leg for staked furniture. It marks the corner of the full width octagon, the 1/7th taper for each face, the center of the stock face and the length of the tapered tenon area. Oh, did I not mention that I designed the gauge so that it’s full length is equal to the length of the tapered tenon area? This one gauge gives me all the distances I need on stock up to 1-7/8″(48mm) thick in section. As well as a consistent 7:5 taper no matter the length of the leg. Not too shabby for a scrap of wood and three nails! Thus the OCTA-LEG-PRO was born.

Here is how I use it.
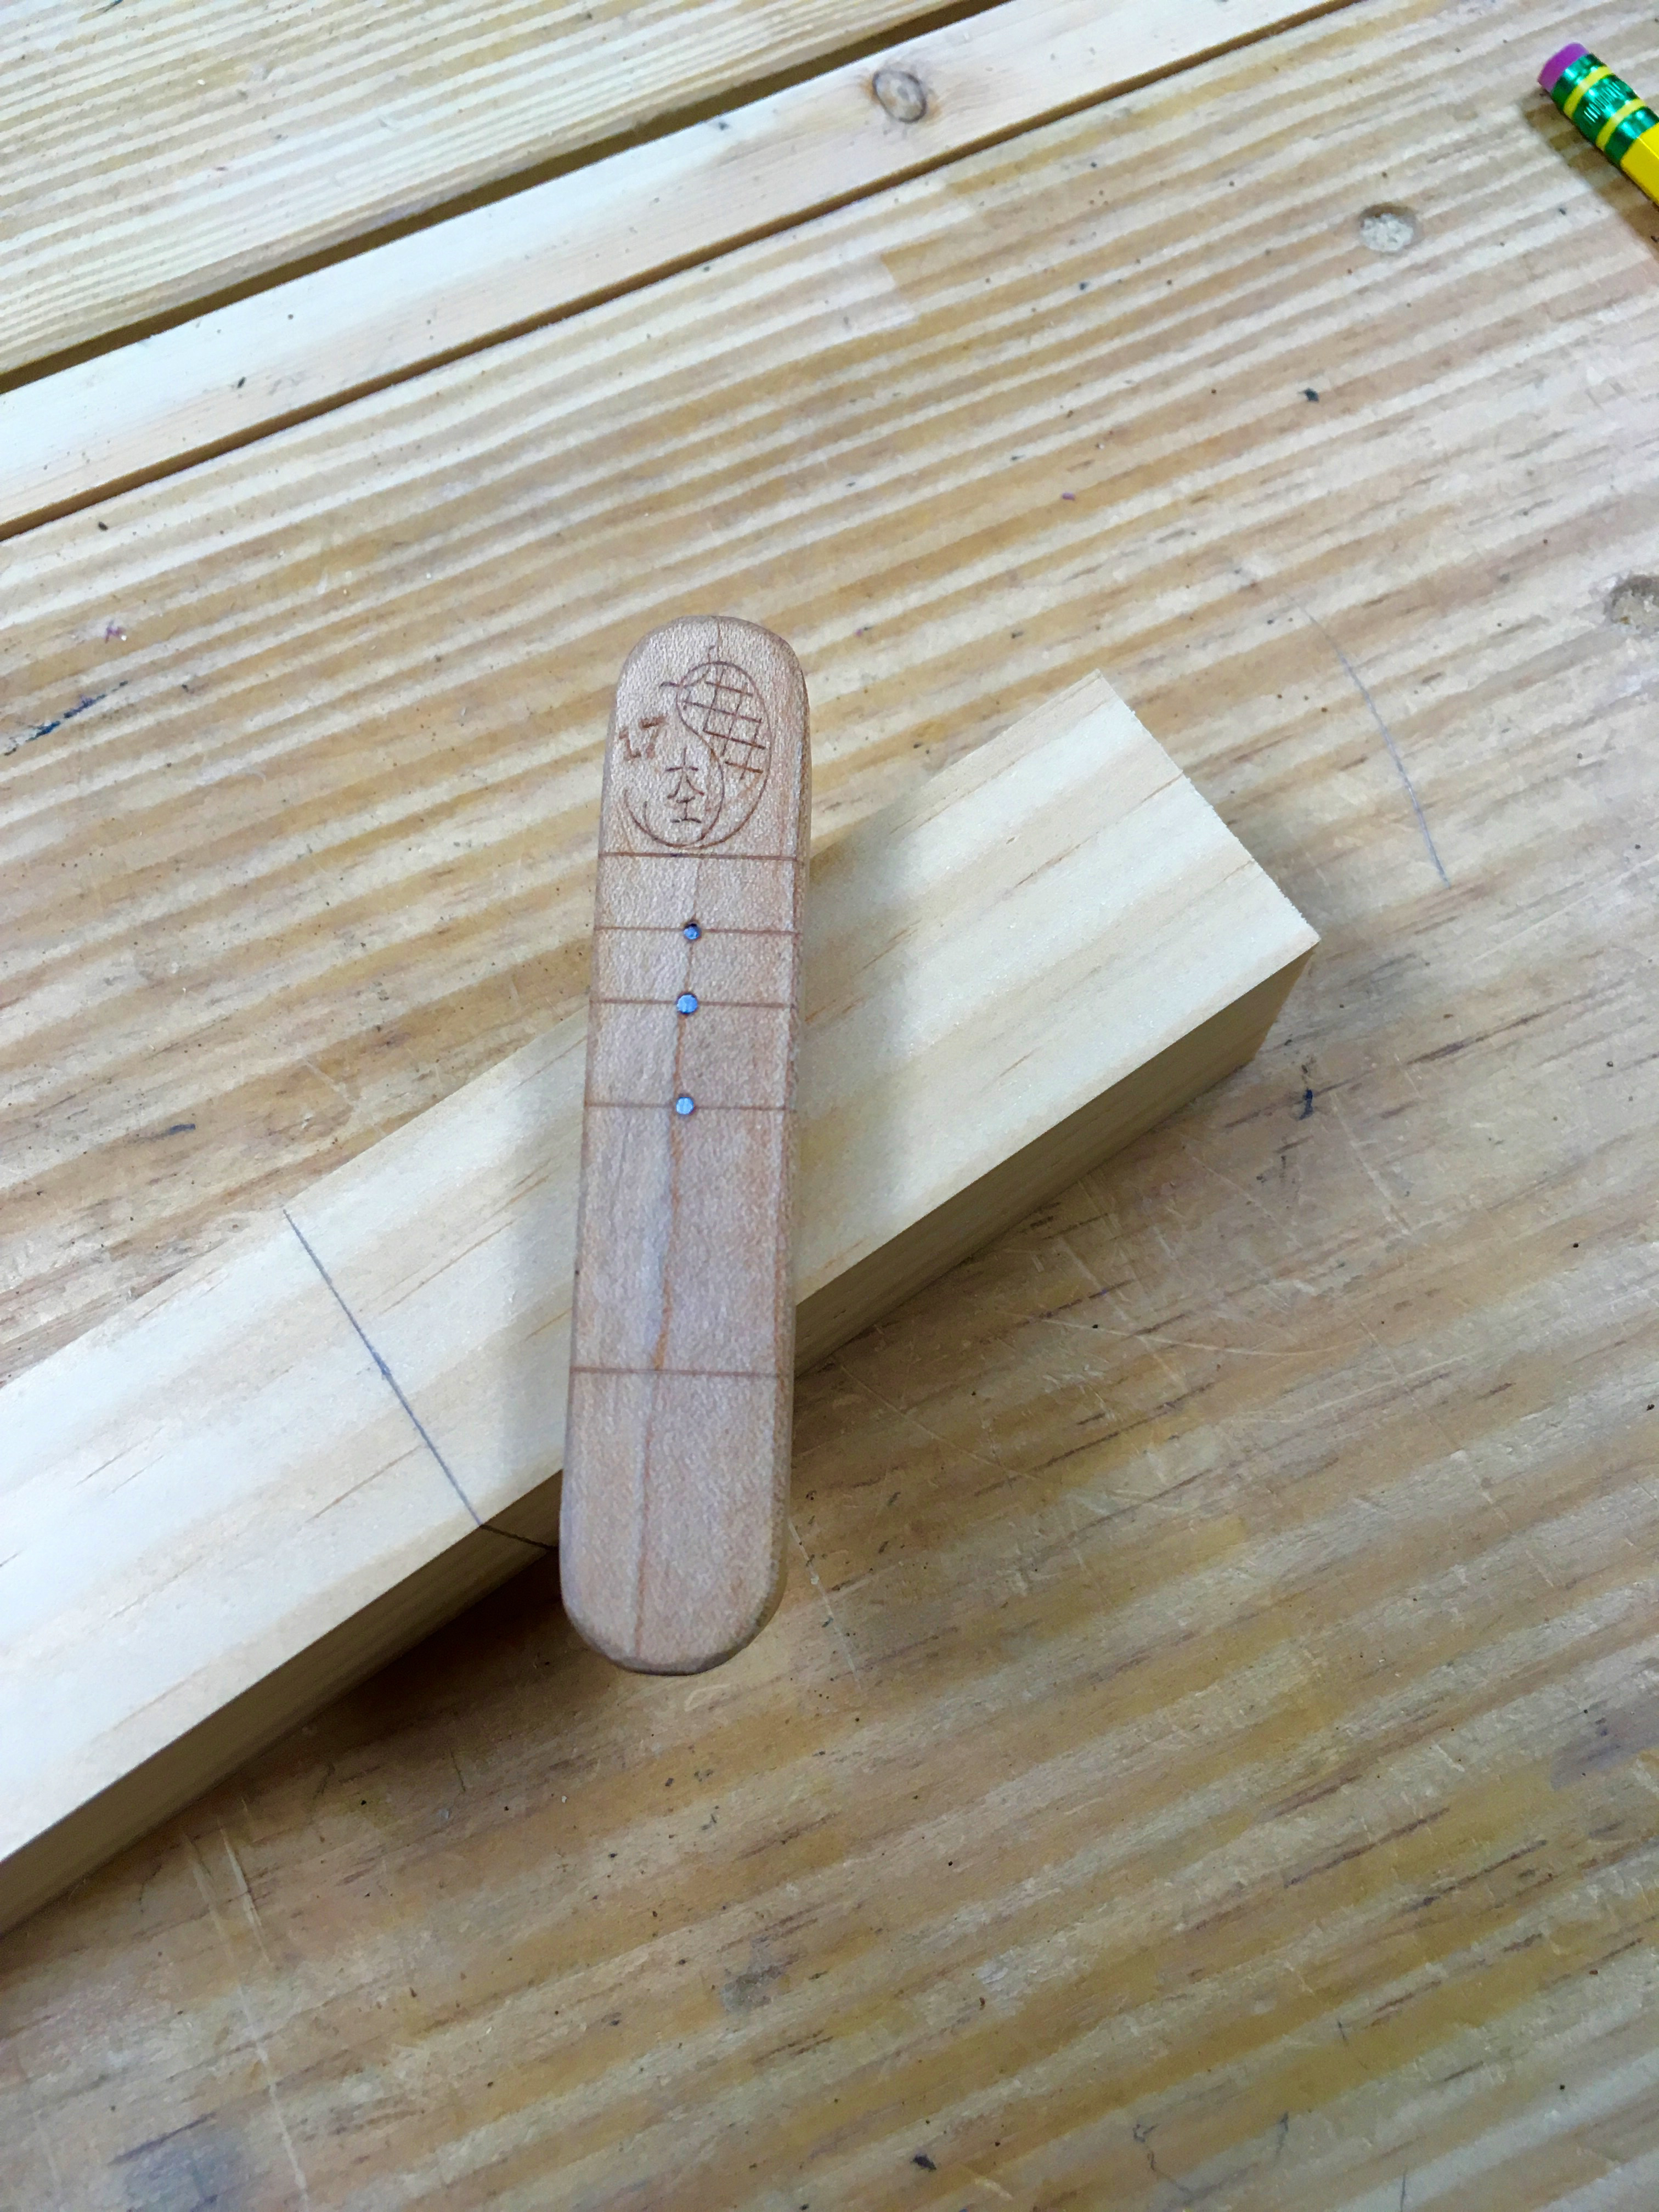
I first mark the tenon area using the full length of the gauge.

Then I register the gauge on the stock and press down firmly to generate three gauge marks.

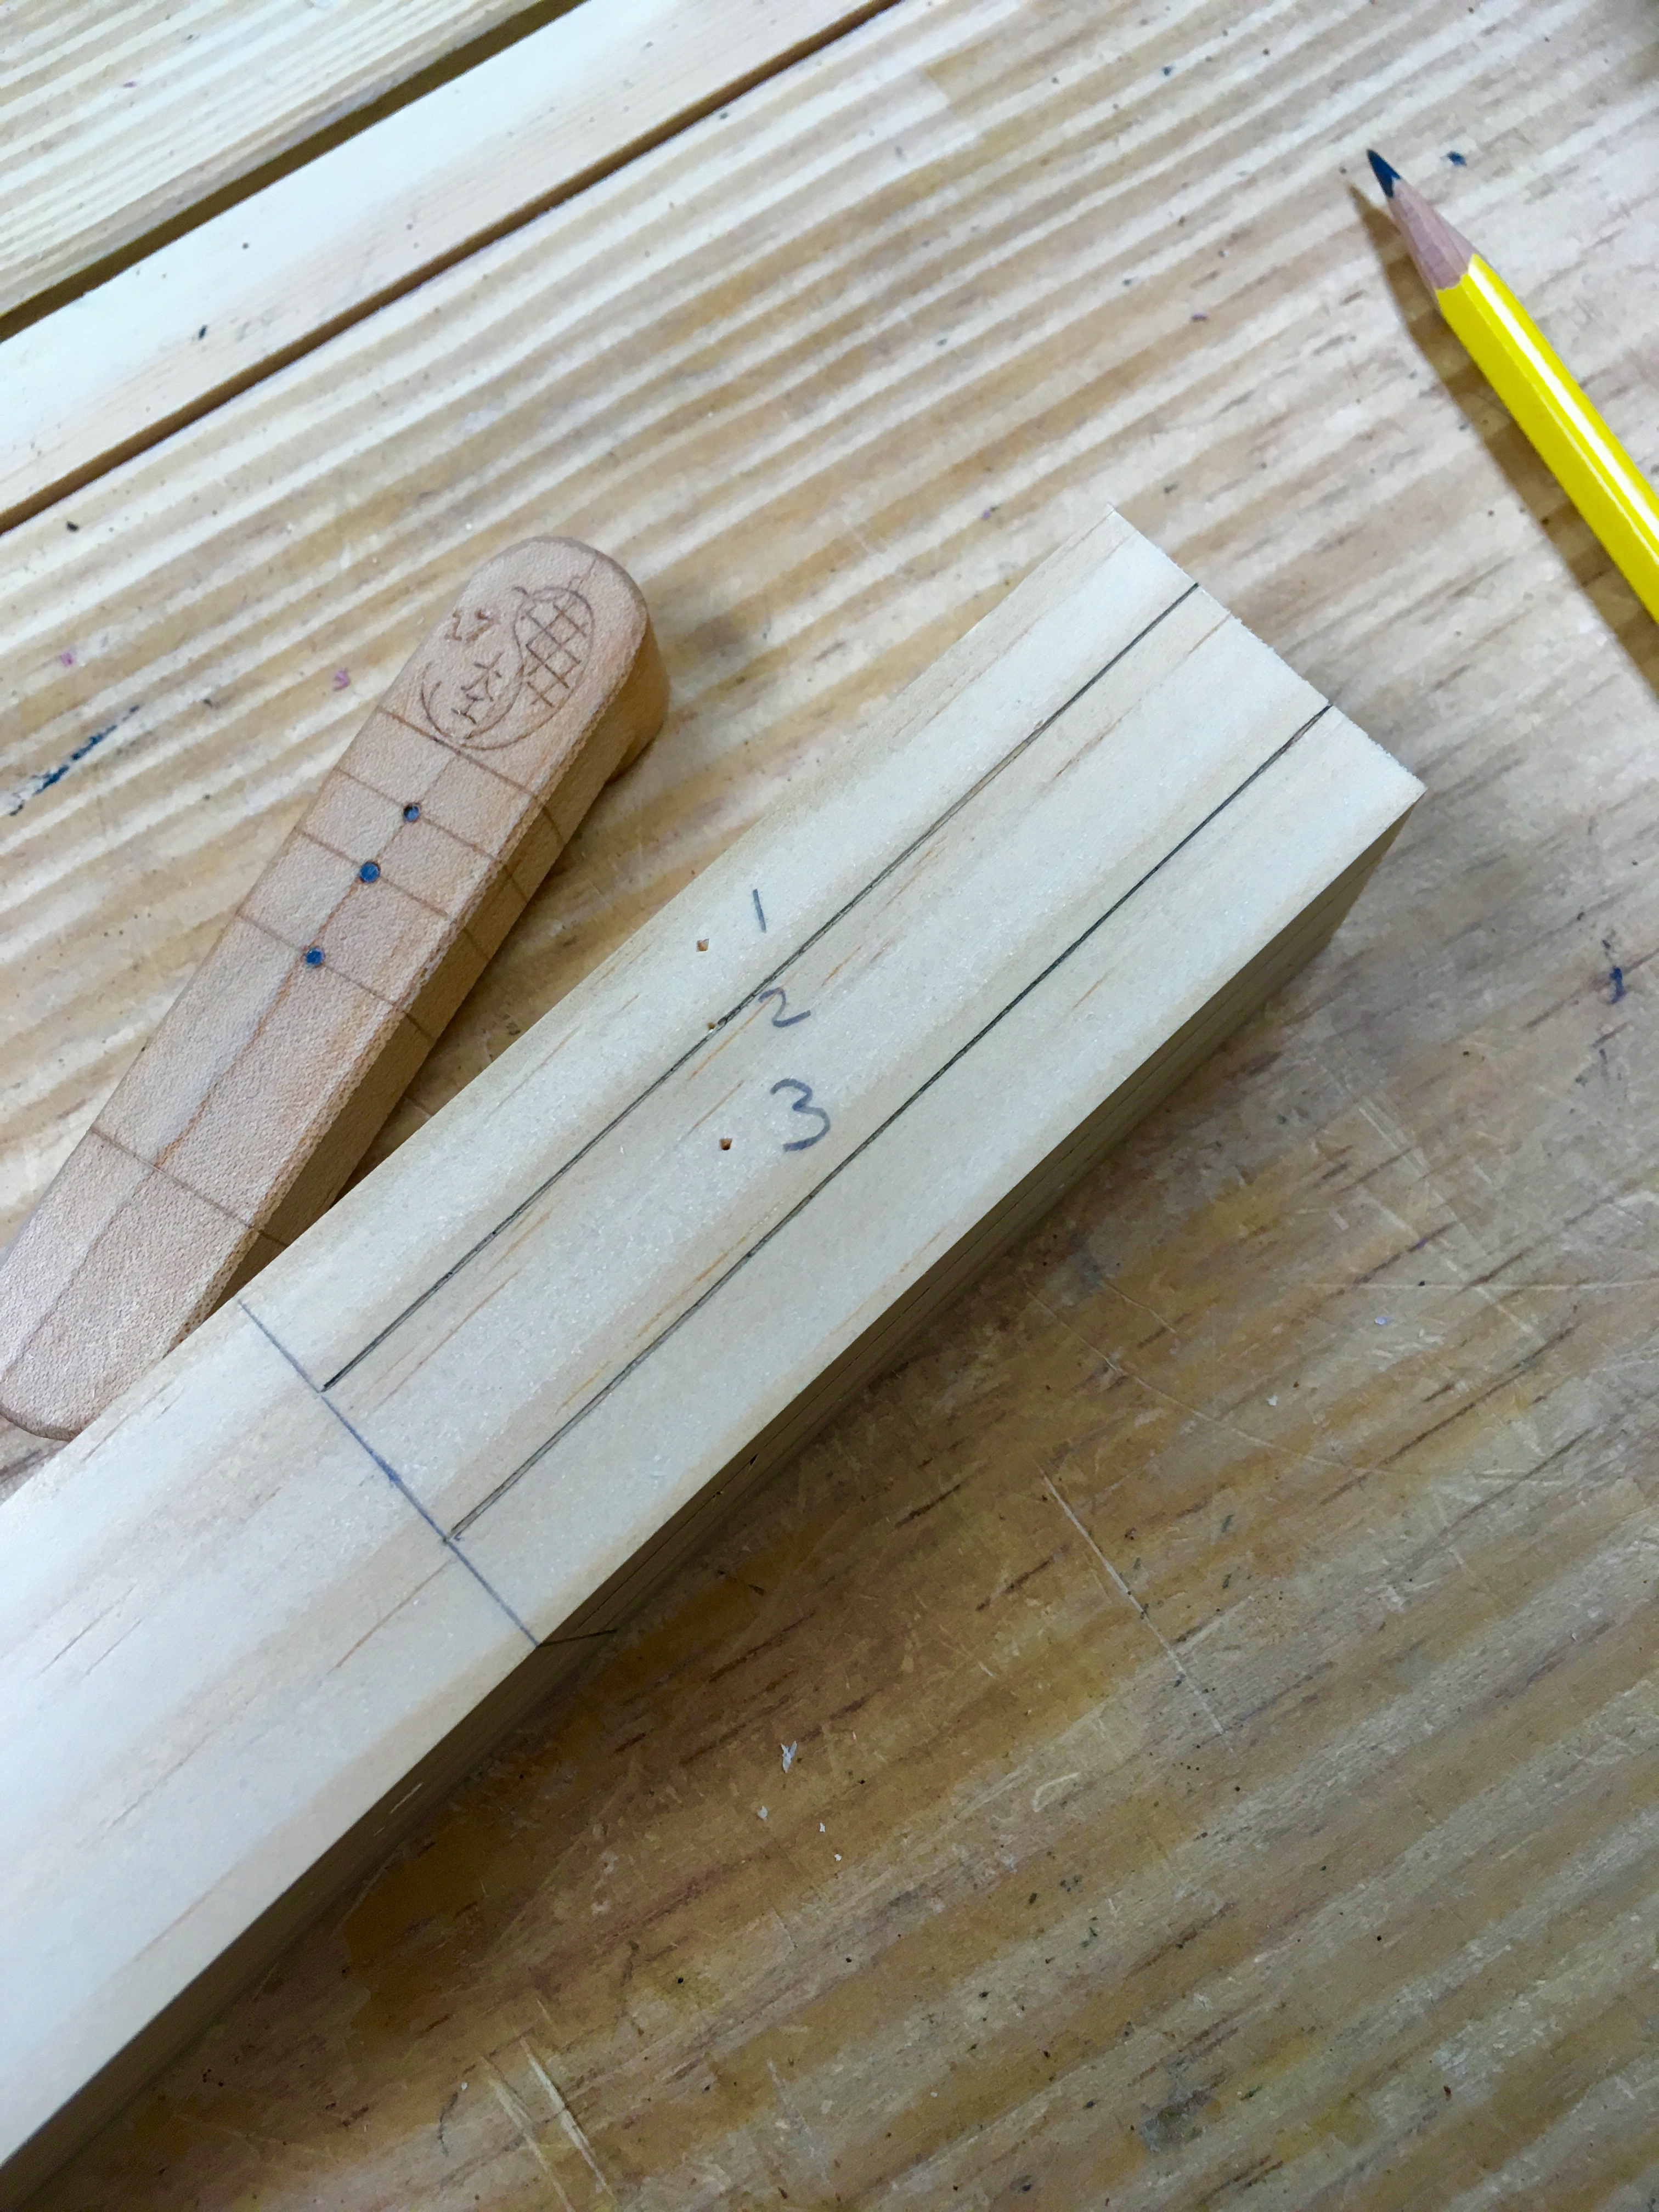
Depending on the number of legs that I am making, I’ll either set my finger gauge or use proper marking gauges set to those gauge points. One for the corner of the full-width octagon, one for the 1/7th taper and possibly one for the center point of the face.
Then I gauge all of the corner lines for the full-width octagon in the tenon area. I like my legs to taper to the floor. So the full-width octagon portion will be at the base of the tenon.
Then I mark the midpoint of each face on the same end of the leg.

Then I use a miter gauge or straightedge to connect those midpoints to create the 5/7th square.
Then I gauge the 1/7th taper for each side.
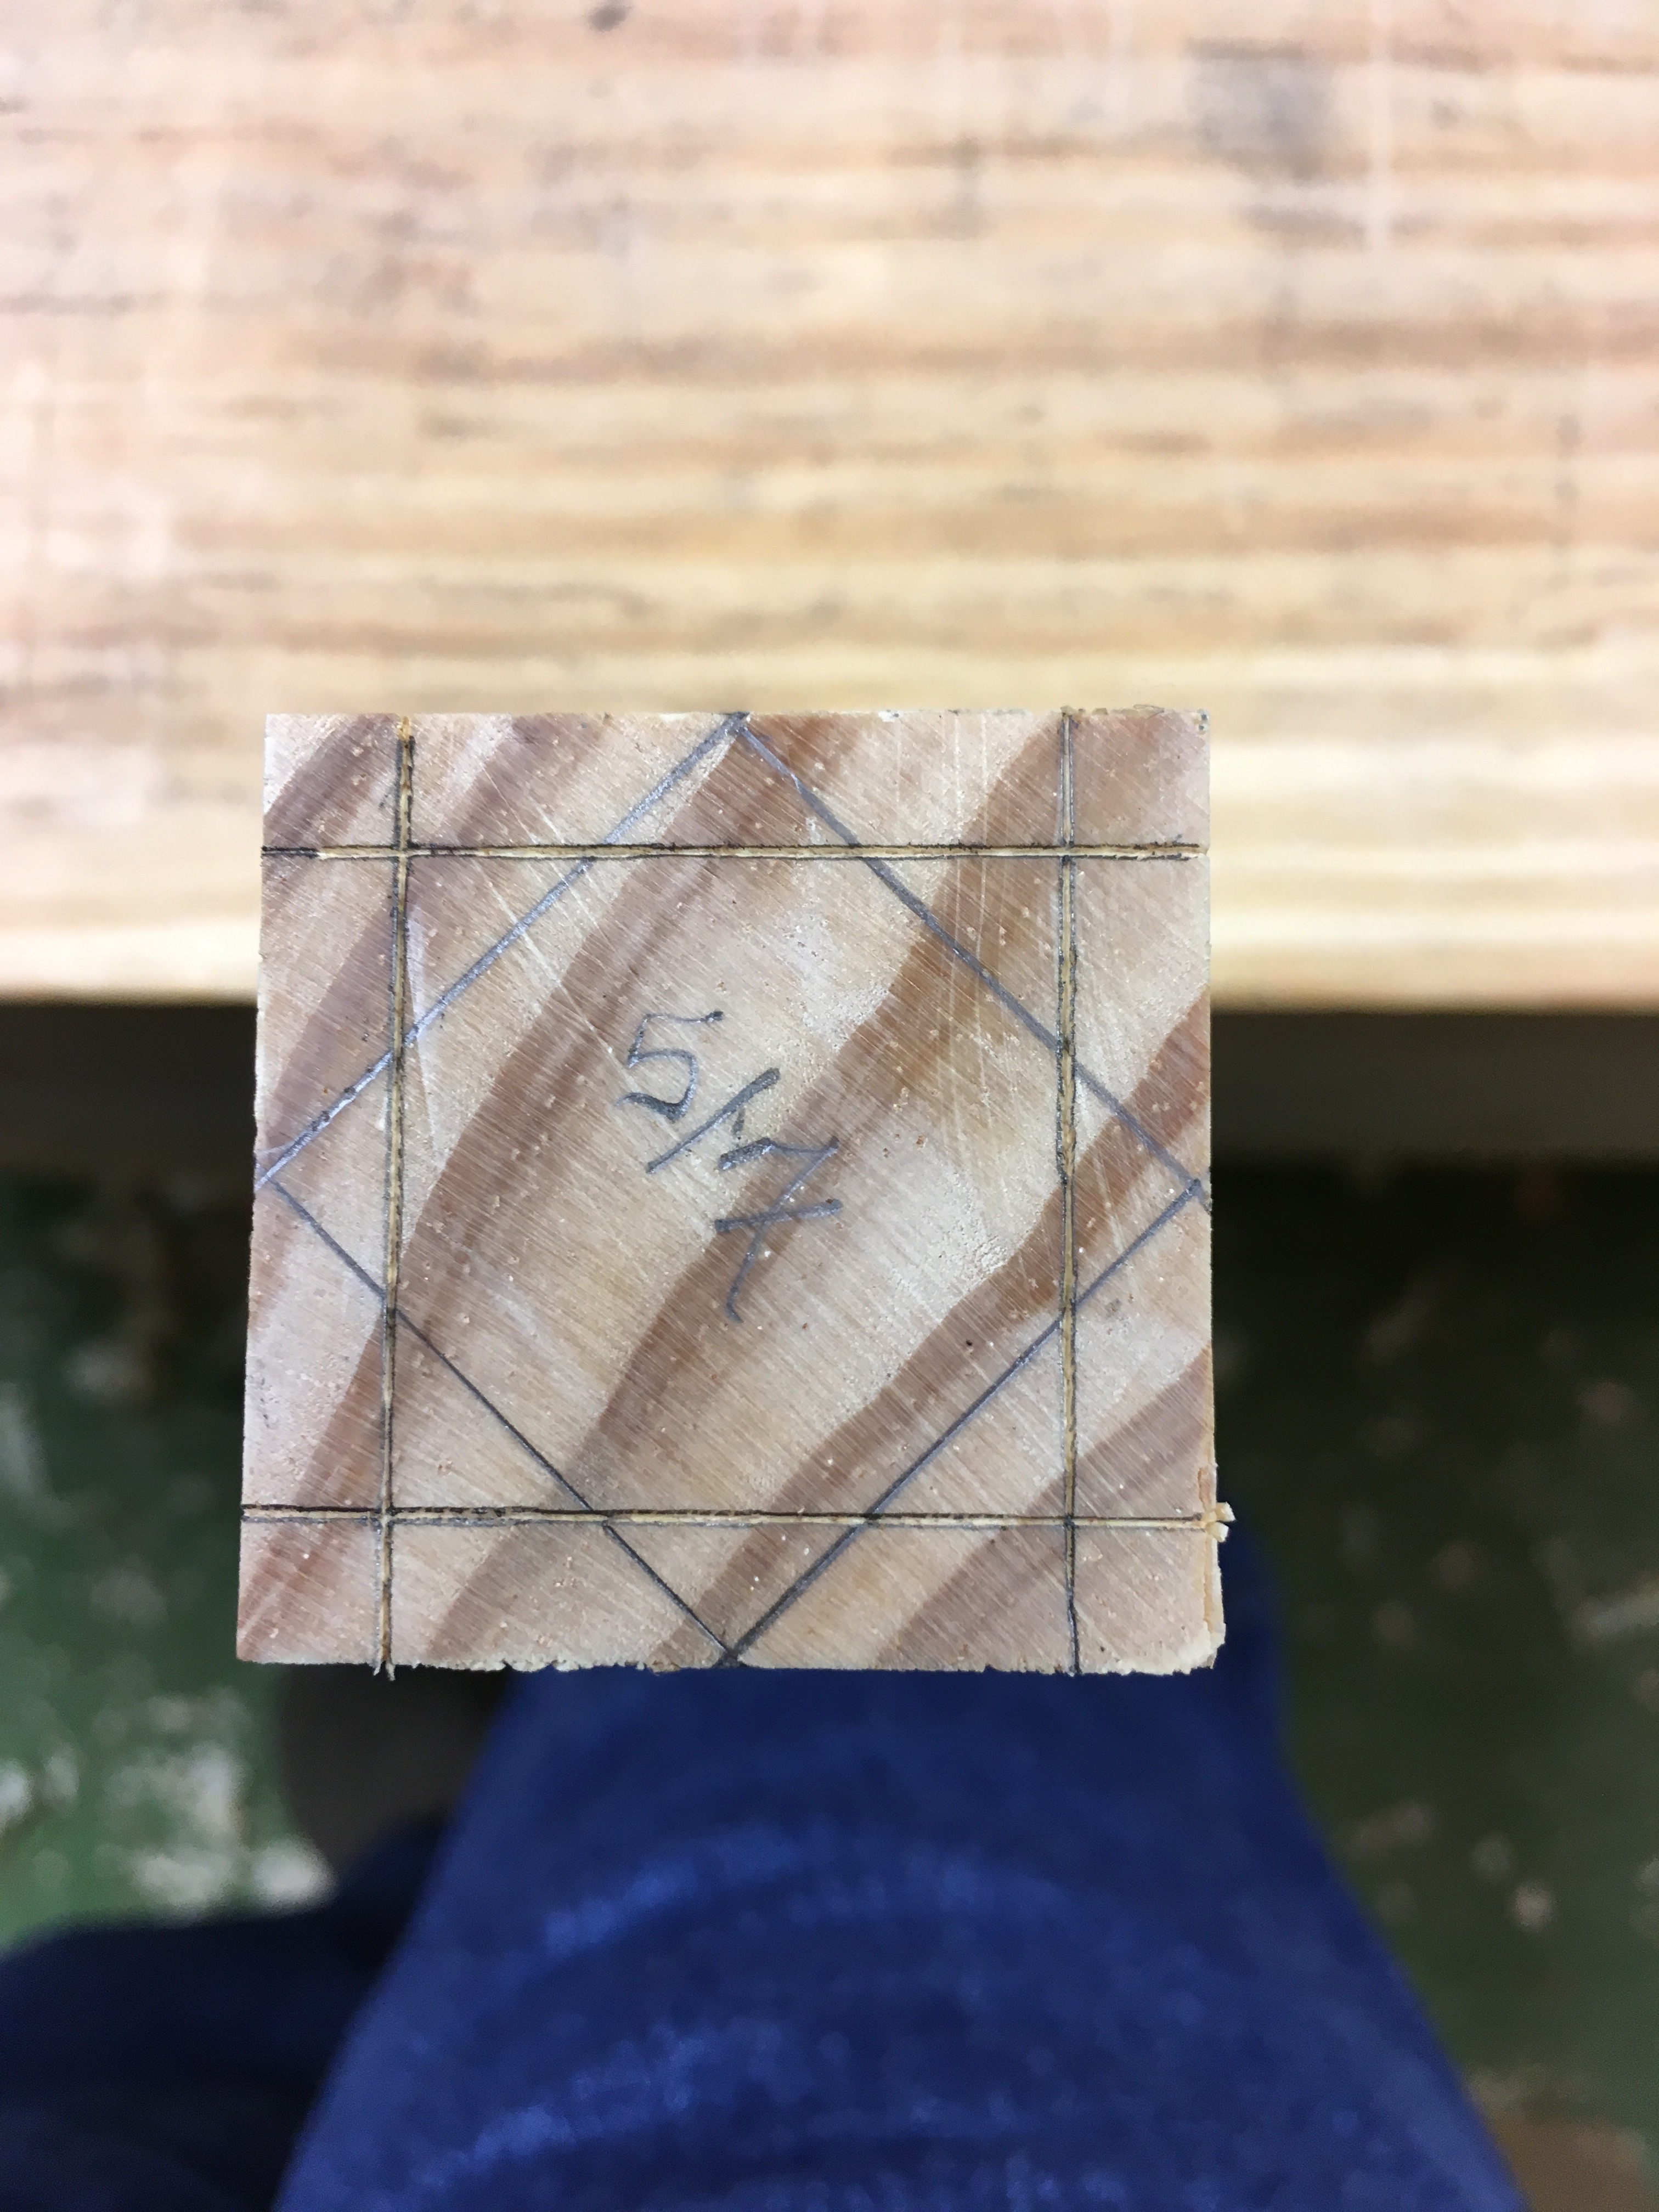
Finally, I draw connecting lines from the corners of the full-width octagon down to the midpoint on the end of the leg. So two lines are drawn on each face of the leg.

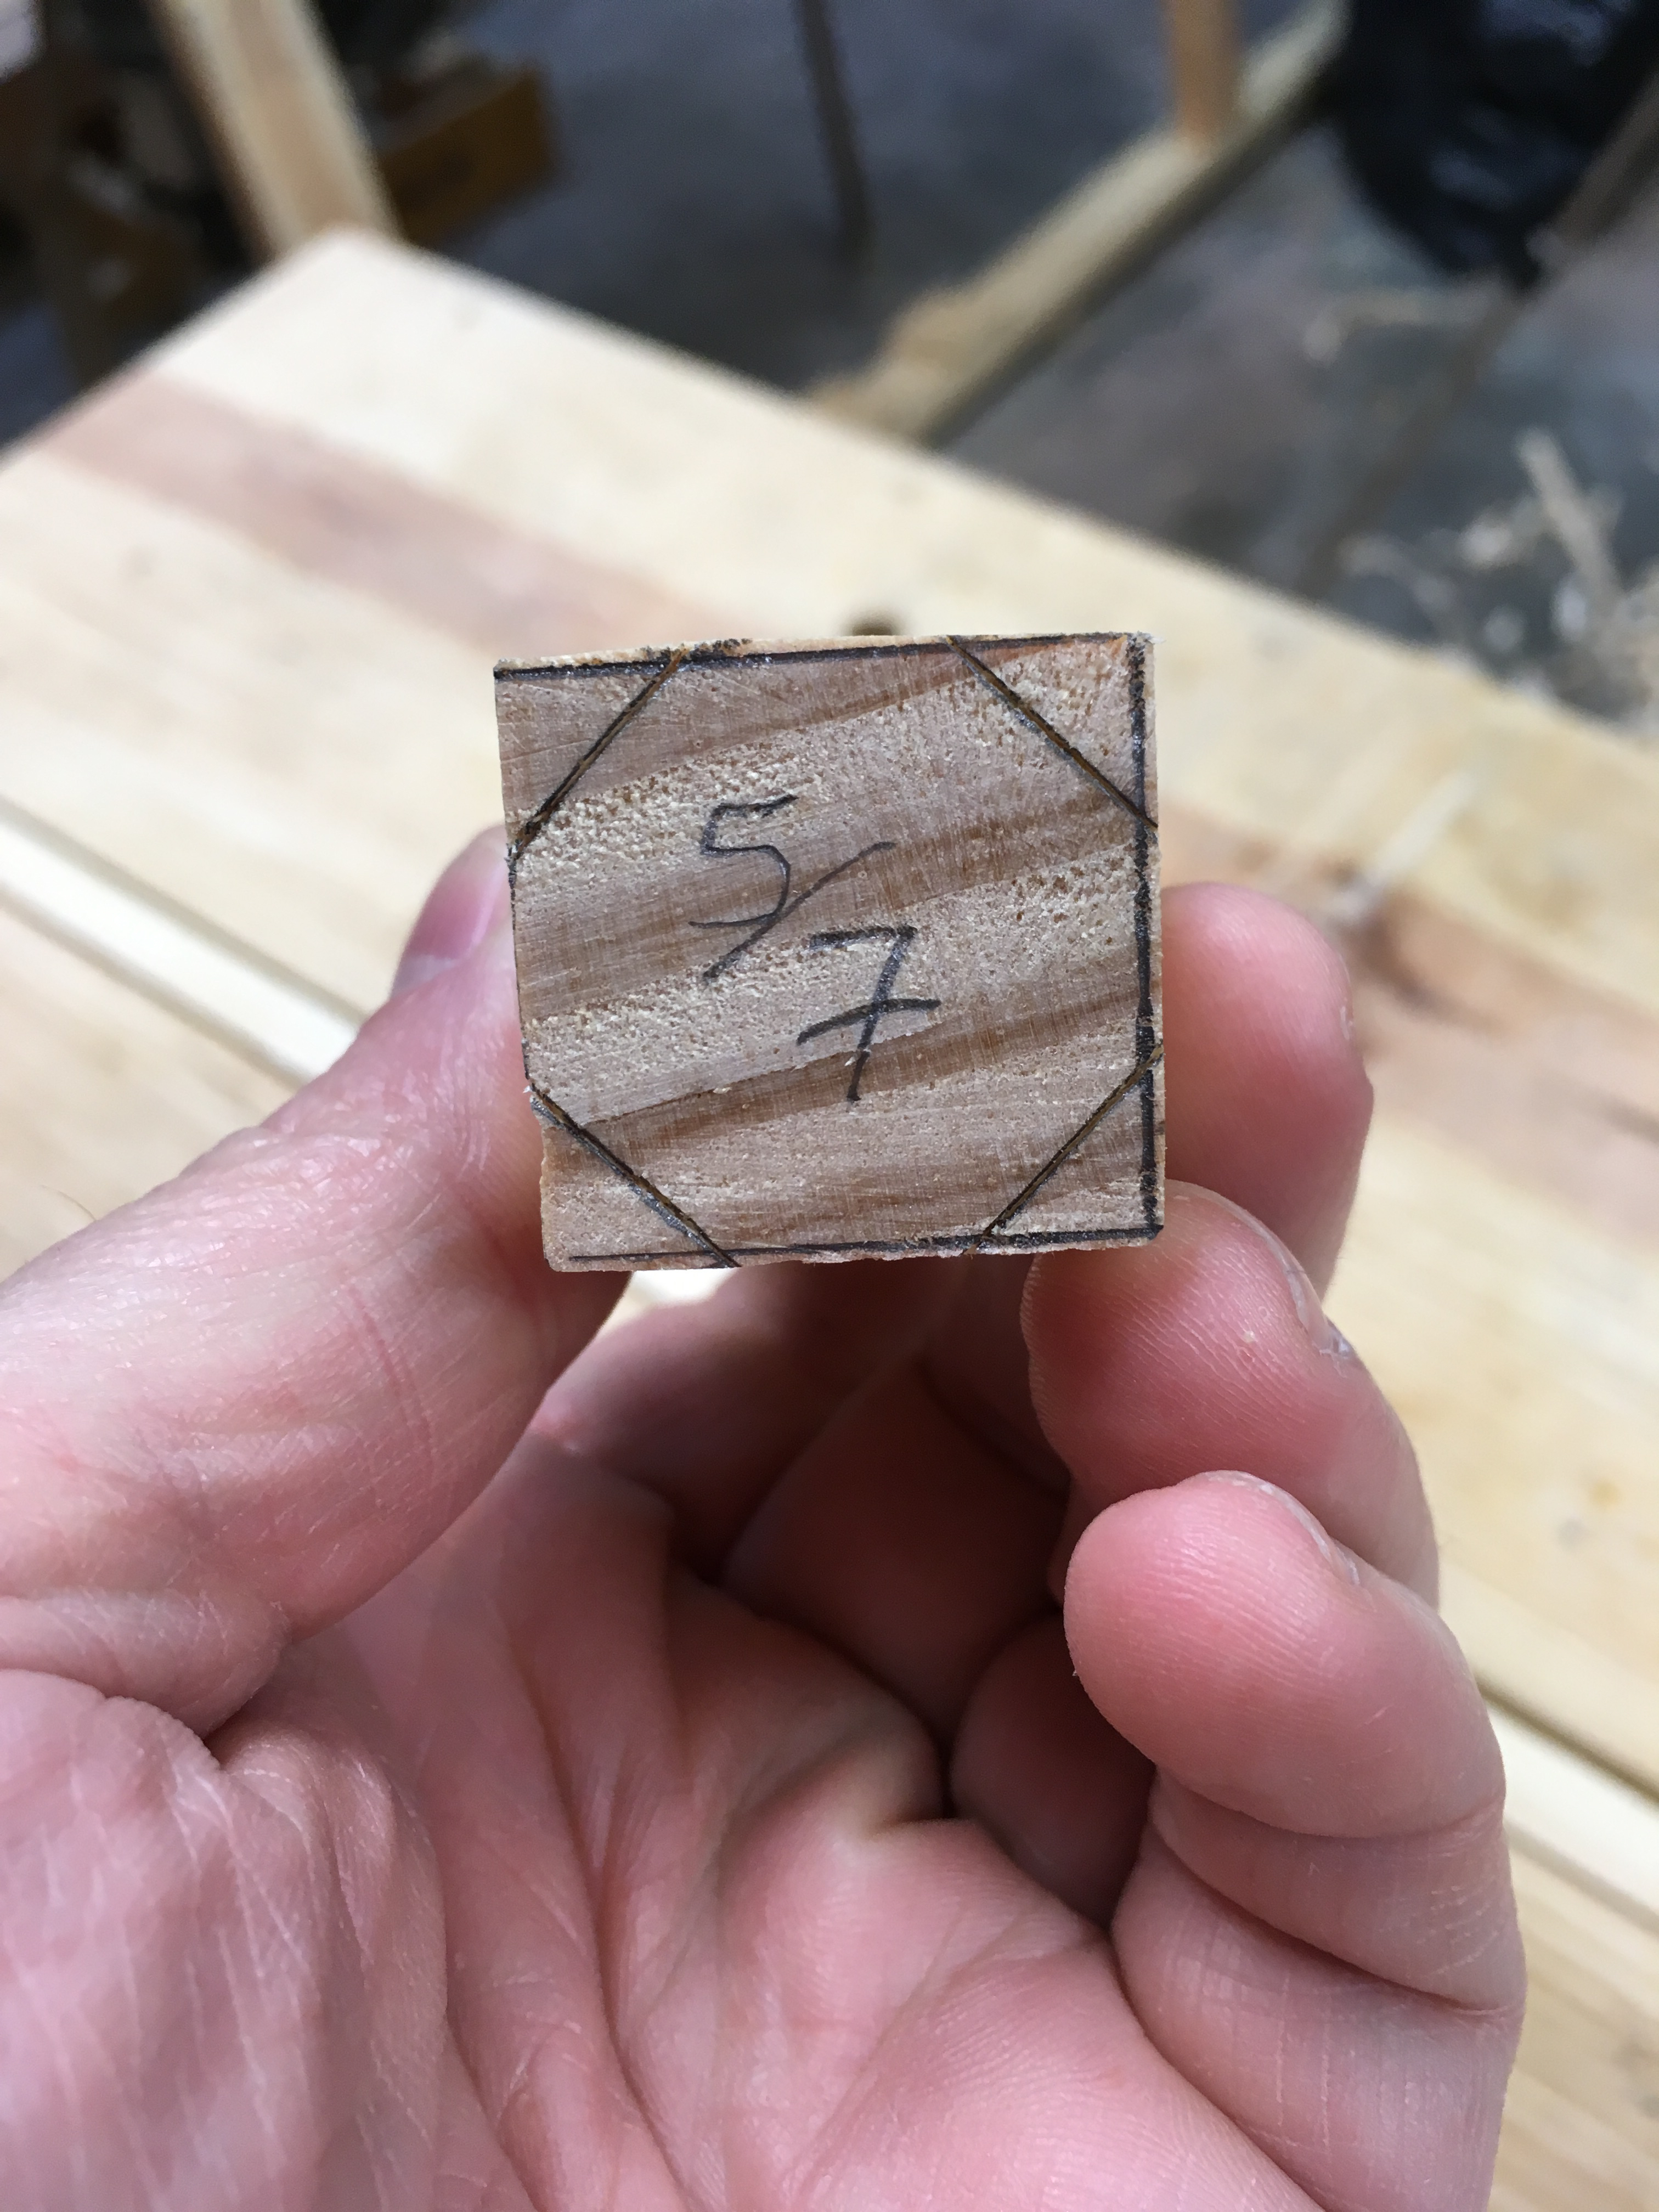
The only other layout takes place on the top of the leg. There I draw a target circle in the center to aid in removing material prior to final shaping of the tenon in the tapered tenon cutter.

Next up is the cutting.
With the drawknife at the shaving horse, I remove all for corners down to my layout lines.

This reveals the 5/7 square at the foot end of the leg.
All that is left is to remove the small amount of wood from the four new corners. I do this by eye since there is so little wood that needs to be removed.

Then I hog off the wood to rough in the tapered tenon at the top of the leg.

Then refine the tenon with the Veritas tapered tenon cutter.

Then a little cleanup work with a plane.
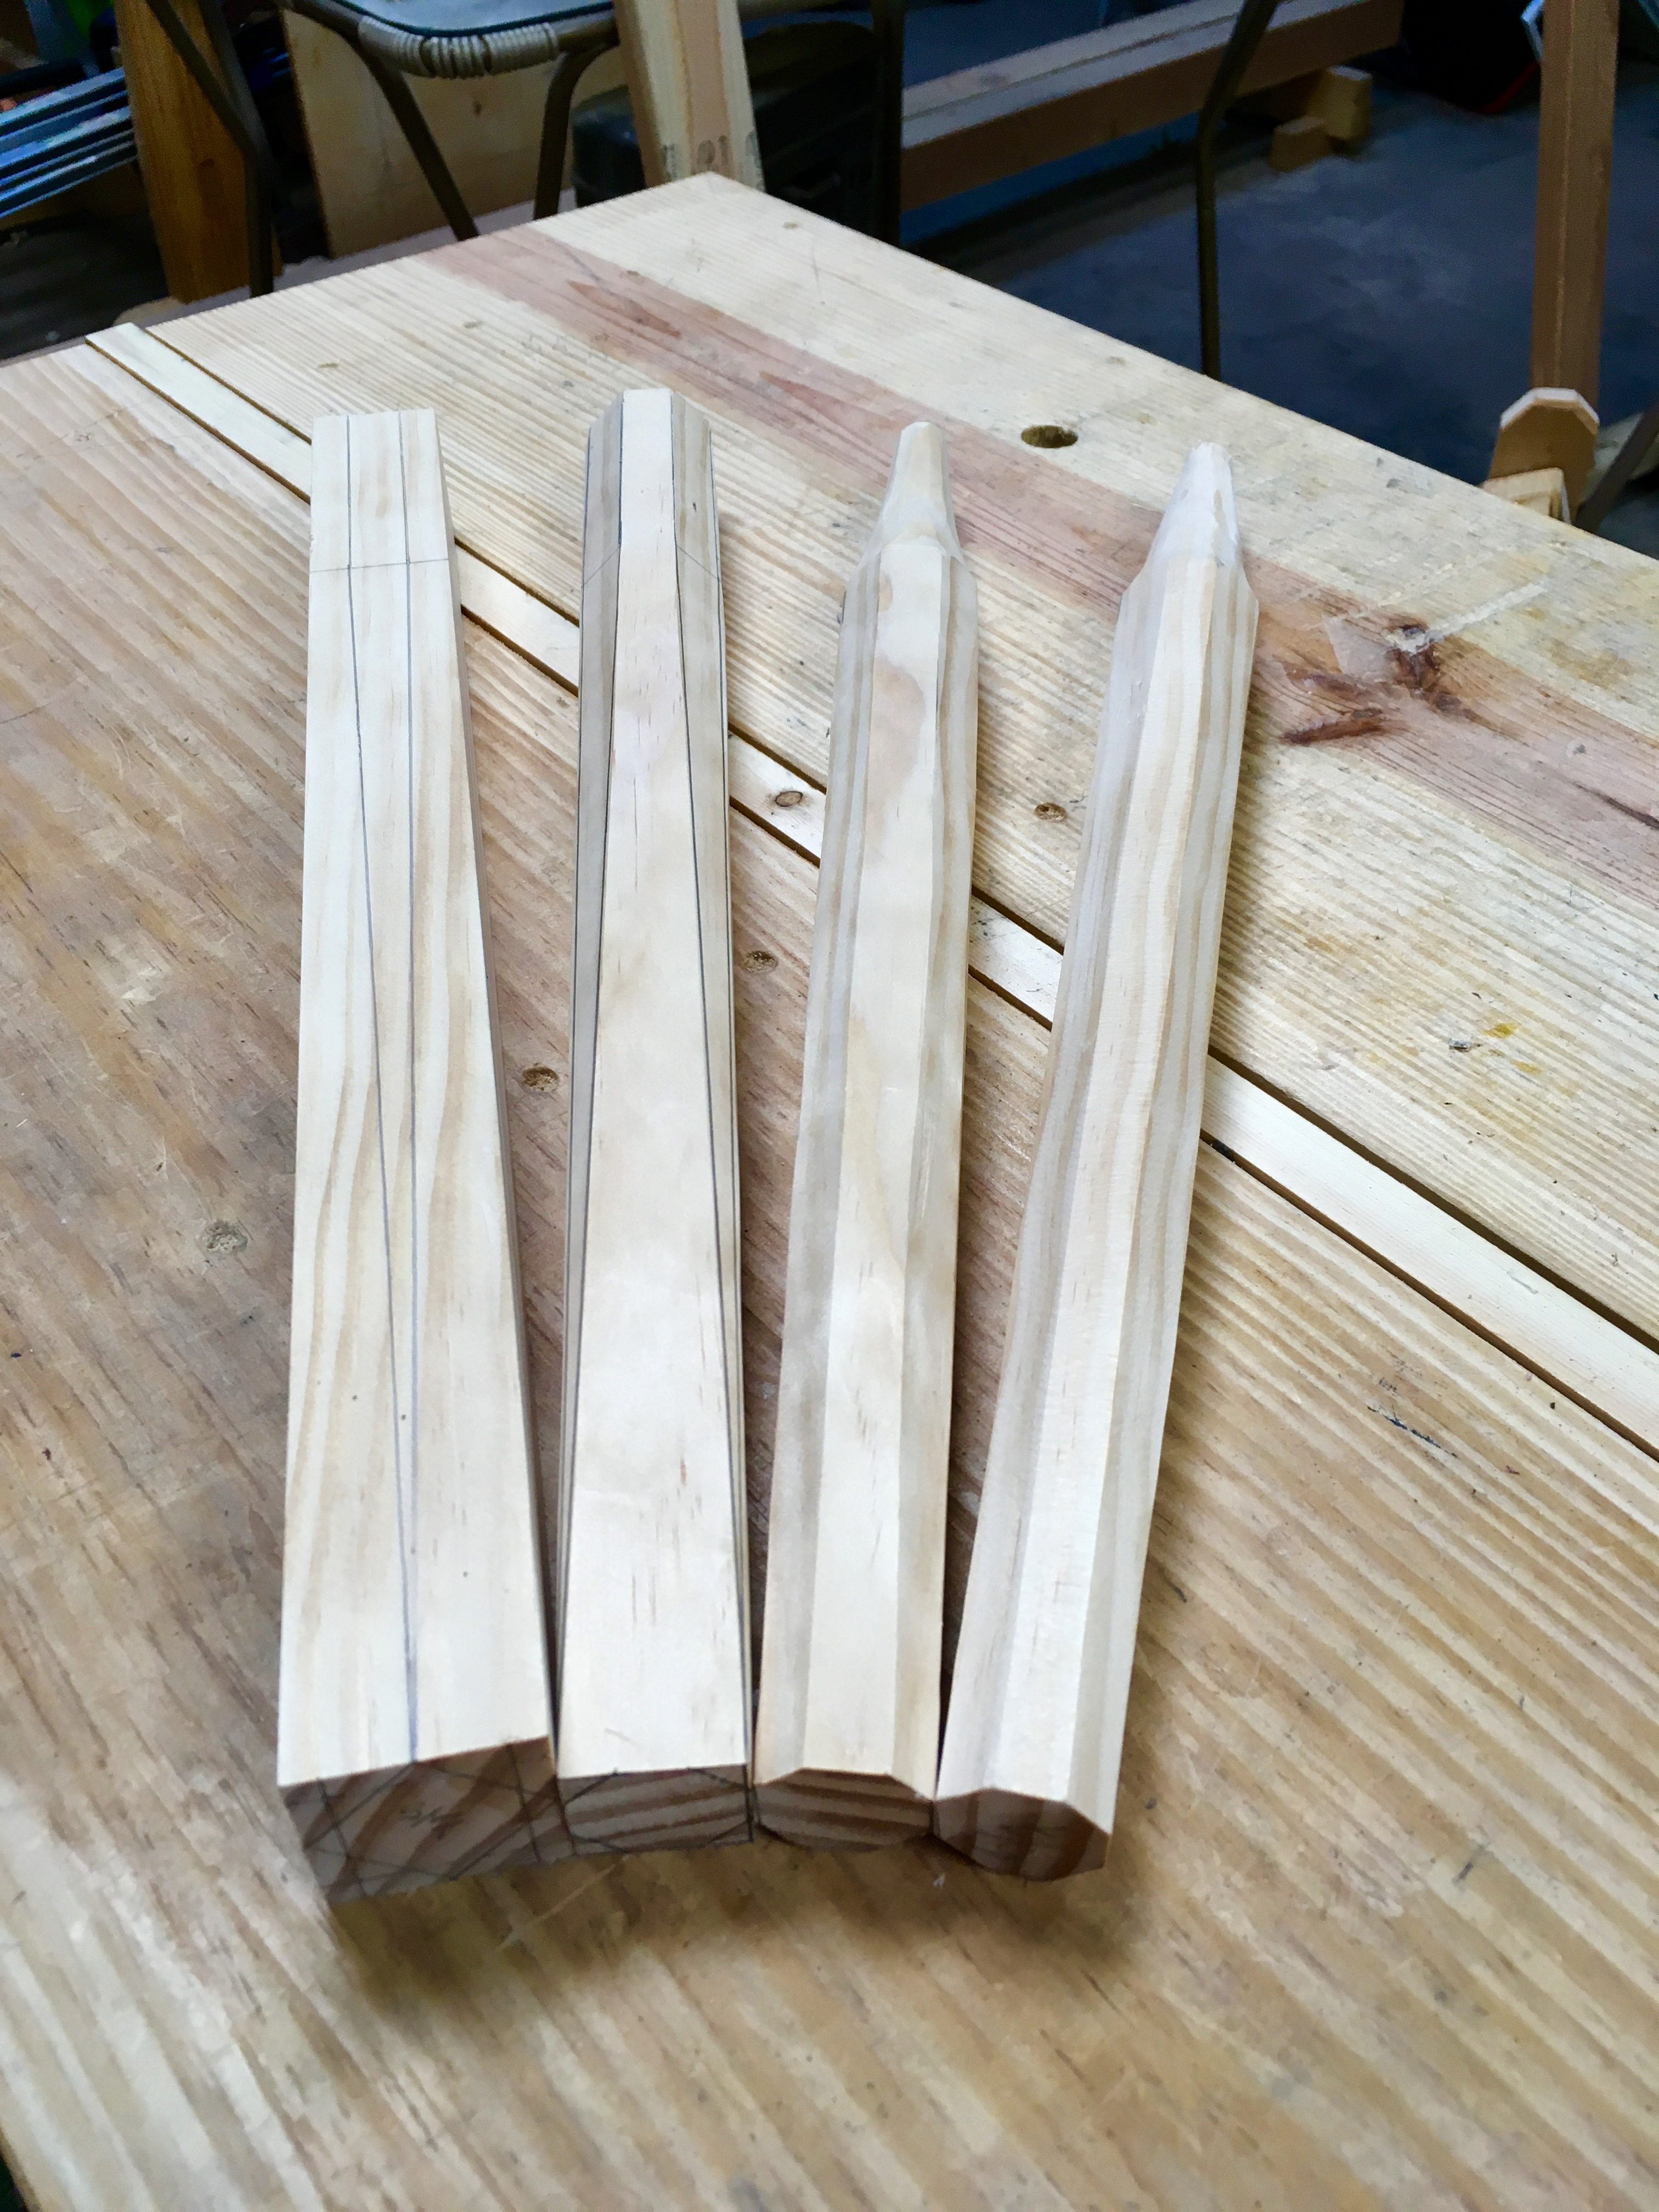
Here you can see the progression from layout to finished leg.
Well there you are, the OCTA-LEG-PRO gauge. I know there are lots of ways to layout and cut a tapered, octagonal leg, but this one works well for me and satisfies my proportional design requirement. It will simplify the layout process as well as standardize the cutting process. This should result in all of the legs of my staked furniture projects having a similar appearance.
I also gave the whole video thing another try. I’m still on the fence, but video is not as bad as I thought it would be. Anyway, have a watch and hit the “Like” button if you are so inclined. Also, if you would be so kind, leave a comment as to the good, bad and/or ugly. It will help with my fence straddling. 😉
Greg Merritt

And here I thought you were going to make a ginormous chopstick maker…
LOL…
Its seems I’m the 1st to place a comment…. (sound of drums) …
Its great! I LIKE it!
Great tutorial as well!
You’re on fire man!!!!
Thanks Antonio! The gauge works great. The video thing is a good bit of work, but I kinda enjoy it.
I love this method you have devised! Thank you so much for sharing it. I’m not personally so keen on the octagonal leg, but the method is so cool I’ll have to give it a try. I suspect I will use this as a foundation for making round(ish) legs. I too have no lathe and in my case no room for one. I’m sure lots of old furniture had round spindles and legs that were hand made to approximate roundness without using a lathe. This method gives such a nice control to the taper that carrying on to a final round(ish) should be a doddle.
Your most welcome. I’m glad you find it useful. It would be just a little work with a spokeshave to bring these to round. Let me know how you make out if you give it a try.
Very nice job. I needed the video in order to understand the text, but the video did make every thing clear. I like the horse you have, functional but not overly complicated.
Thanks James. Yep, a lot of times it is much easier to show something rather than try to write about it. The horse is super simple to build and works great. You can find the plans here. http://www.greenwoodworking.com/ShavingHorsePlans
Simple solution and very well thought out and explained. Thanks for sharing Greg.
Thank you Roy.
Excellent video; nice addition to the text and drawings.
Sylvain
Sylvain, thank you. I have a lot to learn when it come to video, but I sort of enjoy it…much to my surprise.
You’re going to have to trademark the name. I dig it. The vid was very good, too. That drawknfe looked like it was razor sharp, slicing through that wood. Looked like a lot of fun.
LOL…and thanks. The drawknife and horse are quickly becoming my favorite tools.
Great idea, Greg!
Thanks Derek.
Wow, great blog and video.
I appreciate that, thank you.
Excellent job Greg, I will have to give it a try.
Thank you very much.
Great job Greg, you would never believe it was only your second video,very professional. I certainly had a lot better under standing of the use of the gauge after watching the video it is a great teaching medium.
Although I am sure you did not need it you have just found something else to fill your already very productive life.
I look forward to the next one
Thanks
David
Thank you David. I’m going to keep plugging away at the video thing and see how it goes. I’m starting to run out of hours in the day though. Maybe I’ll win the lottery and can cut out the pesky day job. 🙂
Wow, good idea! To see your post, again and again I remember childhood moments. That time I played with my friends and created little home but we could do without any measurement.Of course, I have to say, your task is really professional and unique. I like it
Pingback: Table Trestles-Part 1 | HILLBILLY DAIKU
Pingback: Table Trestles-Part 9-Complete | HILLBILLY DAIKU